Removal and Installation
REMOVAL
1. Remove tires. Refer to Exploded View .
.
 .
.2. Remove engine room under cover. Refer to Removal and Installation .
.
 .
.3. Remove front bumper fascia assembly. Refer to Removal and Installation .
.
 .
.4. Remove front bumper reinforcement. Refer to Removal and Installation .
.
 .
.5. Secure the radiator and condenser to the vehicle.
6. Separate stabilizer connecting rod (strut side) from strut. Refer to Removal and Installation .
.
 .
.7. Remove steering outer socket from steering knuckle. Refer to Removal and Installation .
.
 .
.8. Remove torque rod. Refer to Removal and Installation .
.
 .
.9. Remove exhaust front pipe. Refer to EXHAUST PIPE AND MAIN MUFFLER REMOVAL AND INSTALLATION .
.
 .
.10. Separate the connection of steering gear assembly and steering column shaft. Refer to Removal and Installation .
.
 .
.11. Separate the transverse link from the steering knuckle while taking care not to damage the ball joint boot. Refer to Removal and Installation .
.
 .
.12. Set suitable jack under front suspension member.
| caution |
|
13. Remove member stay.
14. Remove front suspension member mounting bolts.
15. Gradually lower the jack to remove front suspension member from vehicle body.
| caution | Operate while checking that jack supporting status is stable. |
| note | Remove suspension member with stabilizer bar and transverse link. |
16. Remove the following parts.
- Stabilizer bar: Refer to Removal and Installation
 .
. - Transverse link: Refer to Removal and Installation
 .
. - Steering gear and linkage. Refer to Exploded View
 .
.
17. Perform inspection after removal. Refer to Inspection Inspection .
.
 .
.INSTALLATION
Note the following, and install in the reverse order of removal.
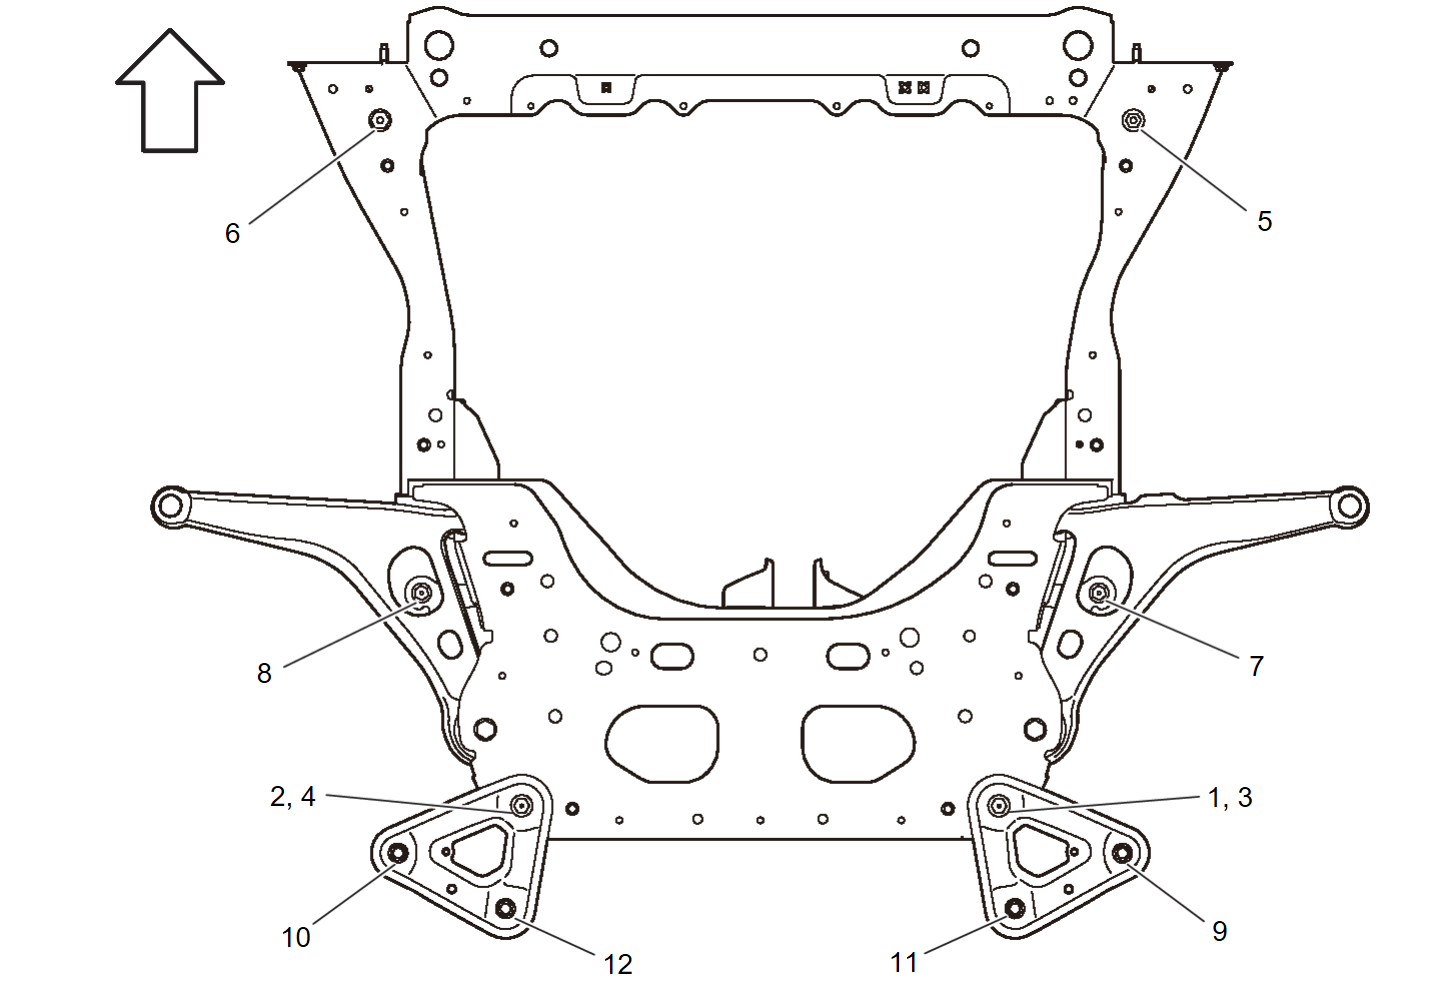
- To install member stay and mounting bolts of front suspension member, temporarily tighten the bolts before tightening to the specified torque, referring to the tightening method and the numerical order shown below:
Temporary tightening : 1 → 2 Final tightening (Specified torque) : 3 → 4 → 5 → 6 → 7 → 8 → 9 → 10 → 11 → 12 
: Vehicle front - Perform final tightening of bolts and nuts at the vehicle installation position (rubber bushing), under unladen conditions with tires on level ground.
- Perform inspection after installation. Refer to Inspection Inspection
 .
.
![[Previous]](../../../buttons/fprev.png)
![[Next]](../../../buttons/fnext.png)
