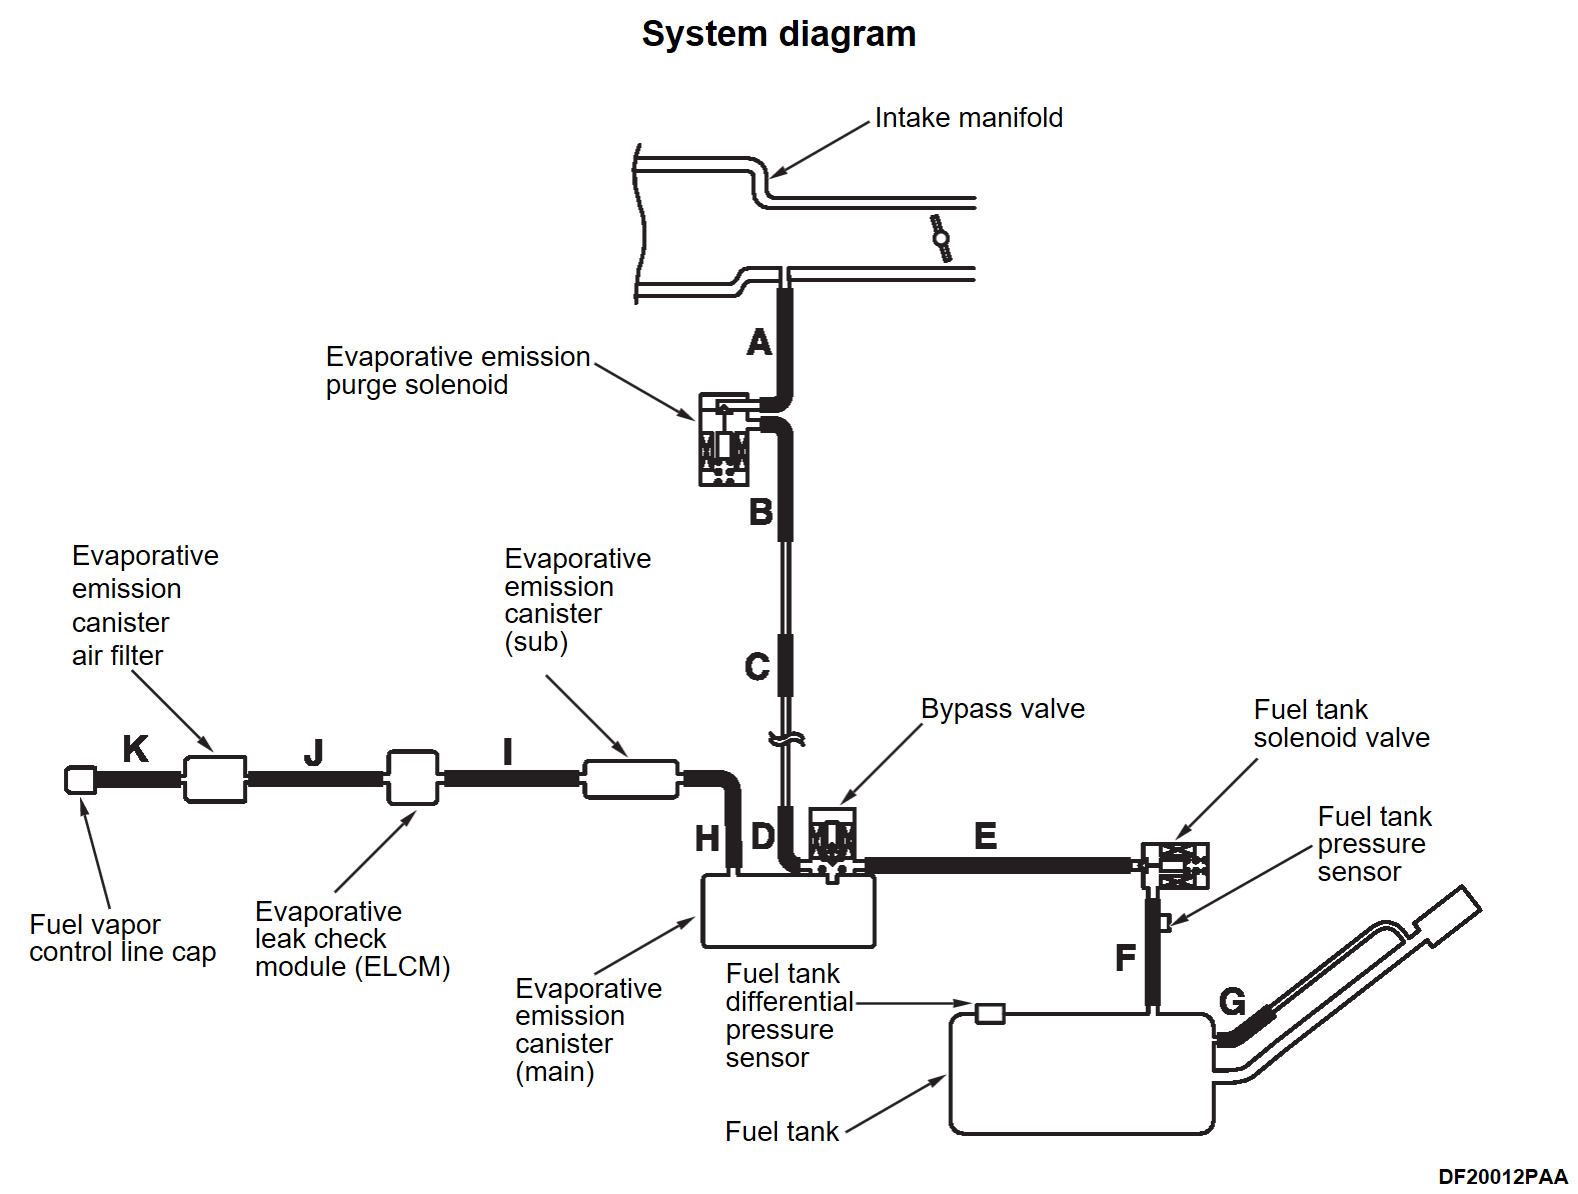
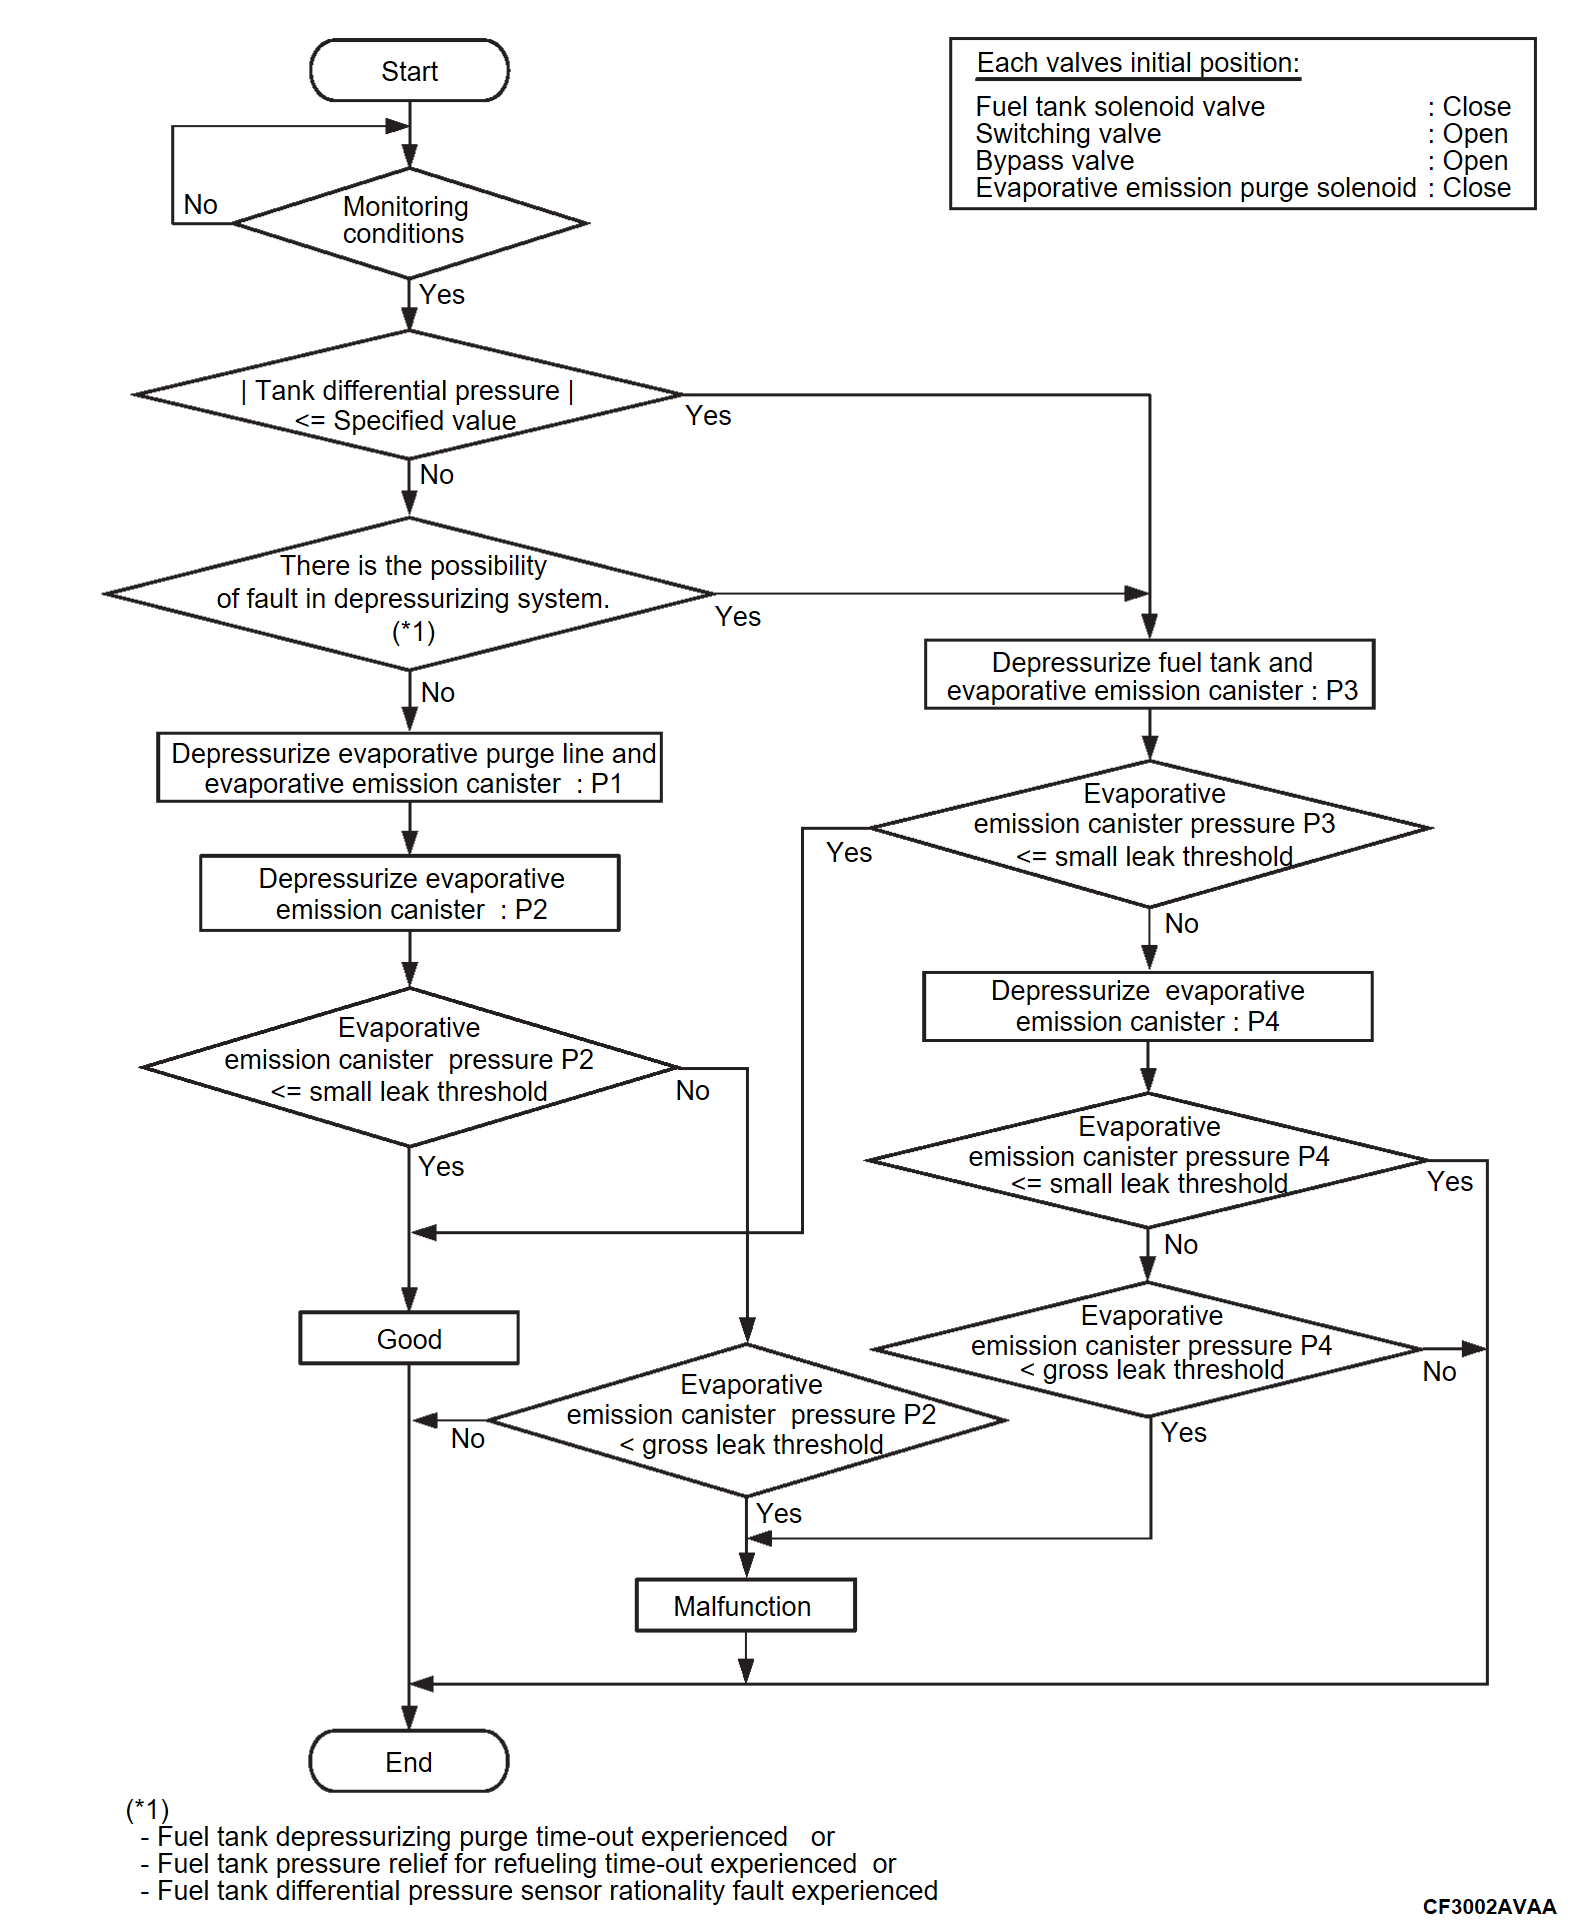
DTC P04EF-00: EVAP emission purge system very small leakage canister side
CIRCUIT OPERATION
- MFI relay is built into the IPDM E/R.
- Power is supplied to the Evaporative Leak Check Module (ELCM) and evaporative emission purge solenoid from the MFI relay.
TECHNICAL DESCRIPTION
- During the key-off evaporative leakage monitoring, by comparing the reference pressure for which the reference space in the evaporative leak check module with the reference orifice is depressurized and the value for which the evaporative emission system is depressurized, detect the leak in the evaporative emission system.
- Determine whether it is a 0.5 mm (0.02 inch) leak or gross leak according to the depressurized value of the evaporative emission system.
- By opening/closing the fuel tank solenoid valve and bypass valve, identify the leak on the fuel tank side and evaporative emission canister side.
DESCRIPTIONS OF MONITOR METHODS
Evaporative leak check monitor is performed by ELCM operation during key-off – after 5 to 8.5 hour soak. ECM makes a comparison between evapo system negative pressure and 0.5 mm (0.02 inch) leak negative pressure.
MONITOR EXECUTION
Once per driving cycle.
MONITOR EXECUTION CONDITIONS (OTHER MONITOR AND SENSOR)
Other Monitor (There is no temporary DTC set in memory for the item monitored below)
- Evaporative emission purge solenoid monitor
- Bypass valve monitor
- Fuel tank solenoid valve monitor
- Switching valve monitor
- Canister pressure sensor monitor
- Manifold absolute pressure sensor monitor
- Fuel tank pressure sensor monitor
- Fuel tank differential pressure sensor monitor
- Barometric pressure sensor/Manifold absolute pressure correlation
- Barometric pressure sensor monitor
- Fuel level sensor monitor
- Engine off timer monitor
- Controller area network (CAN) monitor
Sensor (The sensors below are determined to be normal)
- Engine coolant temperature sensor
- Intake air temperature sensor
DTC SET CONDITIONS
Check Conditions
- Power supply mode of electric motor switch is OFF.
- 12V battery positive voltage is 11.0 volts or higher.
- Engine coolant temperature is higher than 4°C (39°F) and lower than 35°C (95°F).
- Intake air temperature at ECM wake-up is higher than 4°C (39°F) and lower than 35°C (95°F).
- ECM is woken up in 5, 6 or 8.5 hours since the power supply mode of electric motor switch was OFF.
- Barometric pressure is 76 kPa (22.4 in.Hg) or higher.
- Fuel level is 85 percent or less.
- Fuel tank pressure at ECM wake-up is less than 19.96 kPa (5.89 in.Hg) or more than 40.00 kPa (11.81 in.Hg).
- Accumulated time that power supply mode of electric motor switch is ON is more than 27 minutes.
Judgment Criteria
- The canister leakage check pressure subtracted from the barometric pressure is higher than following pressure: the third reference pressure subtracted from the barometric pressure in parentheses times 0.2.
- The canister leakage check pressure subtracted from the barometric pressure is following pressure or lower: the third reference pressure subtracted from the barometric pressure.or
- The canister pressure subtracted from the barometric pressure is higher than following pressure: the first reference pressure subtracted from the barometric pressure in parentheses times 0.2.
- The canister pressure subtracted from the barometric pressure is lower than following pressure: the first reference pressure subtracted from the barometric pressure.
FAIL-SAFE AND BACKUP FUNCTION
Prohibit introduction of purges.
OBD-II DRIVE CYCLE PATTERN
Refer to Diagnostic Function, OBD-II Drive Cycle – Pattern 4 OBD- II DRIVE CYCLE .
.
 .
.TROUBLESHOOTING HINTS (THE MOST LIKELY CAUSES FOR THIS CODE TO BE SET ARE:)
- Evaporative emission canister seal failed.
- Evaporative leak check module seal failed.
- Vent pipe is clogged.
- ELCM circuit harness damage or connector damage.
- Bypass valve circuit harness damage or connector damage.
- ECM failed.
DIAGNOSIS
Required Special Tools:
- MB992744: Vehicle communication interface-Lite (V.C.I.-Lite)
- MB992745: V.C.I.-Lite main harness A
- MB992747: V.C.I.-Lite USB cable short
- MB992748: V.C.I.-Lite USB cable long
1.STEP 1. Using scan tool (M.U.T.-III SE), check the data list.
Use scan tool (M.U.T.-III SE) to check the data list (Refer to DATA LIST REFERENCE TABLE ).
).
 ).
).- Item number 550: EVP leak from canister NG
Q: Is the check result normal?
2.STEP 2. Check harness between IPDM E/R connector terminal number 78 and ELCM connector terminal number 8.
Check power supply line for damage. Repair or replace the connector, or repair the damaged harness wire.
Q: Is the check result normal?
 Repair or replace the connector, or repair the damaged harness wire.
3.STEP 3. Check harness between ELCM connector terminal number 2 and ECM connector terminal number 93, check harness between ELCM connector terminal number 4 and ECM connector terminal number 80, check harness between ELCM connector terminal number 5 and ECM connector terminal number 117, check harness between ELCM connector terminal number 6 and ECM connector terminal number 107, and check harness between ELCM connector terminal number 7 and ECM connector terminal number 97.
Check signal line for damage. Repair or replace the connector, or repair the damaged harness wire.
Q: Are the check result normal?
 Repair or replace the connector, or repair the damaged harness wire.
4.STEP 4. Check harness between ELCM connector terminal number 1 and ground.
Check ground line for damage. Repair or replace the connector, or repair the damaged harness wire.
Q: Is the check result normal?
 Repair or replace the connector, or repair the damaged harness wire.
5.STEP 5. Check harness between IPDM E/R connector terminal number 78 and bypass valve connector terminal number 2.
Check power supply line for damage. Repair or replace the connector, or repair the damaged harness wire.
Q: Is the check result normal?
 Repair or replace the connector, or repair the damaged harness wire.
6.STEP 6. Check harness between bypass valve connector terminal number 1 and ECM connector terminal number 66.
Check output line for damage. Repair or replace the connector, or repair the damaged harness wire.
Is the check result normal?
 Repair or replace the connector, or repair the damaged harness wire.
7.STEP 7. Check clogging of the ELCM air intake and vent pipe
(1) Disconnect the tube J of the ELCM air intake, and visually check whether the air intake is blocked by foreign matters etc.
(2) Mount the hand vacuum pump on the side of the tube disconnected at step 1.
(3) When negative pressure is applied with the hand vacuum pump, check that there is ventilation and no clogging.
Q: Is the vent pipe in good condition?
 Repair or replace it.
8.STEP 8. Check for leaks in tube H, tube I and evaporative emission (sub).
Use a hand vacuum pump to check each tube H, tube I and evaporative emission (sub). Replace the evaporative emission (main) (Refer to ENGINE, Engine, Motor and Emission Control – Emission Control – Evaporative Emission System EVAPORATIVE EMISSION CANISTER REMOVAL AND INSTALLATION
 ). Then
 Replace any damaged tube or evaporative emission (sub).
Q: Does the tubes and evaporative emission (sub) hold vacuum?
 Replace the evaporative emission (main) (Refer to ENGINE, Engine, Motor and Emission Control – Emission Control – Evaporative Emission System EVAPORATIVE EMISSION CANISTER REMOVAL AND INSTALLATION
 ). Then
 Replace any damaged tube or evaporative emission (sub).
9.STEP 9. Using scan tool (M.U.T.-III SE) to check the data list, after perform the evaporative emission system monitor test.
(1) Perform the evaporative emission system monitor test (Refer to EVAPORATIVE EMISSION CONTROL SYSTEM MONITOR TEST ).
).
 ).
).(2) Use scan tool (M.U.T.-III SE) to check the data list (Refer to DATA LIST REFERENCE TABLE ).
).
 ).
).- Item number 550: EVP leak from canister NG
Q: Is the check result normal?
 Intermittent malfunction (Refer to GENERAL INFORMATION, General Information – How to Use Troubleshooting/Inspection Service Points – How to Cope with Intermittent Malfunctions HOW TO COPE WITH INTERMITTENT MALFUNCTIONS
 ).
). Replace the engine-ECU (Refer to ENGINE CONTROL MODULE (ECM) REMOVAL AND INSTALLATION
 ).
).![[Previous]](../../../buttons/fprev.png)
![[Next]](../../../buttons/fnext.png)

