[Previous][Next]
REMOVAL AND INSTALLATION
 
 
caution
  • Before removing the driver's air bag module and steering wheel assembly, always refer to GROUP 52B - Service Precautions , Driver's Air Bag Module and Clock Spring . Also, set the front wheels so that they are facing straight forward, and remove the ignition key. If you fail to do this, the SRS clock spring will be damaged, causing the SRS (air bag) to be inoperative and serious injury.
  • The parts indicated by * are the bolts with friction coefficient stabilizer. In removal, ensure there is no damage, clean dust and soiling from the bearing and thread surfaces, and tighten them to the specified torque.
  • After the installation, perform a calibration for the ASC-ECU to learn the steering wheel sensor neutral point. (Refer to GROUP 35C - On-vehicle Service, Steering Wheel Sensor Calibration ).
  • After the installation, perform a calibration for the EPS-ECU to learn the torque sensor neutral point (Refer to GROUP 37 - On-vehicle Service, Torque Sensor Calibration ).
Pre-removal Operation
  • Steering Wheel Assembly Removal (Refer to GROUP 37 - Steering Wheel ).
  • Engine Roll Stopper Rod Assembly Removal (Refer to ).
  • Lower Arm Assembly Removal (Refer to GROUP 33 - Lower Arm ).
  • Front Floor Backbone Brace Removal (Refer to GROUP 42A - Loose Panel ).
Post-installation Operation
  • Front Floor Backbone Brace Installation (Refer to GROUP 42A - Loose Panel ).
  • Lower Arm Assembly Installation (Refer to GROUP 33 - Lower Arm ).
  • Engine Roll Rod Assembly Installation (Refer to ).
  • Steering Wheel Assembly Installation (Refer to GROUP 37 - Steering Wheel ).
  • Checking Steering Wheel Position with Wheels Straight Ahead.
  • Wheel Alignment Check and Adjustment (Refer to GROUP 33 - On-vehicle Service - Front Wheel Alignment Check and Adjustment ).
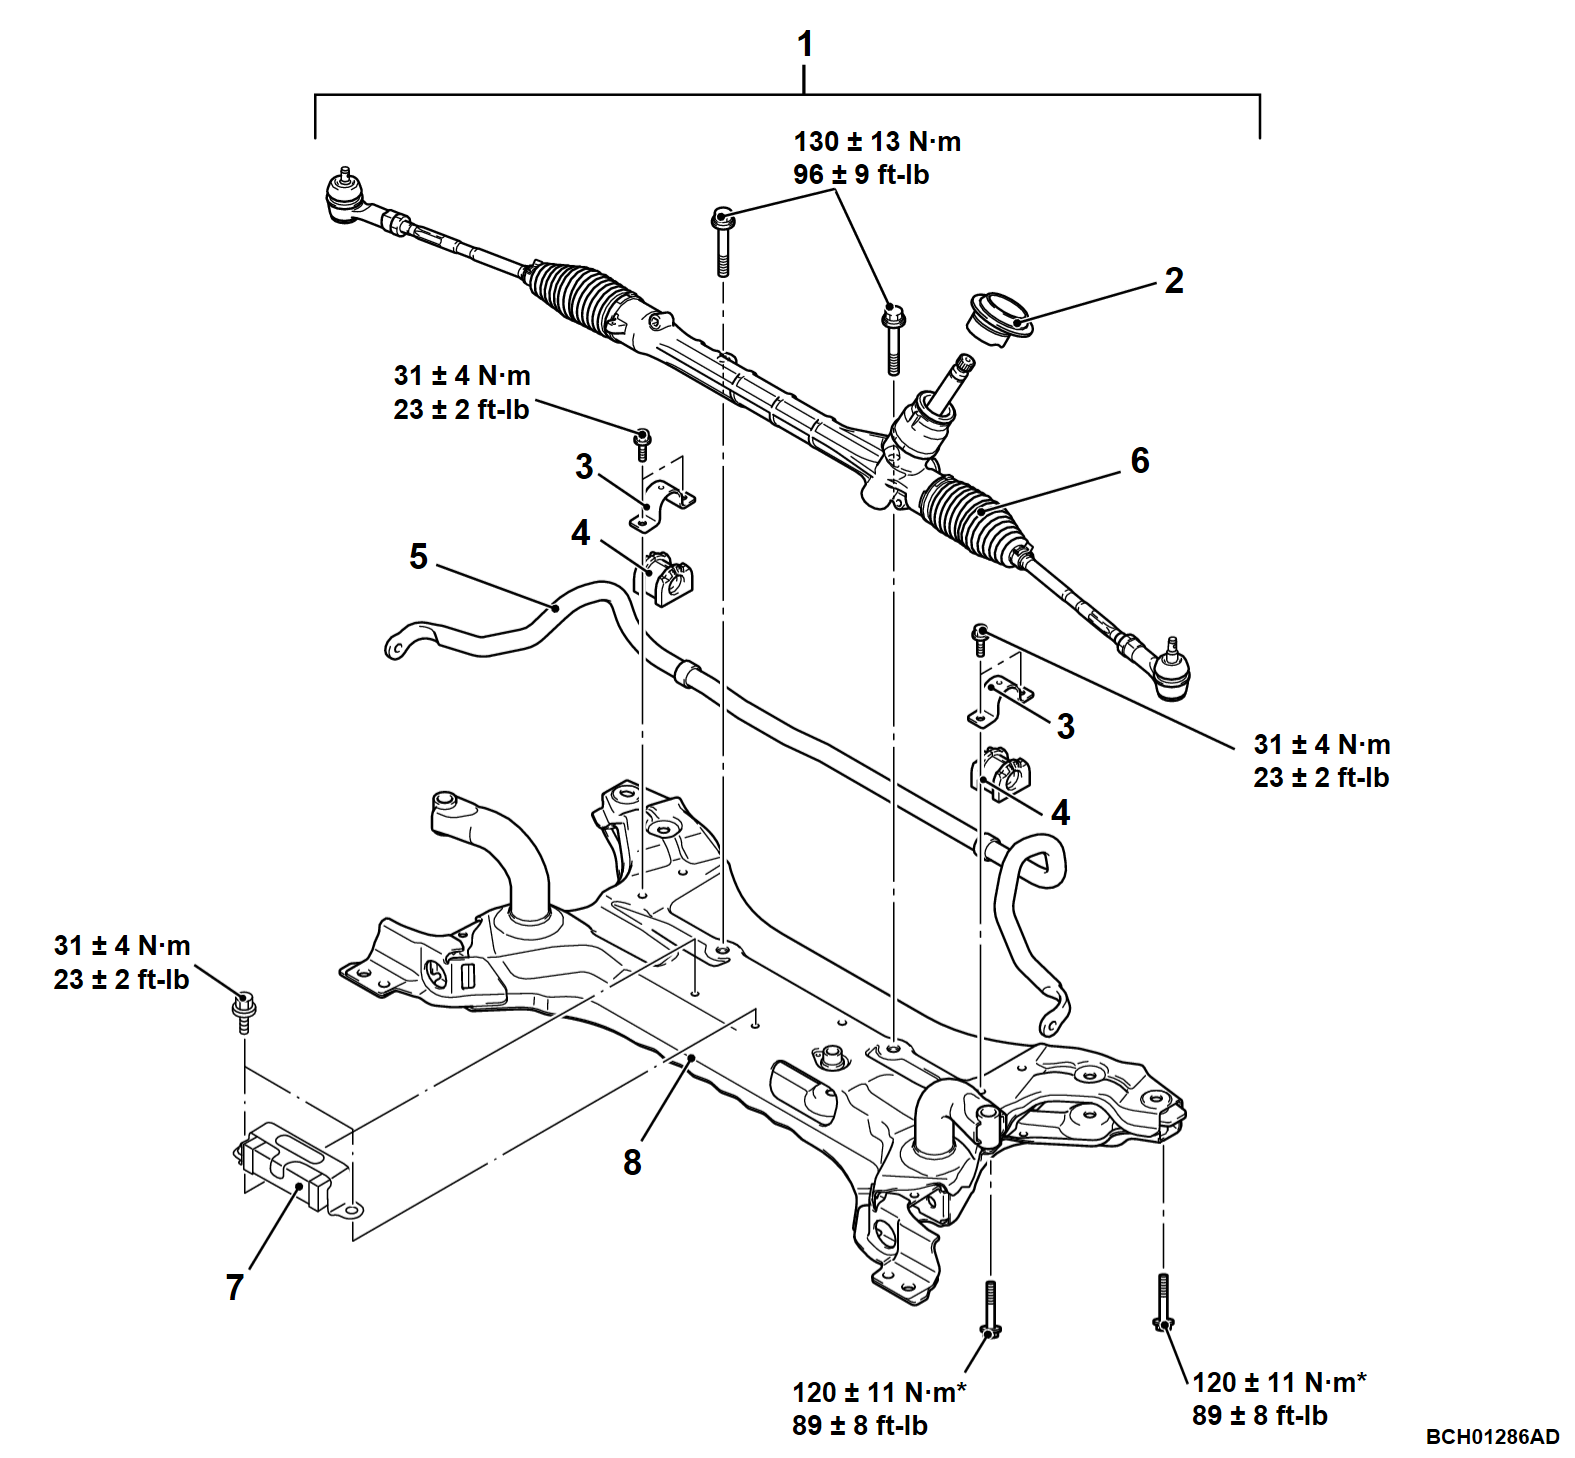
Removal steps
Steering column bolt (Steering column shaft assembly and steering gear & linkage connection) (Refer to GROUP 37 - Steering Shaft ).
Self-locking nut (Tie-rod end and knuckle connection) (Refer to GROUP 26 -Hub and Knuckle Assembly ).
Stabilizer link and stabilizer bar connection nut (Refer to GROUP 33 - Stabilizer Bar ).
Front end side panel mounting bolt (Refer to GROUP 42A - Loose Panel ).
<<A>>1.Front suspension crossmember assembly
>>B<<2.Grommet
3.Stabilizer bar bracket
>>A<<4.Stabilizer bushing
5.Stabilizer bar (Refer to GROUP 33 - Stabilizer Bar ).
6.Steering gear and linkage assembly
7.Dynamic damper <Up to 20 Model year>
8.Front suspension crossmember
 
 
REMOVAL SERVICE POINT
 
 
<<A>> FRONT SUSPENSION CROSSMEMBER ASSEMBLY REMOVAL
Support the front suspension crossmember with a transmission jack, and remove the mounting bolts of the front suspension crossmember. Then, remove the front suspension crossmember assembly with the steering gear and linkage installed.


INSTALLATION SERVICE POINTS
 
 
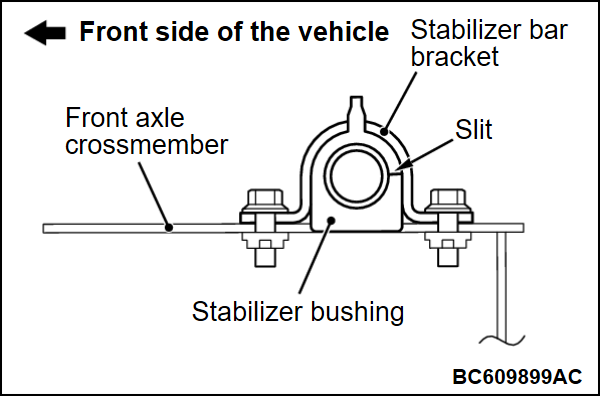
>>A<< STABILIZER BUSHING INSTALLATION
Install the stabilizer bushing as shown in the figure.


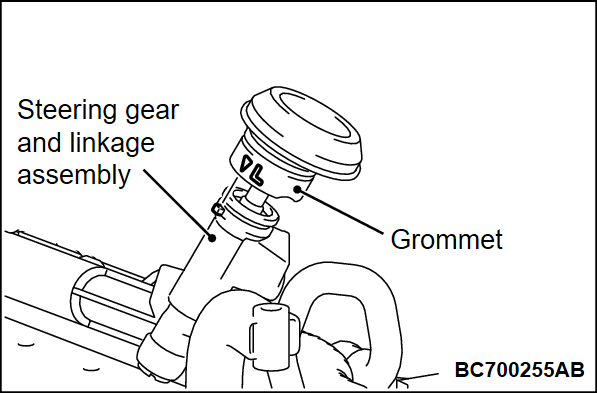
>>B<< GROMMET INSTALLATION
Install the joint cover grommet to the steering gear and linkage by aligning the mating marks as shown in the figure.