[Previous][Next]
REMOVAL AND INSTALLATION
 
 
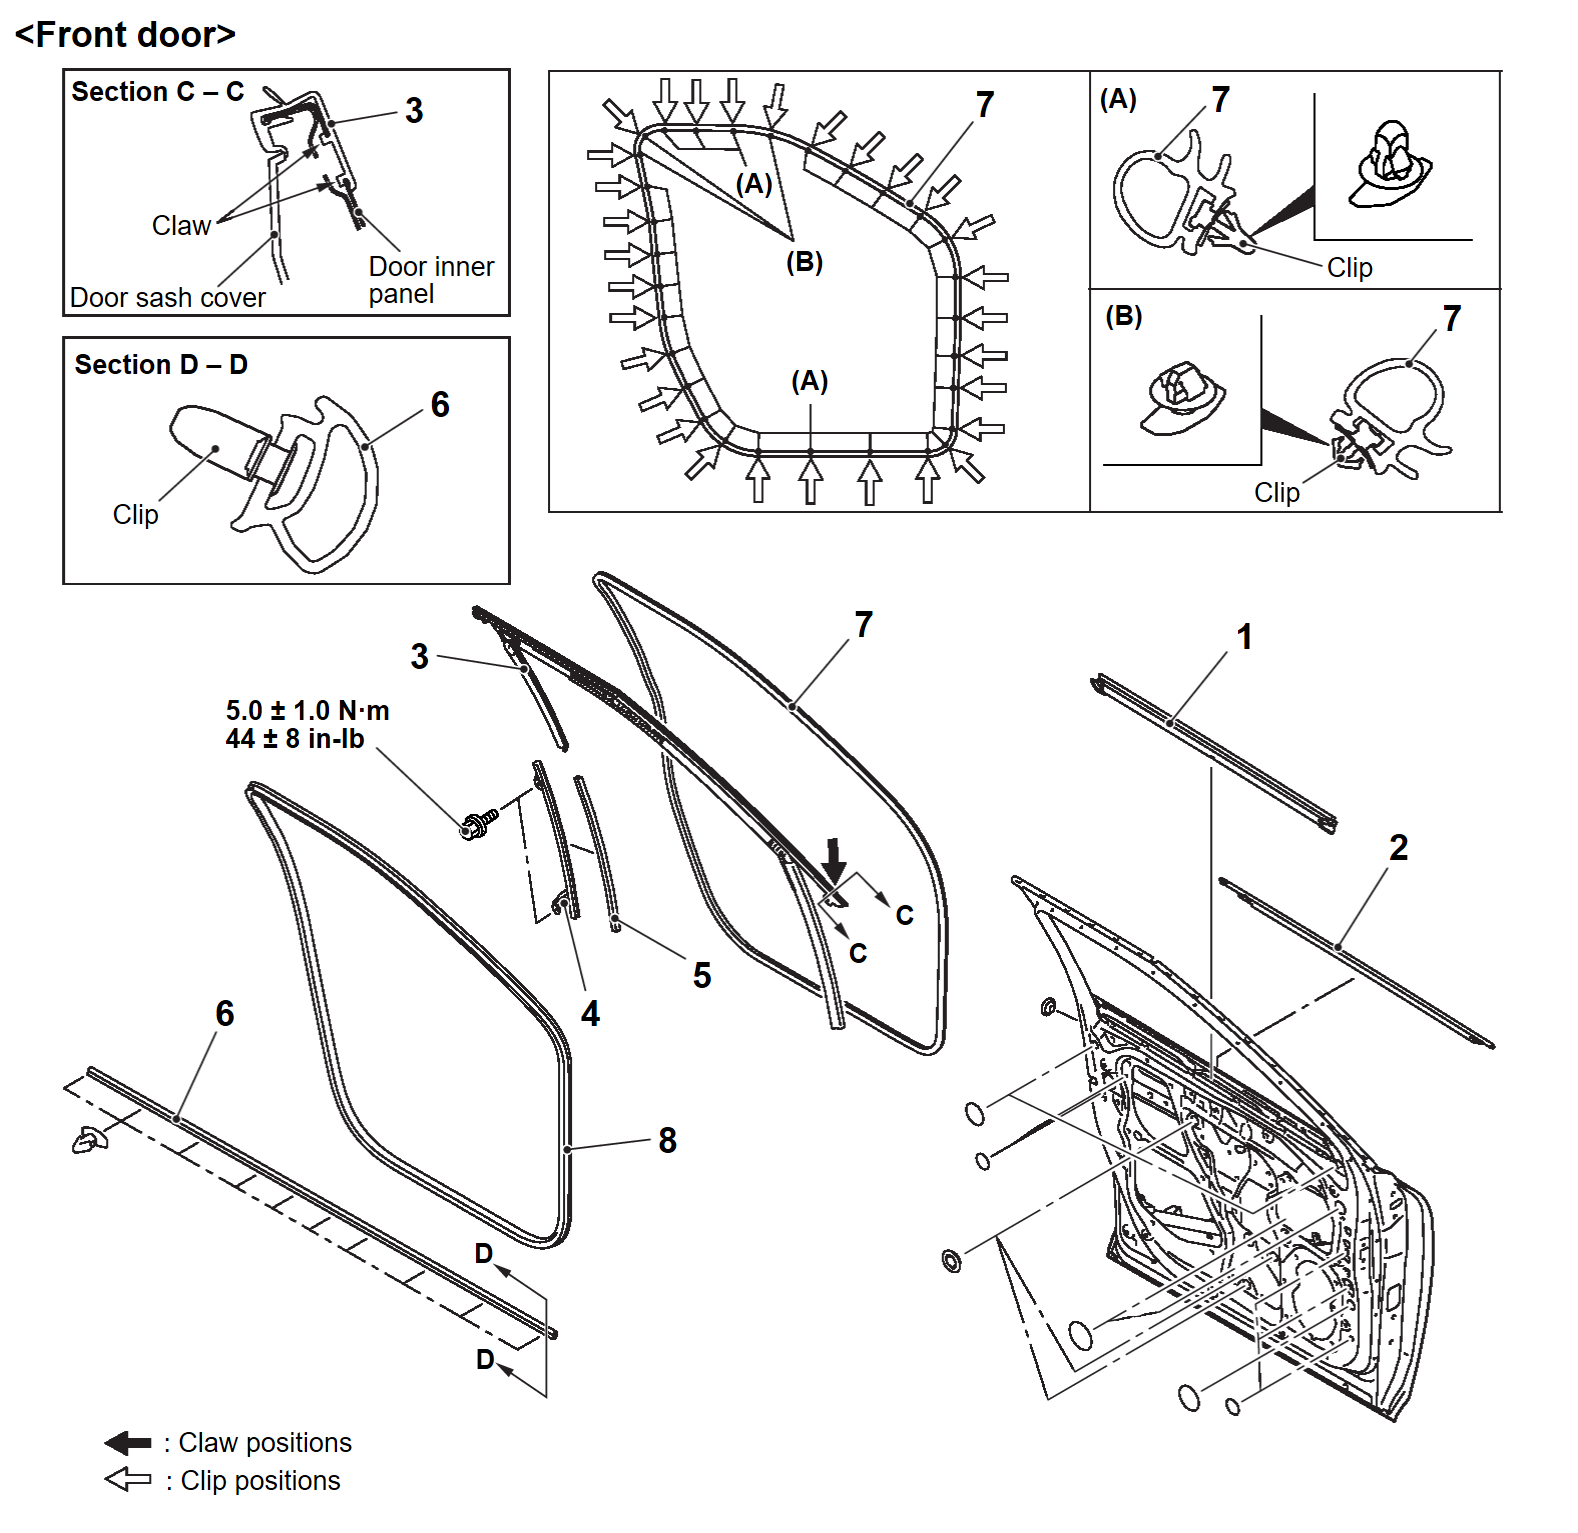
Door beltline inner weatherstrip removal steps
Front door finisher assembly (Refer to Door Finisher REMOVAL AND INSTALLATION)
1.Door beltline inner weatherstrip
Door beltline molding removal steps
Front door finisher assembly (Refer to Door Finisher REMOVAL AND INSTALLATION)
1.Door beltline inner weatherstrip
Front door sash cover front/Front door sash cover rear (Refer to Door Sash Cover REMOVAL AND INSTALLATION)
2.Door beltline molding
Door window glass runchannel removal steps
Front door finisher assembly (Refer to Door Finisher REMOVAL AND INSTALLATION)
1.Door beltline inner weatherstrip
Front door sash cover front/Front door sash cover rear (Refer to Door Sash Cover REMOVAL AND INSTALLATION)
3.Door window glass runchannel
Door window glass rear lower sash removal steps
Door working hole rear cover (Refer to Door Glass and Regulator REMOVAL AND INSTALLATION)
4.Door window glass rear lower sash
Door window glass lower runchannel removal steps
Door working hole rear cover (Refer to Door Glass and Regulator REMOVAL AND INSTALLATION)
4.Door window glass rear lower sash
5.Door window glass lower runchannel
Door opening lower weatherstrip removal steps
Rear parting seal (Refer to Parting Seal REMOVAL AND INSTALLATION)
6.Door opening lower weatherstrip
Door opening outer weatherstrip removal steps
Door check connecting bolt (Refer to REMOVAL AND INSTALLATION)
7.Door opening outer weatherstrip
Door opening inner weatherstrip removal
8.Door opening inner weatherstrip
 
 
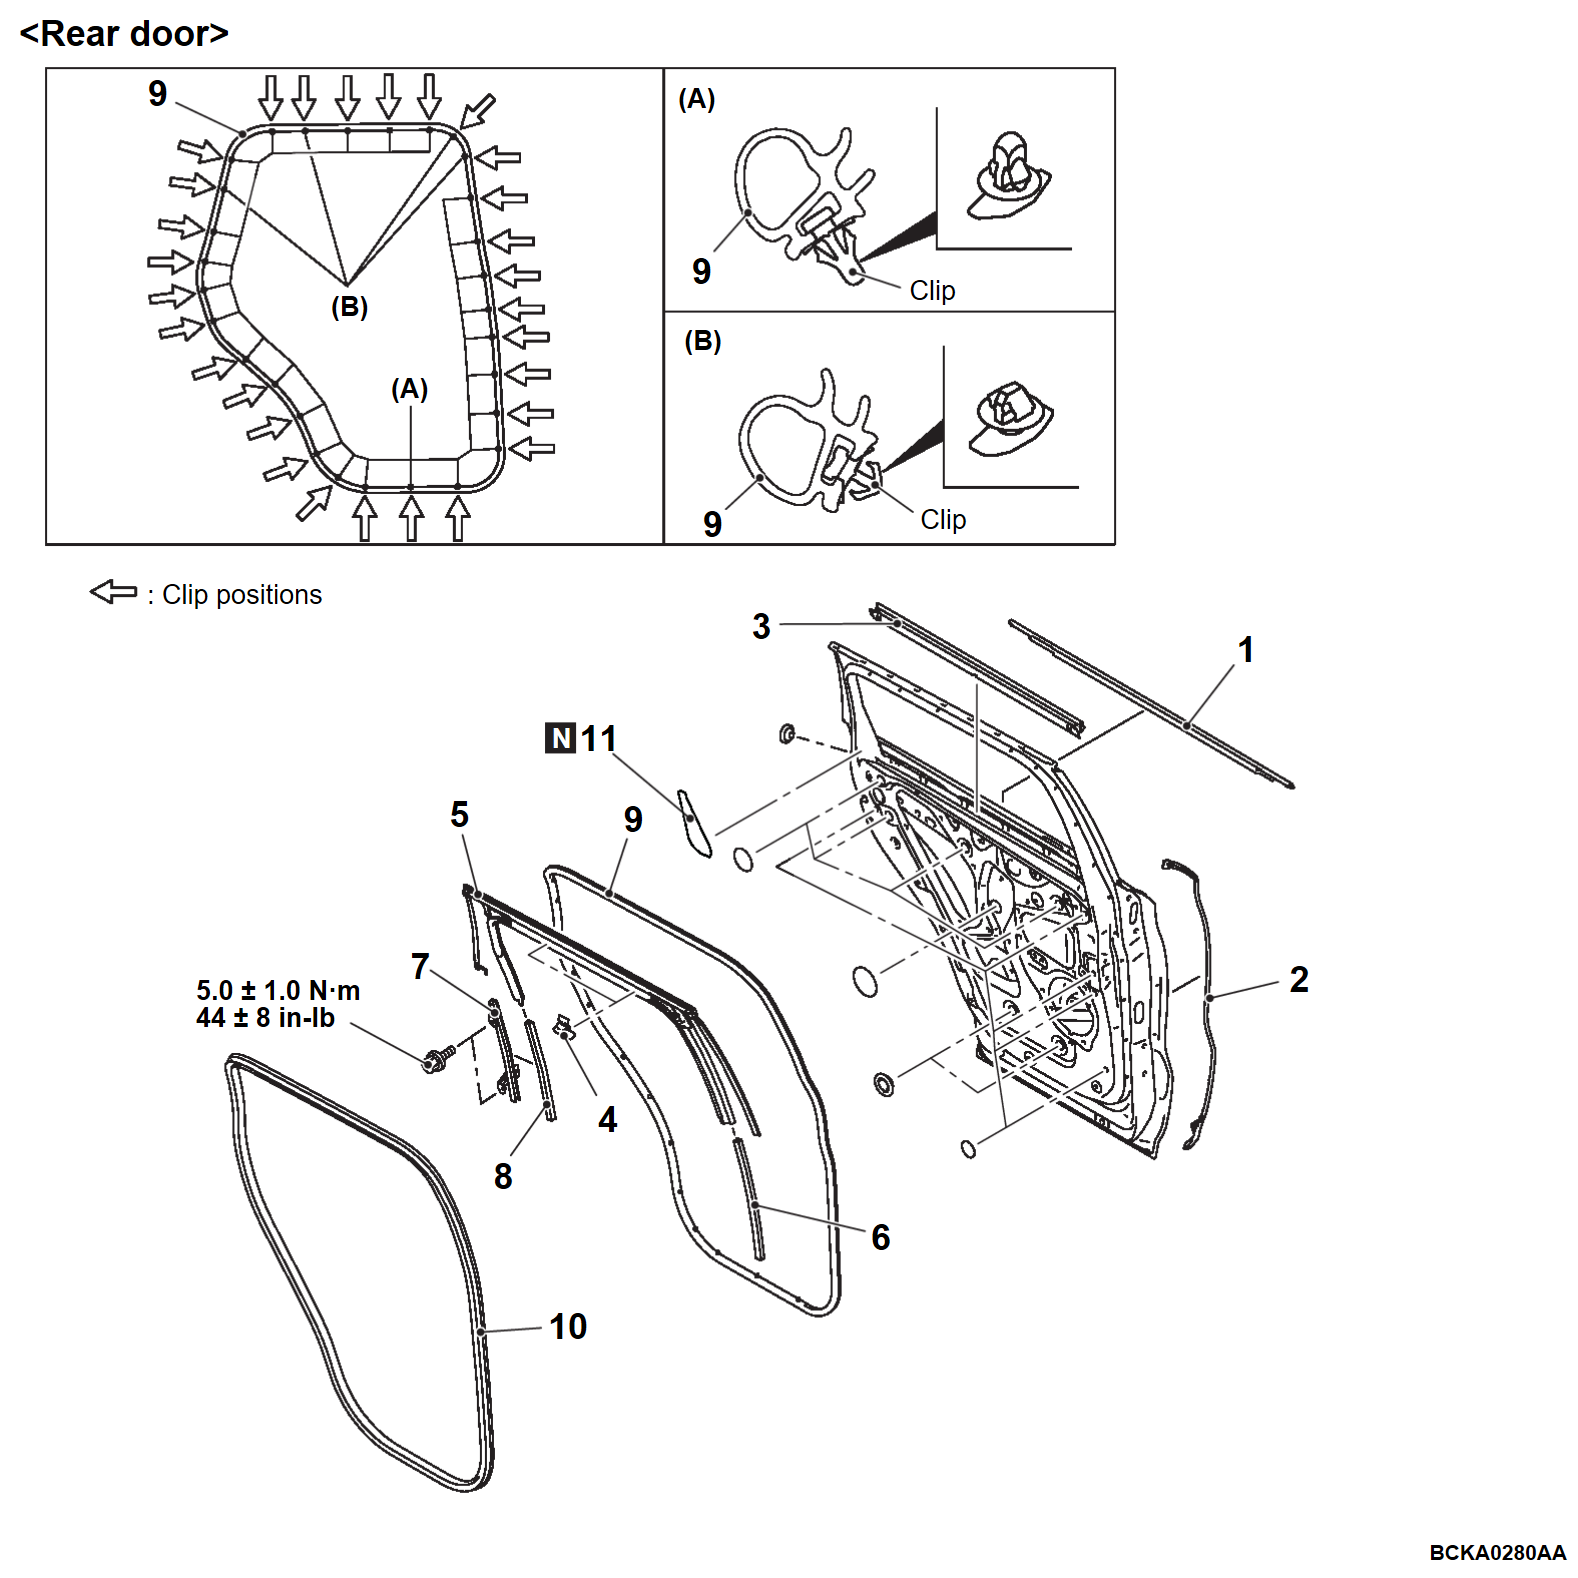
Door beltline molding removal
1.Door beltline molding
Center pillar door opening weatherstrip removal steps
Rear side guard molding (Refer to Side Guard Molding REMOVAL AND INSTALLATION)
2.Center pillar door opening weatherstrip
Door beltline inner weatherstrip removal steps
Rear door finisher assembly (Refer to Door Finisher REMOVAL AND INSTALLATION)
3.Door beltline inner weatherstrip
Roll shade holder removal <Vehicles with roll sunshade>
4.Roll shade holder <Vehicles with roll sunshade>
Door window glass runchannel removal steps
Rear door sash cover front/Rear door sash cover rear (Refer to Door Sash Cover REMOVAL AND INSTALLATION)
4.Roll shade holder <Vehicles with roll sunshade>
5.Door window glass runchannel
Door window glass rear lower sash removal steps
Door working hole rear cover (Refer to Door Window and Regulator REMOVAL AND INSTALLATION)
6.Door window glass rear lower sash
Door window glass rear lower runchannel removal steps
Door working hole rear cover (Refer to Door Window and Regulator REMOVAL AND INSTALLATION)
6.Door window glass rear lower sash
7.Door window glass rear lower runchannel
Door window glass front lower runchannel removal steps
Rear door speaker (Refer to Rear Door Speaker Removal and Installation)
Door window glass assembly (Refer to Door Window and Regulator REMOVAL AND INSTALLATION)
8.Door window glass front lower runchannel
Door opening outer weatherstrip removal steps
Door check connecting bolt (Refer to REMOVAL AND INSTALLATION)
9.Door opening outer weatherstrip
Door opening inner weatherstrip removal
10.Door opening inner weatherstrip
Rear door sash tape removal steps
10.Door opening inner weatherstrip
11.Rear door sash tape
 
 
REMOVAL SERVICE POINT
 
 
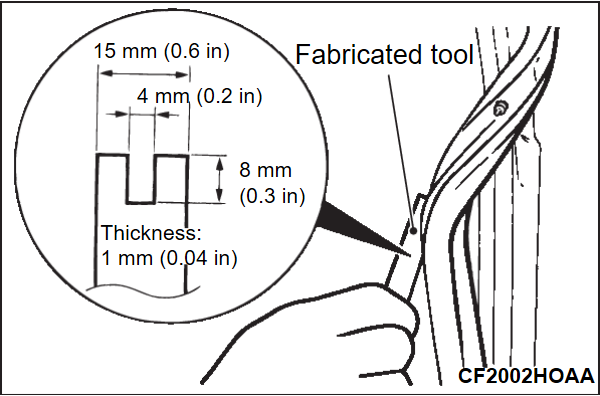
<<A>> DOOR OPENING OUTER WEATHERSTRIP REMOVAL
Make the tool as shown in the figure, and remove the weatherstrip from the door panel.


INSTALLATION SERVICE POINTS
 
 
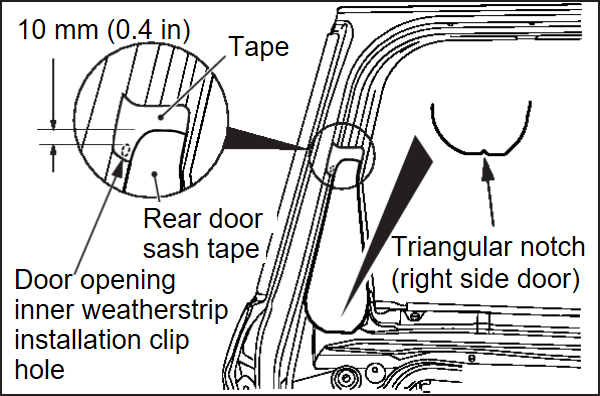
>>A<< REAR DOOR SASH TAPE INSTALLATION
Apply a new rear door sash tape according to the procedure below.
1. Apply a positioning tape at 10 mm (0.4 inch) above from the upper end of the door opening inner weatherstrip installation clip hole as shown in the figure.
2. Position the upper end of the rear door sash tape at the lower end of the applied positioning tape, and apply the rear door sash tape so that it is parallel to the sash.
noteThere is a triangular notch for identification on the rear door sash tape for the right side door.


>>B<< DOOR OPENING INNER WEATHERSTRIP INSTALLATION
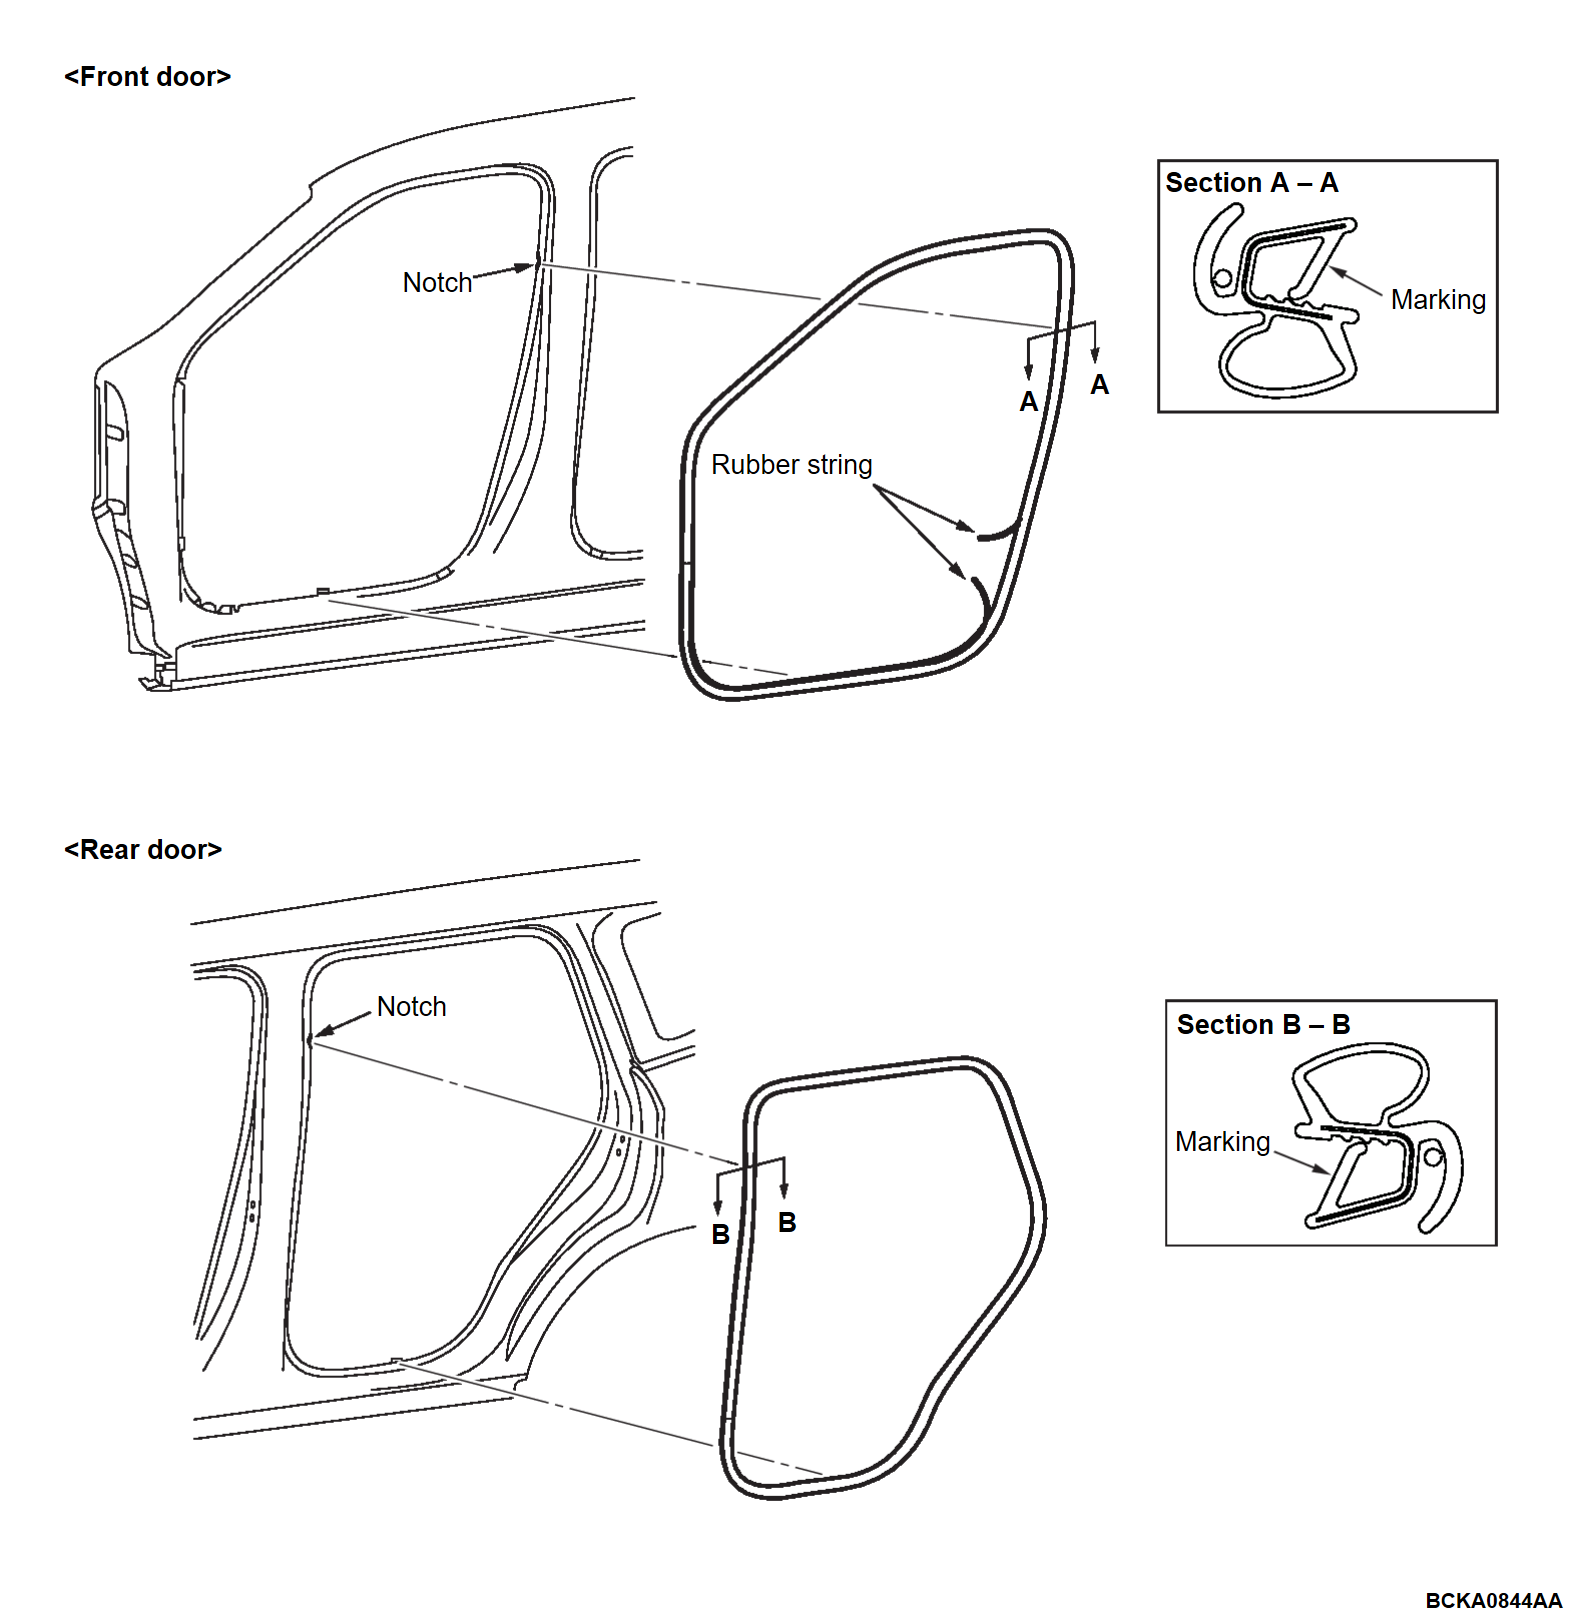
1. A rubber string for factory production is installed to the new front side door opening inner weatherstrip. Therefore, peel off the rubber string to the root and remove it.
2. Align the mark on the door opening inner weatherstrip with the notch at the vehicle body side as shown.


>>C<< DOOR WINDOW GLASS RUNCHANNEL INSTALLATION
1. Install only the roof part of the door window glass runchannel.
2. Install the front door sash cover front/front door sash cover rear <Front door> or rear door sash cover front/rear door sash cover rear <Rear door> (Refer to Door Sash Cover REMOVAL AND INSTALLATION).
3. Insert the pillar part of the door window glass runchannel into the pillar garnish.
4. Install the other parts of the door window glass runchannel.


>>D<< DOOR BELTLINE MOLDING INSTALLATION
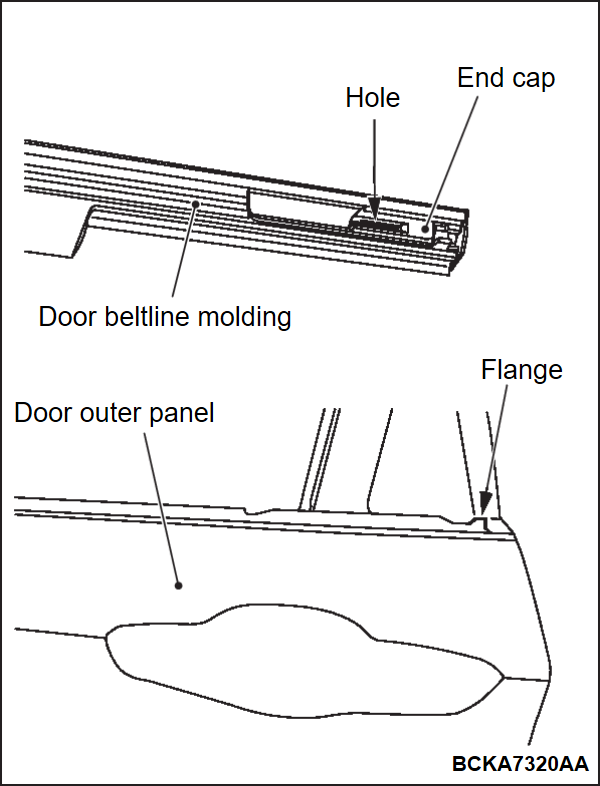
Install the door beltline molding so that the flange part of the door outer panel shown in the figure fits into the hole at the end cap part shown in the figure.