DTC P0450-00: EVAP System Pressure Sensor/Switch Circuit
CIRCUIT OPERATION
- A power voltage of 5 volts is applied to the fuel tank differential pressure sensor connector terminal number 3 from the ECM connector terminal number 106.
- The power voltage is grounded to the ECM connector terminal number 116 from the fuel tank differential pressure sensor connector terminal number 2.
- The fuel tank differential pressure sensor connector terminal number 1 outputs a voltage signal to the ECM connector terminal number 96 according to the differential pressure between the internal pressure of the fuel tank and the atmospheric pressure.
TECHNICAL DESCRIPTION
- The ECM monitors the fuel tank differential pressure sensor signal voltage.
- The ECM determines whether the fuel tank differential pressure sensor signal voltage is within normal operating parameters.
DESCRIPTIONS OF MONITOR METHODS
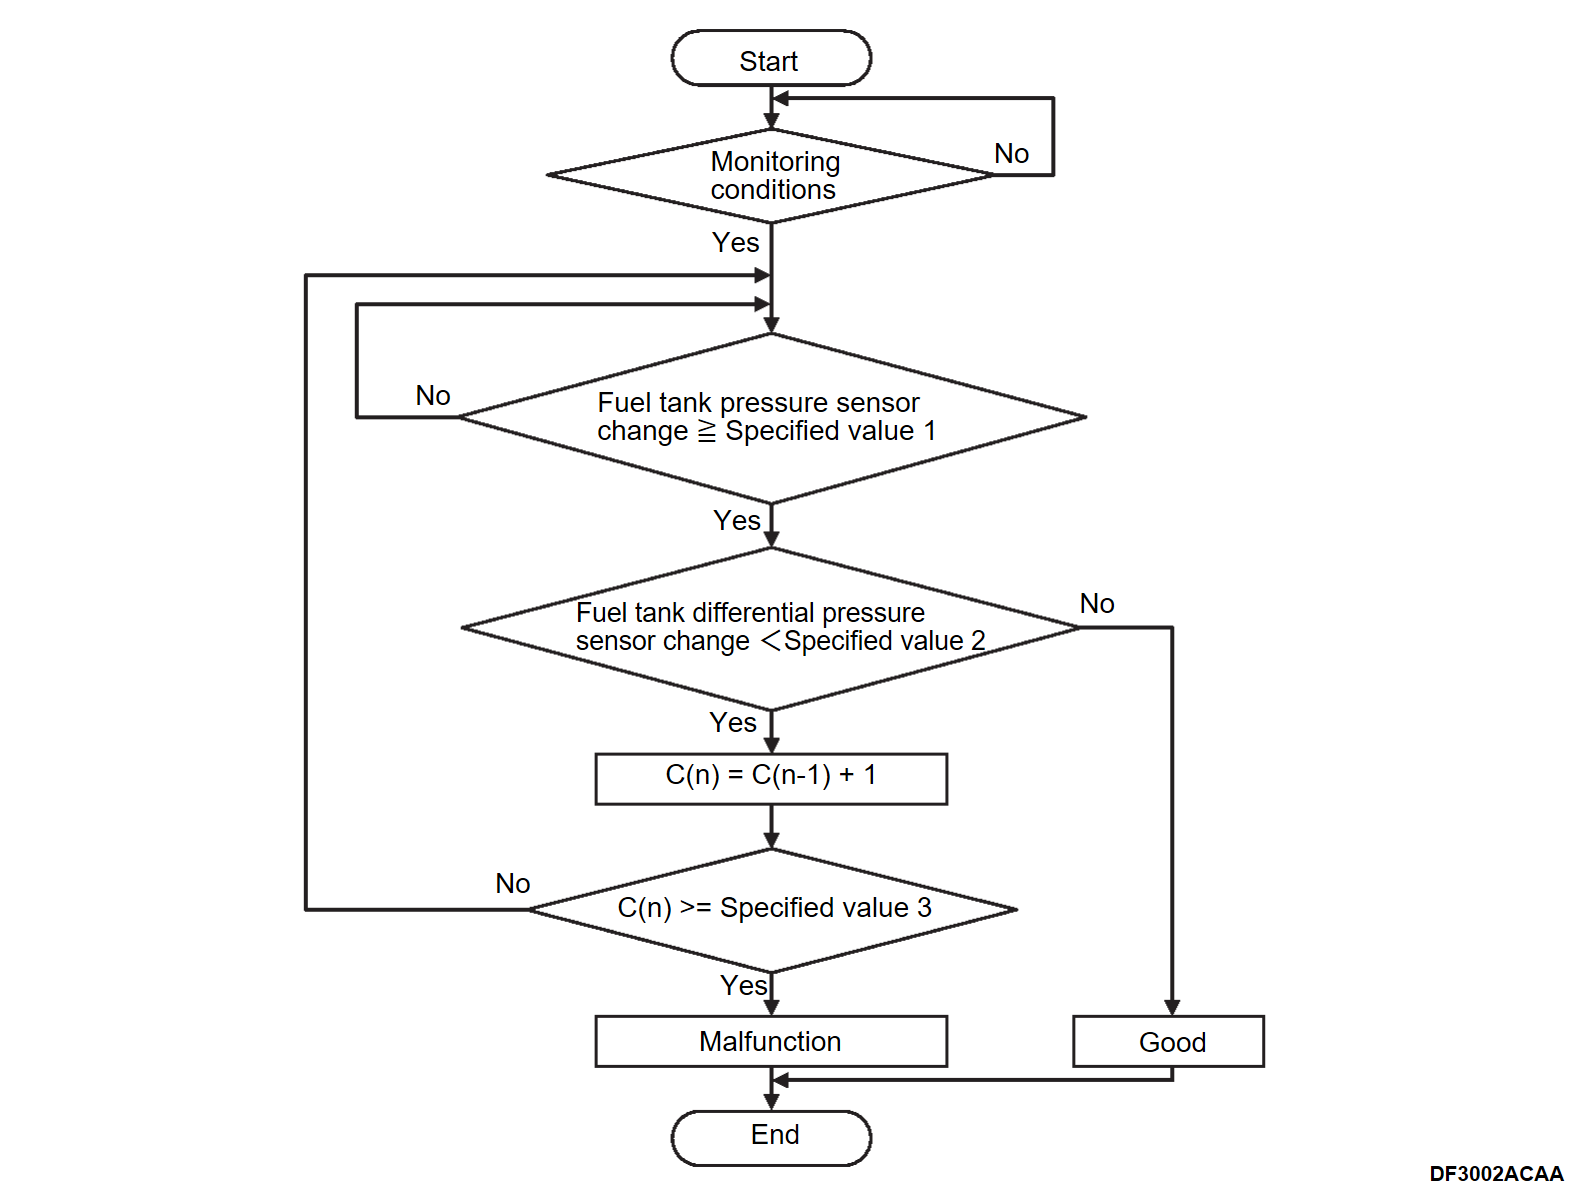
Fuel tank differential pressure sensor output does not change when fuel tank pressure sensor output has changed.
MONITOR EXECUTION
Continuous.
MONITOR EXECUTION CONDITIONS (OTHER MONITOR AND SENSOR)
Other Monitor (There is no temporary DTC set in memory for the item monitored below)
- Fuel tank pressure sensor monitor
- Fuel tank differential pressure sensor monitor
- Fuel tank vapor line monitor
- Vehicle speed sensor monitor
Sensor (The sensors below are determined to be normal)
- Fuel level sensor
DTC SET CONDITIONS
Check Conditions
- When the amount of change of the fuel tank pressure sensor output signal is 1 kPa (0.3 in.Hg) or more.
- Power supply mode of electric motor switch is ON.
- 12V battery positive voltage is between 10.0 and 16.5 volts.
- Fuel level is 70 percent or less.
- The fuel tank differential pressure sensor output signal is more than –5.6 kPa (–1.65 in.Hg) and is less than +5.6 kPa (+1.65 in.Hg).
- Vehicle speed is less than 1.25 km/h (0.8 mph).
- It is not refuel control mode.
Judgment Criteria
- The change of fuel tank differential pressure sensor output signal is less than 0.2 kPa (0.06 in. Hg) for 3 times.
FAIL-SAFE AND BACKUP FUNCTION
- Fuel filler lid cannot be opened even when pressing the fuel filler lid opener switch.
- Indicates "REFUELING SYSTEM SERVICE REQUIRED" on the information screen in the multi-information display.
OBD-II DRIVE CYCLE PATTERN
Refer to Diagnostic Function, OBD-II Drive Cycle – Pattern 5 OBD- II DRIVE CYCLE .
.
 .
.TROUBLESHOOTING HINTS (THE MOST LIKELY CAUSES FOR THIS CODE TO BE SET ARE:)
- Fuel tank differential pressure sensor failed.
- Fuel tank differential pressure sensor circuit harness damage, or connector damage.
- ECM failed.
DIAGNOSIS
Required Special Tools:
- MB992744: Vehicle communication interface-Lite (V.C.I.-Lite)
- MB992745: V.C.I.-Lite main harness A
- MB992747: V.C.I.-Lite USB cable short
- MB992748: V.C.I.-Lite USB cable long
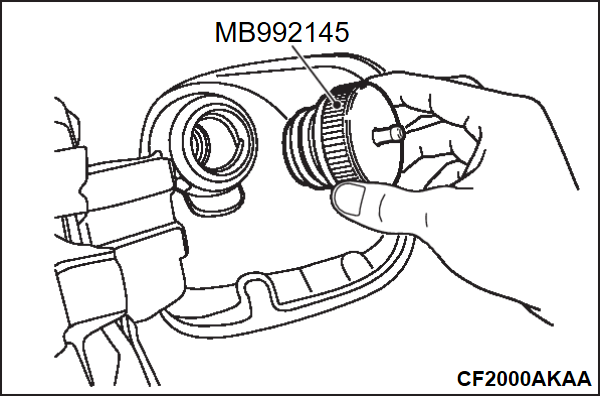
- MB992145: Fuel leak check cap
1.STEP 1. Using scan tool (M.U.T.-III SE), check the data list.
(1) Connect the scan tool (M.U.T.-III SE) to the data link connector
(2) Power supply mode of electric motor switch is ON.
(3) Remove the fuel tank cap.
(4) Use scan tool (M.U.T.-III SE) to check the data list (Refer to DATA LIST REFERENCE TABLE ).
).
 ).
).- Item number 840: Refuel System Differential Pressure Sensor
- The standard value should be –0.57 to 0.57 kPa (–0.168 to 0.168 in.Hg)
(5) Install special tool fuel leak check cap (MB992145).
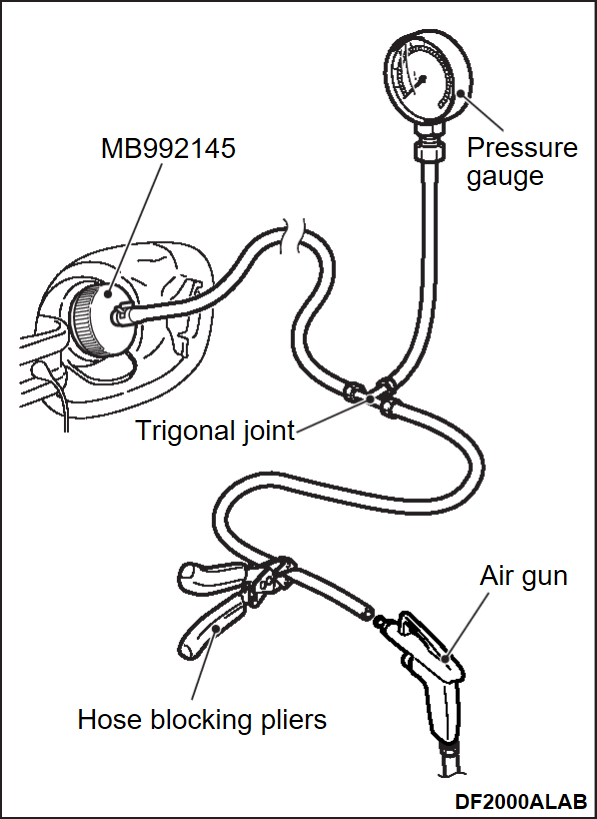
(6) Install the hose and pressure gauge to the special tool as shown.
(7)
| caution |
|
Pressurise while checking the pressure gauge and hold if it reaches from 9.80 to 11.76 kPa (2.89 to 3.47 in.Hg).
OK: The fuel tank pressure reading should increase.
(8) Turn the power supply mode of the electric motor switch to OFF, and disconnect the scan tool (M.U.T.-III SE).
(9) Remove the special tool fuel leak check cap (MB992145), the hose and the pressure gauge, and reinstall the fuel cap.
Q: Is the check result normal?
2.STEP 2. Perform resistance measurement at fuel tank differential pressure sensor connector terminal number 2.
- Disconnect connector, and measure at harness side.
- Resistance between fuel tank differential pressure sensor connector terminal number 2 and ground.
OK: Continuity (2 ohms or less)
Q: Is the check result normal?
3.STEP 3. Check harness between fuel tank differential pressure sensor connector terminal number 3 and ECM connector terminal number 106.
Check power supply line for damage. Replace the fuel tank differential pressure sensor (Refer to ENGINE, Fuel Supply – Fuel Tank – Fuel Pump and Gauge Assembly FUEL PUMP MODULE DISASSEMBLY AND ASSEMBLY
 ). Then
 Repair or replace the connector, or repair the damaged harness wire.
Q: Is the check result normal?
 Replace the fuel tank differential pressure sensor (Refer to ENGINE, Fuel Supply – Fuel Tank – Fuel Pump and Gauge Assembly FUEL PUMP MODULE DISASSEMBLY AND ASSEMBLY
 ). Then
 Repair or replace the connector, or repair the damaged harness wire.
4.STEP 4. Check harness between fuel tank differential pressure sensor connector terminal number 3 and ECM connector terminal number 106.
Check power supply line for open circuit and damage. Repair or replace the connector, or repair the damaged harness wire.
Q: Is the check result normal?
 Repair or replace the connector, or repair the damaged harness wire.
5.STEP 5. Using scan tool (M.U.T.-III SE), check the data list.
(1) Connect the scan tool (M.U.T.-III SE) to the data link connector
(2) Power supply mode of electric motor switch is ON.
(3) Remove the fuel tank cap.
(4) Use scan tool (M.U.T.-III SE) to check the data list (Refer to DATA LIST REFERENCE TABLE ).
).
 ).
).- Item number 840: Refuel System Differential Pressure Sensor
- The standard value should be –0.57 to 0.57 kPa (–0.168 to 0.168 in.Hg)
(5) Install special tool fuel leak check cap (MB992145).
(6) Install the hose and pressure gauge to the special tool as shown.
(7)
| caution |
|
Pressurise while checking the pressure gauge and hold if it reaches from 9.80 to 11.76 kPa (2.89 to 3.47 in.Hg).
OK: The fuel tank pressure reading should increase.
(8) Turn the power supply mode of the electric motor switch to OFF, and disconnect the scan tool (M.U.T.-III SE).
(9) Remove the special tool fuel leak check cap (MB992145), the hose and the pressure gauge, and reinstall the fuel cap.
Q: Is the check result normal?
 Replace the fuel tank differential pressure sensor (Refer to ENGINE, Fuel Supply – Fuel Tank – Fuel Pump and Gauge Assembly FUEL PUMP MODULE DISASSEMBLY AND ASSEMBLY
 ). Then
6.STEP 6. Test the OBD-II drive cycle.
After erasing the DTC, carry out test drive with the drive cycle pattern, and recheck the DTC. Replace the ECM (Refer to ENGINE CONTROL MODULE (ECM) REMOVAL AND INSTALLATION
 ).
). Intermittent malfunction (Refer to GENERAL INFORMATION, General Information – How to Use Troubleshooting/Inspection Service Points – How to Cope with Intermittent Malfunctions HOW TO COPE WITH INTERMITTENT MALFUNCTIONS
 ).
).
(1) Use scan tool (M.U.T.-III SE) to erase the DTC.
(2) Carry out test drive with the drive cycle pattern (Refer to Diagnostic Function, OBD-II Drive Cycle – Pattern 5 OBD- II DRIVE CYCLE ).
).
 ).
).(3) Use scan tool (M.U.T.-III SE) to recheck the DTC.
Q: Is DTC P0450-00 set?
 Replace the ECM (Refer to ENGINE CONTROL MODULE (ECM) REMOVAL AND INSTALLATION
 ).
). Intermittent malfunction (Refer to GENERAL INFORMATION, General Information – How to Use Troubleshooting/Inspection Service Points – How to Cope with Intermittent Malfunctions HOW TO COPE WITH INTERMITTENT MALFUNCTIONS
 ).
).7.STEP 7. Test the OBD-II drive cycle.
After erasing the DTC, carry out test drive with the drive cycle pattern, and recheck the DTC. Replace the ECM (Refer to ENGINE CONTROL MODULE (ECM) REMOVAL AND INSTALLATION
 ).
). The inspection is complete.
(1) Use scan tool (M.U.T.-III SE) to erase the DTC.
(2) Carry out test drive with the drive cycle pattern (Refer to Diagnostic Function, OBD-II Drive Cycle – Pattern 5 OBD- II DRIVE CYCLE ).
).
 ).
).(3) Use scan tool (M.U.T.-III SE) to recheck the DTC.
Q: Is DTC P0450-00 set?
 Replace the ECM (Refer to ENGINE CONTROL MODULE (ECM) REMOVAL AND INSTALLATION
 ).
). The inspection is complete.
![[Previous]](../../../buttons/fprev.png)
![[Next]](../../../buttons/fnext.png)


