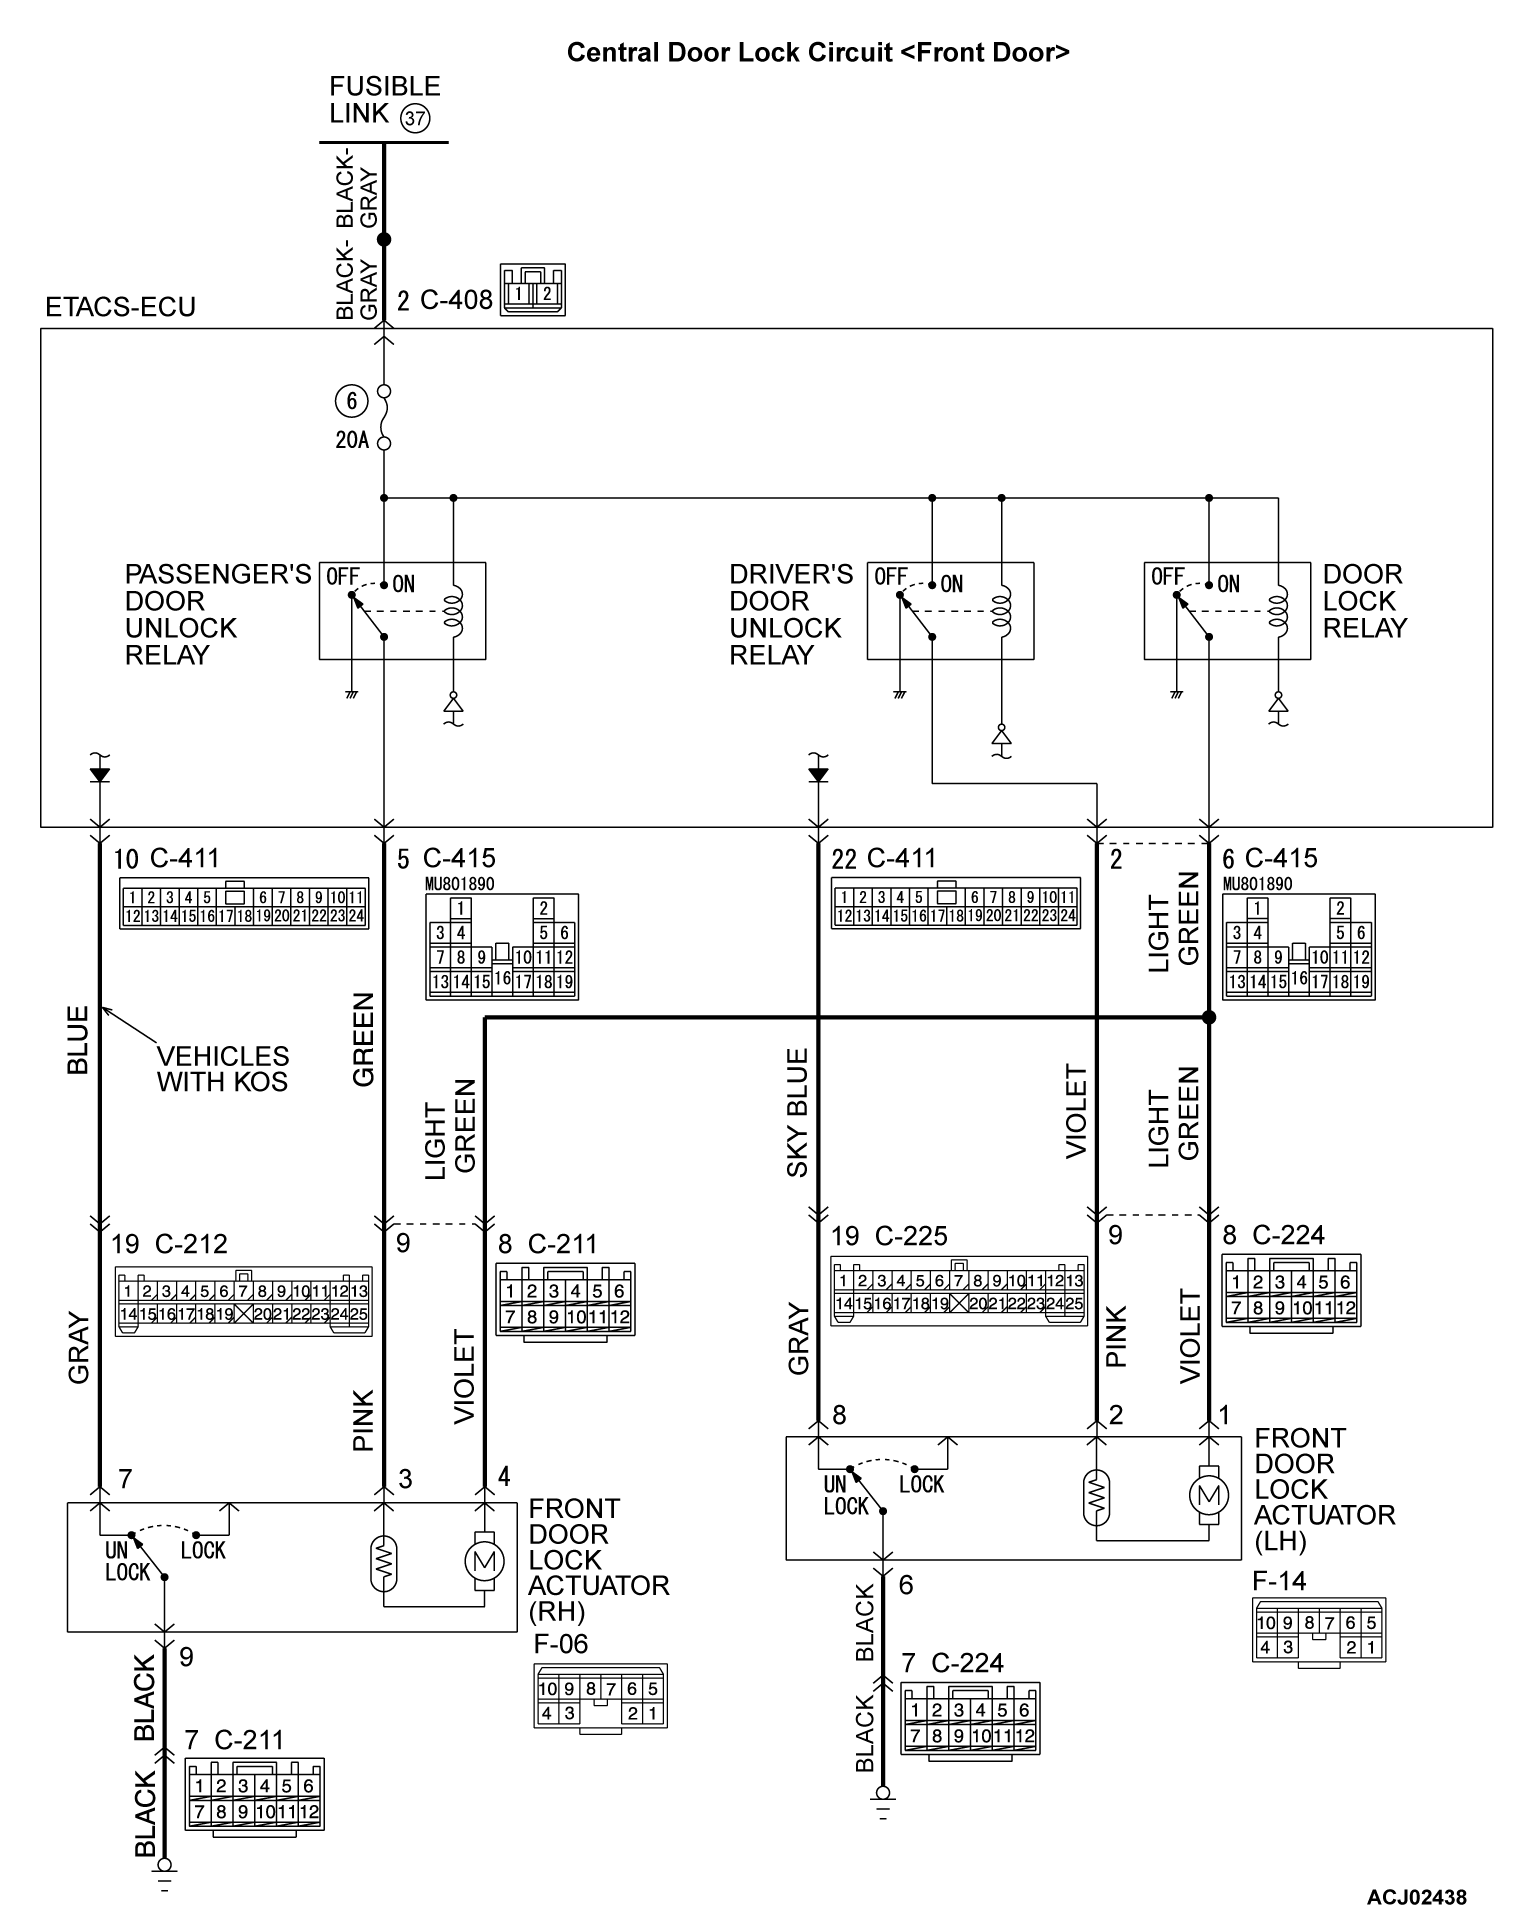
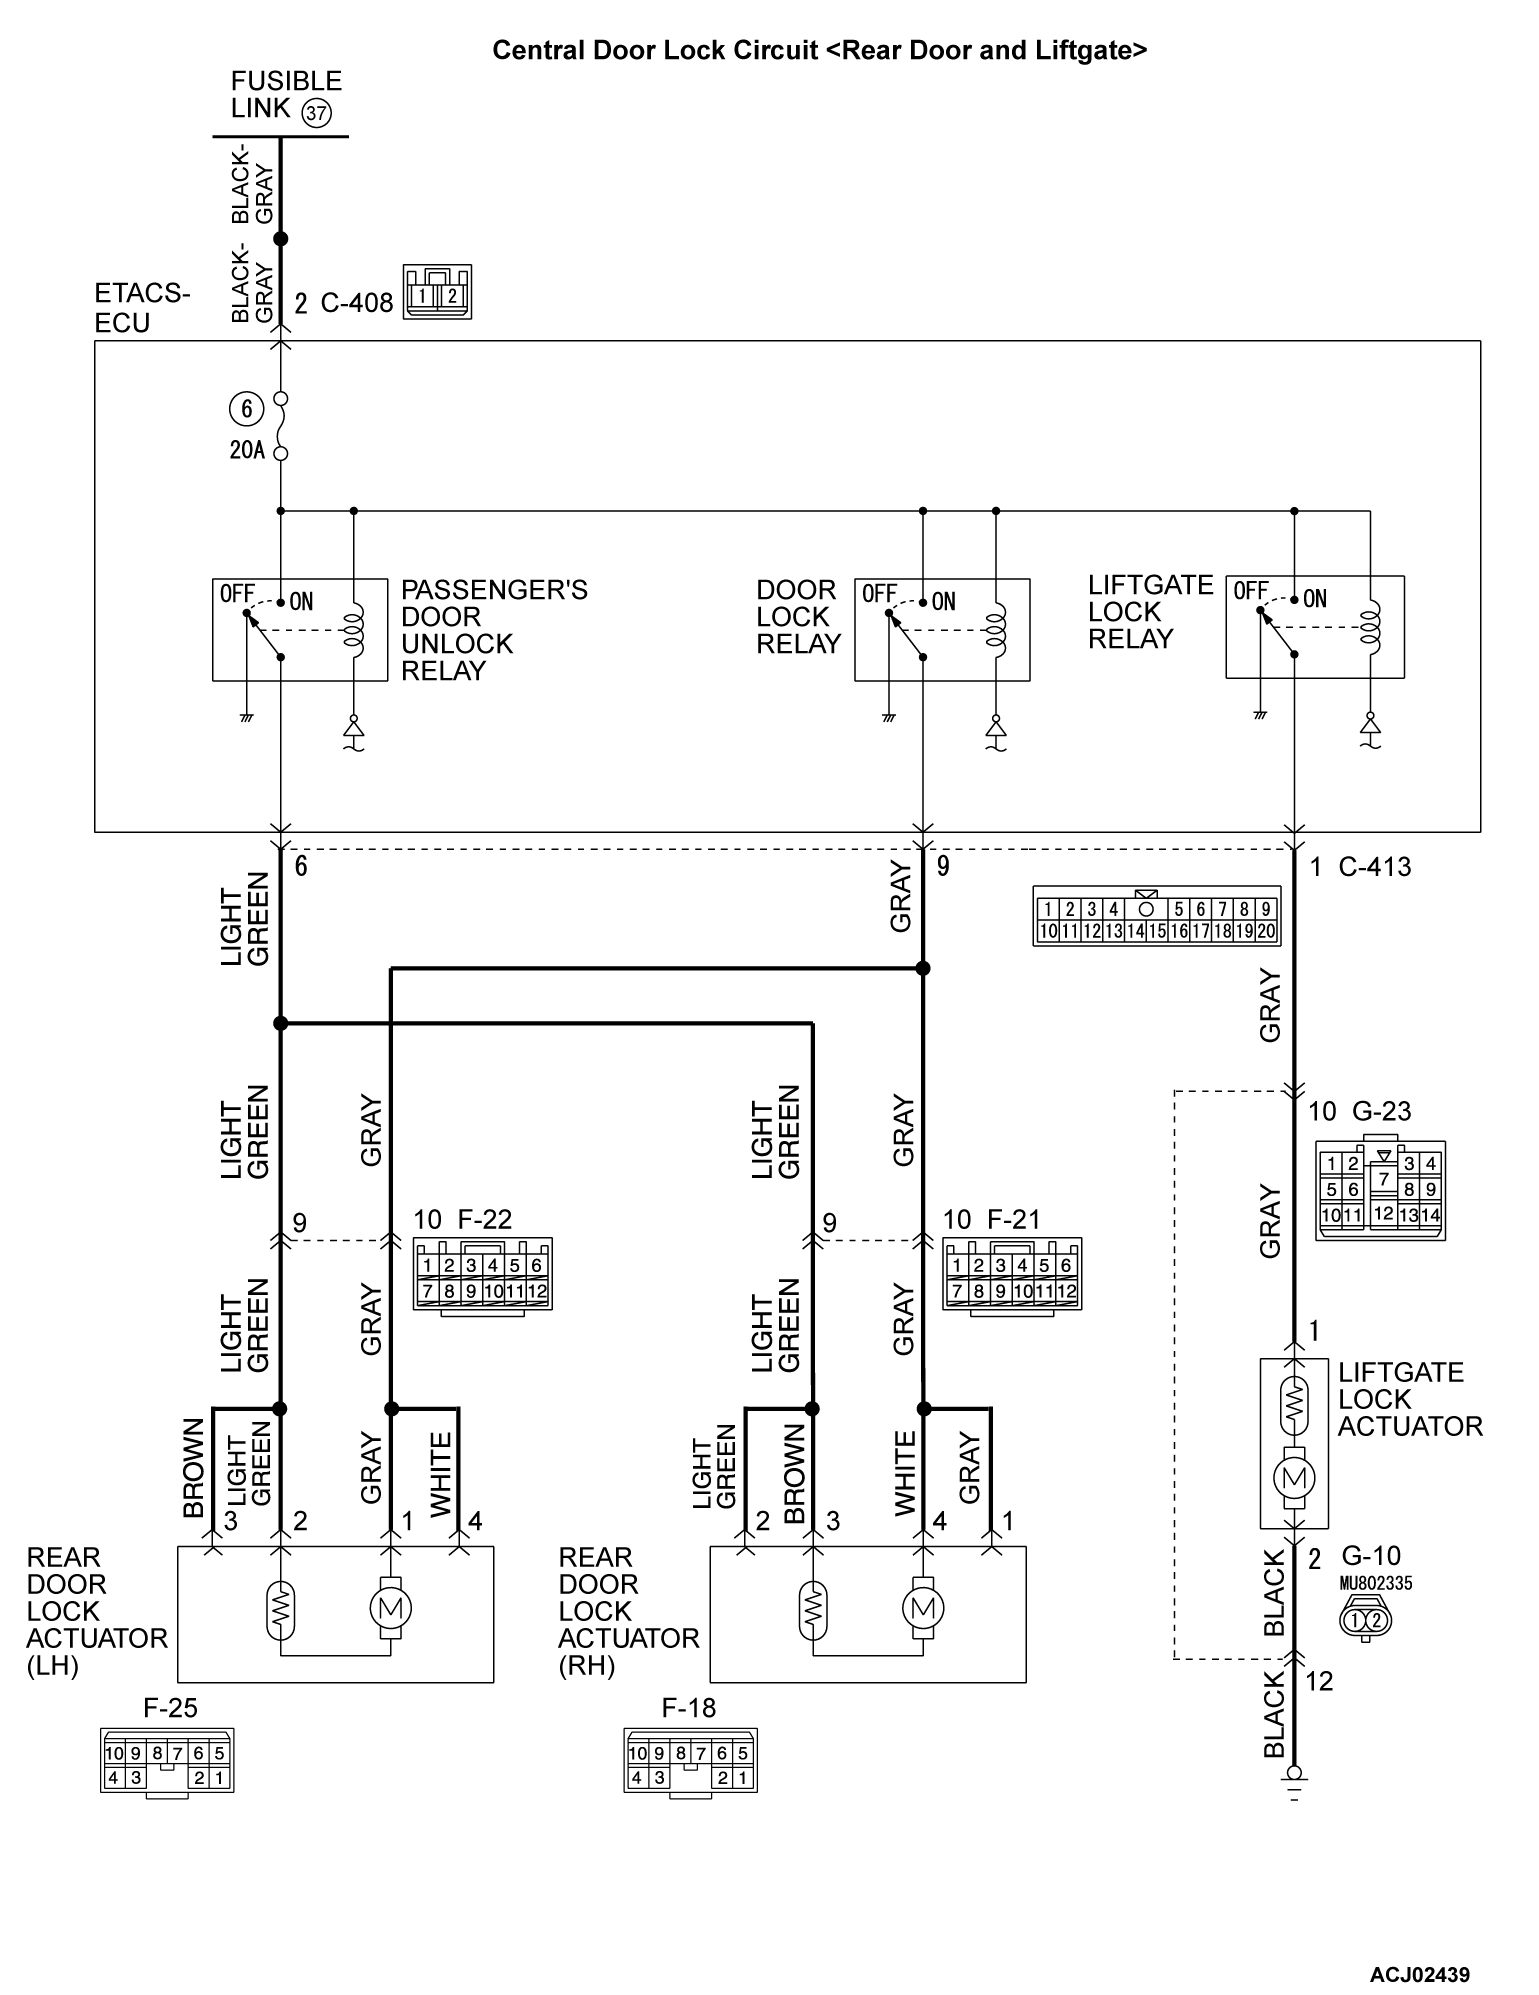
INSPECTION PROCEDURE A-4: A Door or a Liftgate cannot be Locked or Unlocked by the Central Door Locking System.
| caution | Before replacing the ECU, ensure that the power supply circuit, the ground circuit and the communication circuit are normal. |
CIRCUIT OPERATION
- The ETACS-ECU operates the central door locking system according to the following signals:
- Door lock actuator switch
- Door lock switch, which is incorporated in the power window main switch or front power window sub switch
- The ETACS-ECU locks or unlocks all doors by operating the central door lock relay (incorporated in the ECU) in response to input signals.
TECHNICAL DESCRIPTION (COMMENT)
The wiring harness between the ETACS-ECU and the door lock actuator may be defective.
TROUBLESHOOTING HINTS
- The door lock actuator(s) may be defective
- The liftgate lock actuator may be defective
- The wiring harness or connectors may have loose, corroded, or damaged terminals, or terminals pushed back in the connector
- The ETACS-ECU may be defective
DIAGNOSIS
STEP 1. Confirmation of the defective door lock actuator or liftgate lock actuator.
Which door or liftgate is not operating normally?
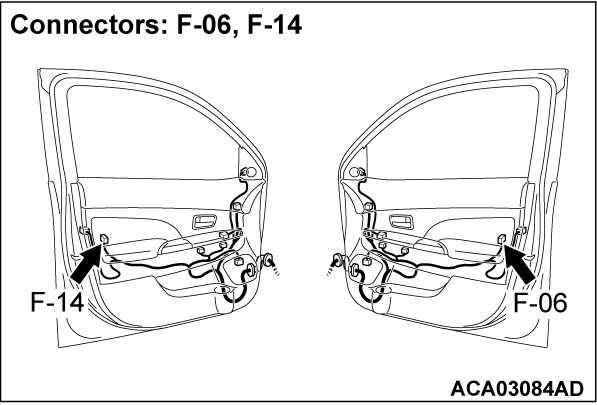
STEP 2. Check front door lock actuator (LH) connector F-14 for loose, corroded or damaged terminals, or terminals pushed back in the connector.
Is the front door lock actuator (LH) connector F-14 in good condition?
STEP 3. Check the front door lock actuator (LH).
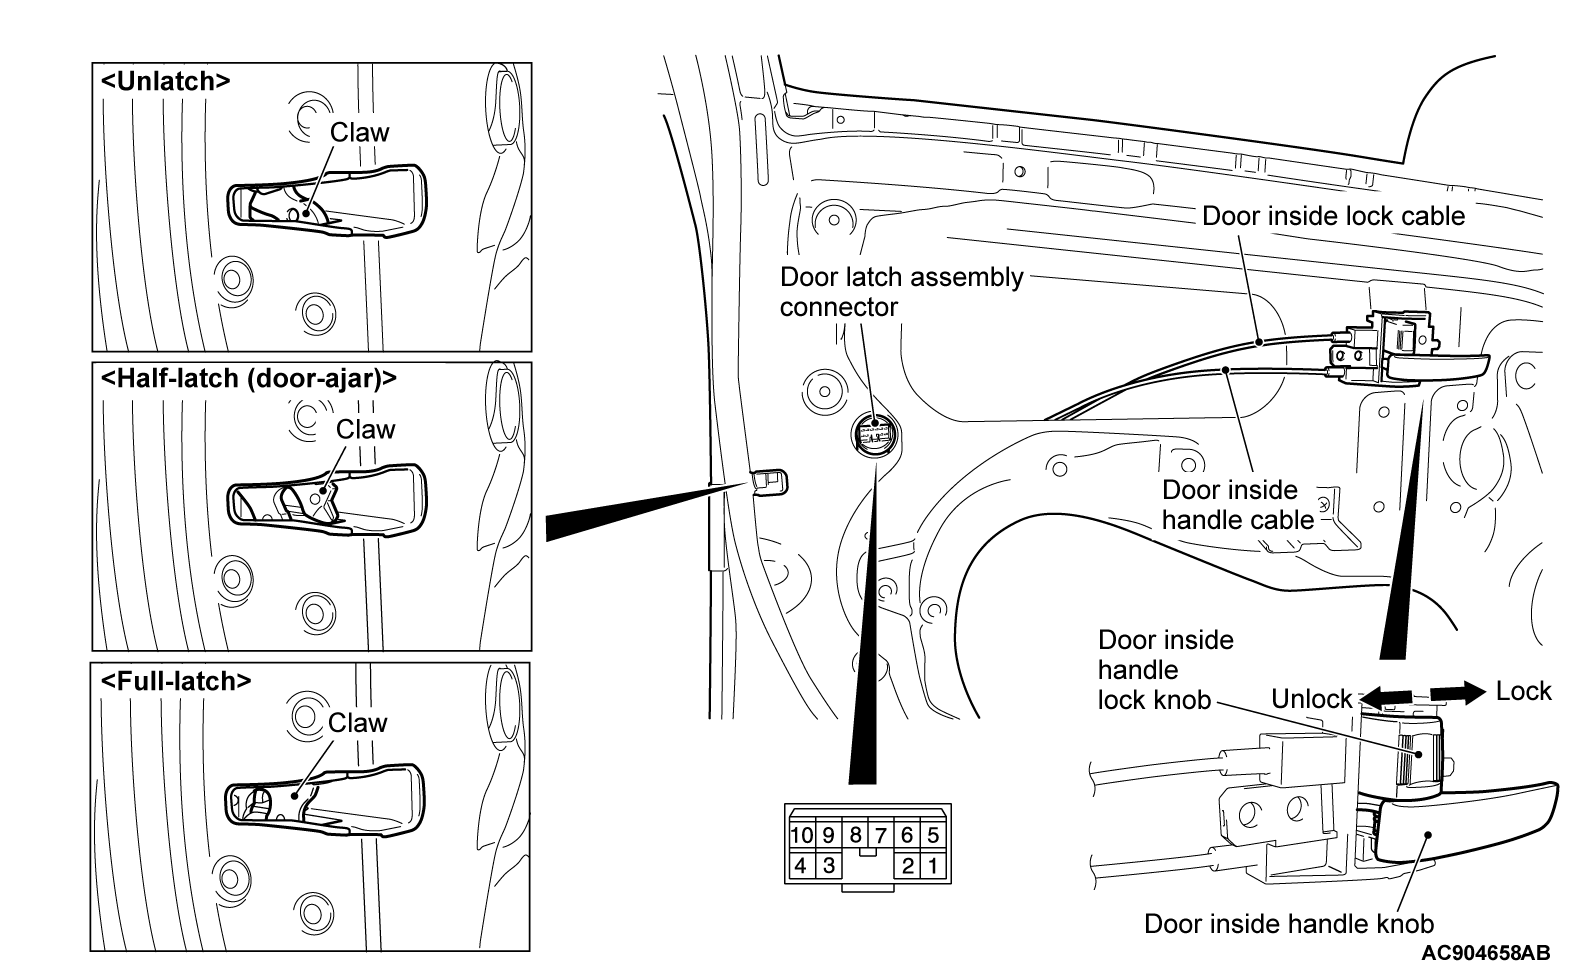
Check the front door lock actuator (LH). Refer to  .
.
 Replace the front door lock actuator (LH). Verify that all the doors and the liftgate can be locked and unlocked normally.
 .
.
|
Does the front door lock actuator (LH) work normally?
 Replace the front door lock actuator (LH). Verify that all the doors and the liftgate can be locked and unlocked normally.
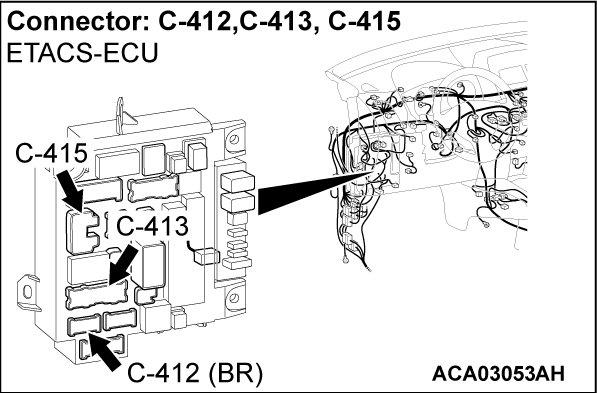
STEP 4. Check ETACS-ECU connector C-415 for loose, corroded or damaged terminals, or terminals pushed back in the connector.
Is ETACS-ECU connector C-415 in good condition?
STEP 5. Check the wiring harness between ETACS-ECU connector C-415 (terminals No. 2 and 6) and front door lock actuator (LH) connector F-14 (terminals No. 2 and 1).
- Check the power supply lines for open circuit and short circuit.
Is the wiring harness between ETACS-ECU connector C-415 (terminals No. 2 and 6) and front door lock actuator (LH) connector F-14 (terminals No. 2 and 1) in good condition?
 The wiring harness may be damaged or the connector(s) may have loose, corroded or damaged terminals, or terminals pushed back in the connector. Repair or replace the damaged component(s). Verify that all the doors and the liftgate can be locked and unlocked normally.
STEP 6. Check front door lock actuator (RH) connector F-06 for loose, corroded or damaged terminals, or terminals pushed back in the connector.
Is front door lock actuator (RH) connector F-06 in good condition?
STEP 7. Check the front door lock actuator (RH).
Check the front door lock actuator (RH). Refer to  .
.
 Replace the front door lock actuator (RH). Verify that all the doors and the liftgate can be locked and unlocked normally.
 .
.
|
Is the front door lock actuator (RH) normal?
 Replace the front door lock actuator (RH). Verify that all the doors and the liftgate can be locked and unlocked normally.
STEP 8. Check ETACS-ECU connector C-415 for loose, corroded or damaged terminals, or terminals pushed back in the connector.
Is ETACS-ECU connector C-415 in good condition?
STEP 9. Check the wiring harness between ETACS-ECU connector C-415 (terminals No. 5 and 6) and front door lock actuator (RH) connector F-06 (terminals No. 3 and 4).
- Check the power supply lines for open circuit and short circuit.
Is the wiring harness between ETACS-ECU connector C-415 (terminals No. 5 and 6) and front door lock actuator (RH) connector F-06 (terminals No. 3 and 4) in good condition?
 The wiring harness may be damaged or the connector(s) may have loose, corroded or damaged terminals, or terminals pushed back in the connector. Repair the wiring harness as necessary. Verify that all the doors and the liftgate can be locked and unlocked normally.
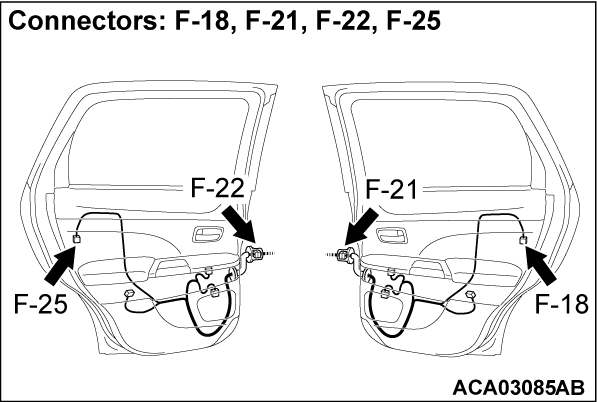
STEP 10. Check rear door lock actuator (RH) connector F-18 for loose, corroded or damaged terminals, or terminals pushed back in the connector.
Is rear door lock actuator (RH) connector F-18 in good condition?
STEP 11. Check the rear door lock actuator (RH).
Check the rear door lock actuator (RH). Refer to  .
.
 Replace the rear door lock actuator (RH). Verify that all the doors and the liftgate can be locked and unlocked normally.
 .
.
|
Is the rear door lock actuator (RH) normal?
 Replace the rear door lock actuator (RH). Verify that all the doors and the liftgate can be locked and unlocked normally.
STEP 12. Check ETACS-ECU connector C-413 for loose, corroded or damaged terminals, or terminals pushed back in the connector.
Is ETACS-ECU connector C-413 in good condition?
STEP 13. Check the wiring harness between ETACS-ECU connector C-413 (terminals No. 6 and 9) and rear door lock actuator (RH) connector F-18 (terminals No. 3 and 4).
- Check the power supply lines for open circuit and short circuit.
Is the wiring harness between ETACS-ECU connector C-413 (terminals No. 6 and 9) and rear door lock actuator (RH) connector F-18 (terminals No. 3 and 4) in good condition?
 The wiring harness may be damaged or the connector(s) may have loose, corroded or damaged terminals, or terminals pushed back in the connector. Repair the wiring harness as necessary. Verify that all the doors and the liftgate can be locked and unlocked normally.
STEP 14. Check rear door lock actuator (LH) connector F-25 for loose, corroded or damaged terminals, or terminals pushed back in the connector.
Is rear door lock actuator (LH) connector F-25 in good condition?
STEP 15. Check the rear door lock actuator (LH).
Check the rear door lock actuator (LH). Refer to  .
.
 Replace the rear door lock actuator (LH). Verify that all the doors and the liftgate can be locked and unlocked normally.
 .
.
|
Is the rear door lock actuator (LH) normal?
 Replace the rear door lock actuator (LH). Verify that all the doors and the liftgate can be locked and unlocked normally.
STEP 16. Check ETACS-ECU connector C-413 for loose, corroded or damaged terminals, or terminals pushed back in the connector.
Is ETACS-ECU connector C-413 in good condition?
STEP 17. Check the wiring harness between ETACS-ECU connector C-413 (terminals No. 6 and 9) and rear door lock actuator (LH) connector F-25 (terminals No. 2 and 1).
- Check the power supply lines for open circuit and short circuit.
Is the wiring harness between ETACS-ECU connector C-413 (terminals No. 6 and 9) and rear door lock actuator (LH) connector F-25 (terminals No. 2 and 1) in good condition?
 The wiring harness may be damaged or the connector(s) may have loose, corroded or damaged terminals, or terminals pushed back in the connector. Repair the wiring harness as necessary. Verify that all the doors and the liftgate can be locked and unlocked normally.
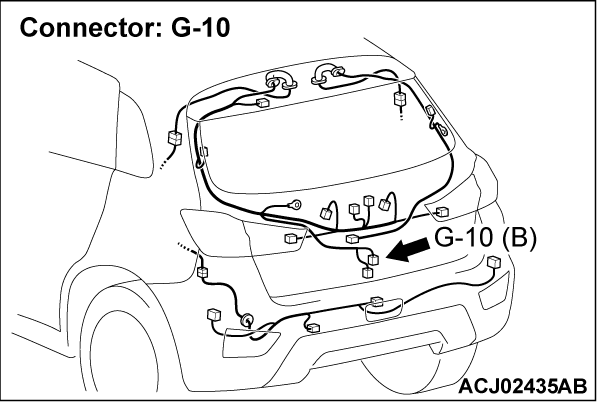
STEP 18. Check liftgate lock actuator connector G-10 for loose, corroded or damaged terminals, or terminals pushed back in the connector.
Is liftgate lock actuator connector G-10 in good condition?
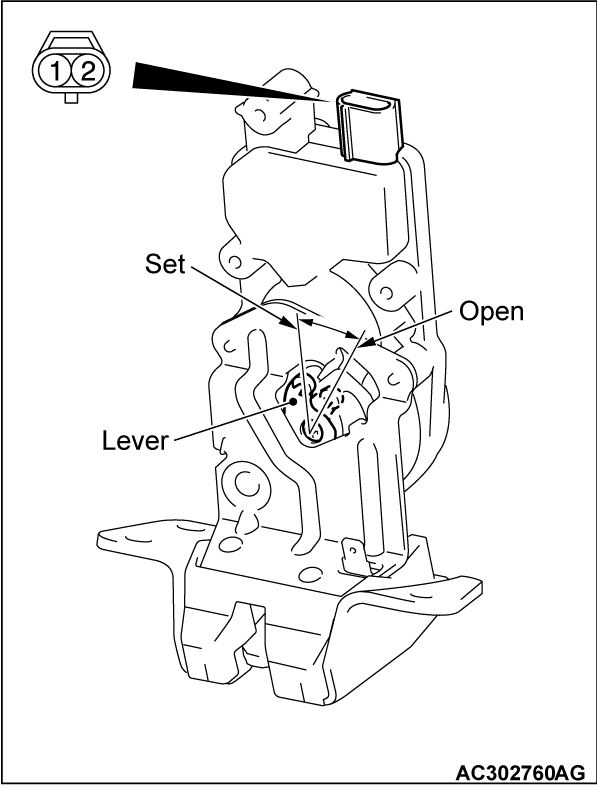
STEP 19. Check the liftgate lock actuator.
Remove the liftgate lock actuator (Refer to  ).
).
 Replace the liftgate lock actuator. Verify that all the doors and the liftgate can be locked and unlocked normally.
 ).
).
|
Is the liftgate lock actuator normal?
 Replace the liftgate lock actuator. Verify that all the doors and the liftgate can be locked and unlocked normally.
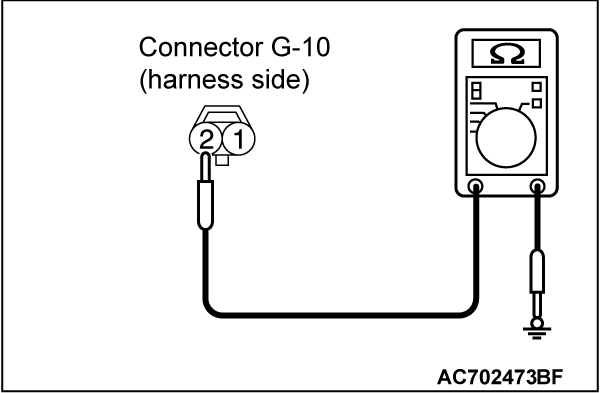
STEP 20. Check the ground circuit to the liftgate lock actuator. Measure the resistance at liftgate lock actuator connector G-10.
(1) Disconnect liftgate lock actuator connector G-10 and measure the resistance on the wiring harness side of the connector.
(2) Measure the resistance value between terminal 2 and ground.
- The resistance should be 2 ohms or less.
Is the measured resistance 2 ohms or less?
STEP 21. Check the wiring harness between liftgate lock actuator connector G-10 (terminal No. 2) and ground.
- Check the ground line for open circuit and short circuit.
Is the wiring harness between liftgate lock actuator connector G-10 (terminal No. 2) and ground in good condition?
 No action is necessary and testing is complete.
 The wiring harness may be damaged or the connector(s) may have loose, corroded or damaged terminals, or terminals pushed back in the connector. Repair the wiring harness as necessary. Verify that all the doors and the liftgate can be locked and unlocked normally.
STEP 22. Check ETACS-ECU connector C-413 for loose, corroded or damaged terminals, or terminals pushed back in the connector.
Is ETACS-ECU connector C-413 in good condition?
STEP 23. Check the wiring harness between ETACS-ECU connector C-413 (terminal No. 1) and liftgate lock actuator connector G-10 (terminal No. 1).
- Check the signal line for open circuit and short circuit.
Is the wiring harness between ETACS-ECU connector C-413 (terminal No. 1) and liftgate lock actuator connector G-10 (terminal No. 1) in good condition?
 The wiring harness may be damaged or the connector(s) may have loose, corroded or damaged terminals, or terminals pushed back in the connector. Repair the wiring harness as necessary. Verify that all the doors and the liftgate can be locked and unlocked normally.
STEP 24. Retest the system.
Check that the central door locking system works normally. No action is necessary and testing is complete.
 Replace the ETACS-ECU. Check that the central door locking system normally.
Is the check result normal?
 No action is necessary and testing is complete.
 Replace the ETACS-ECU. Check that the central door locking system normally.
![[Previous]](../../../buttons/fprev.png)
![[Next]](../../../buttons/fnext.png)
