DTC 15: Cruise Control Switch System.
CIRCUIT OPERATION
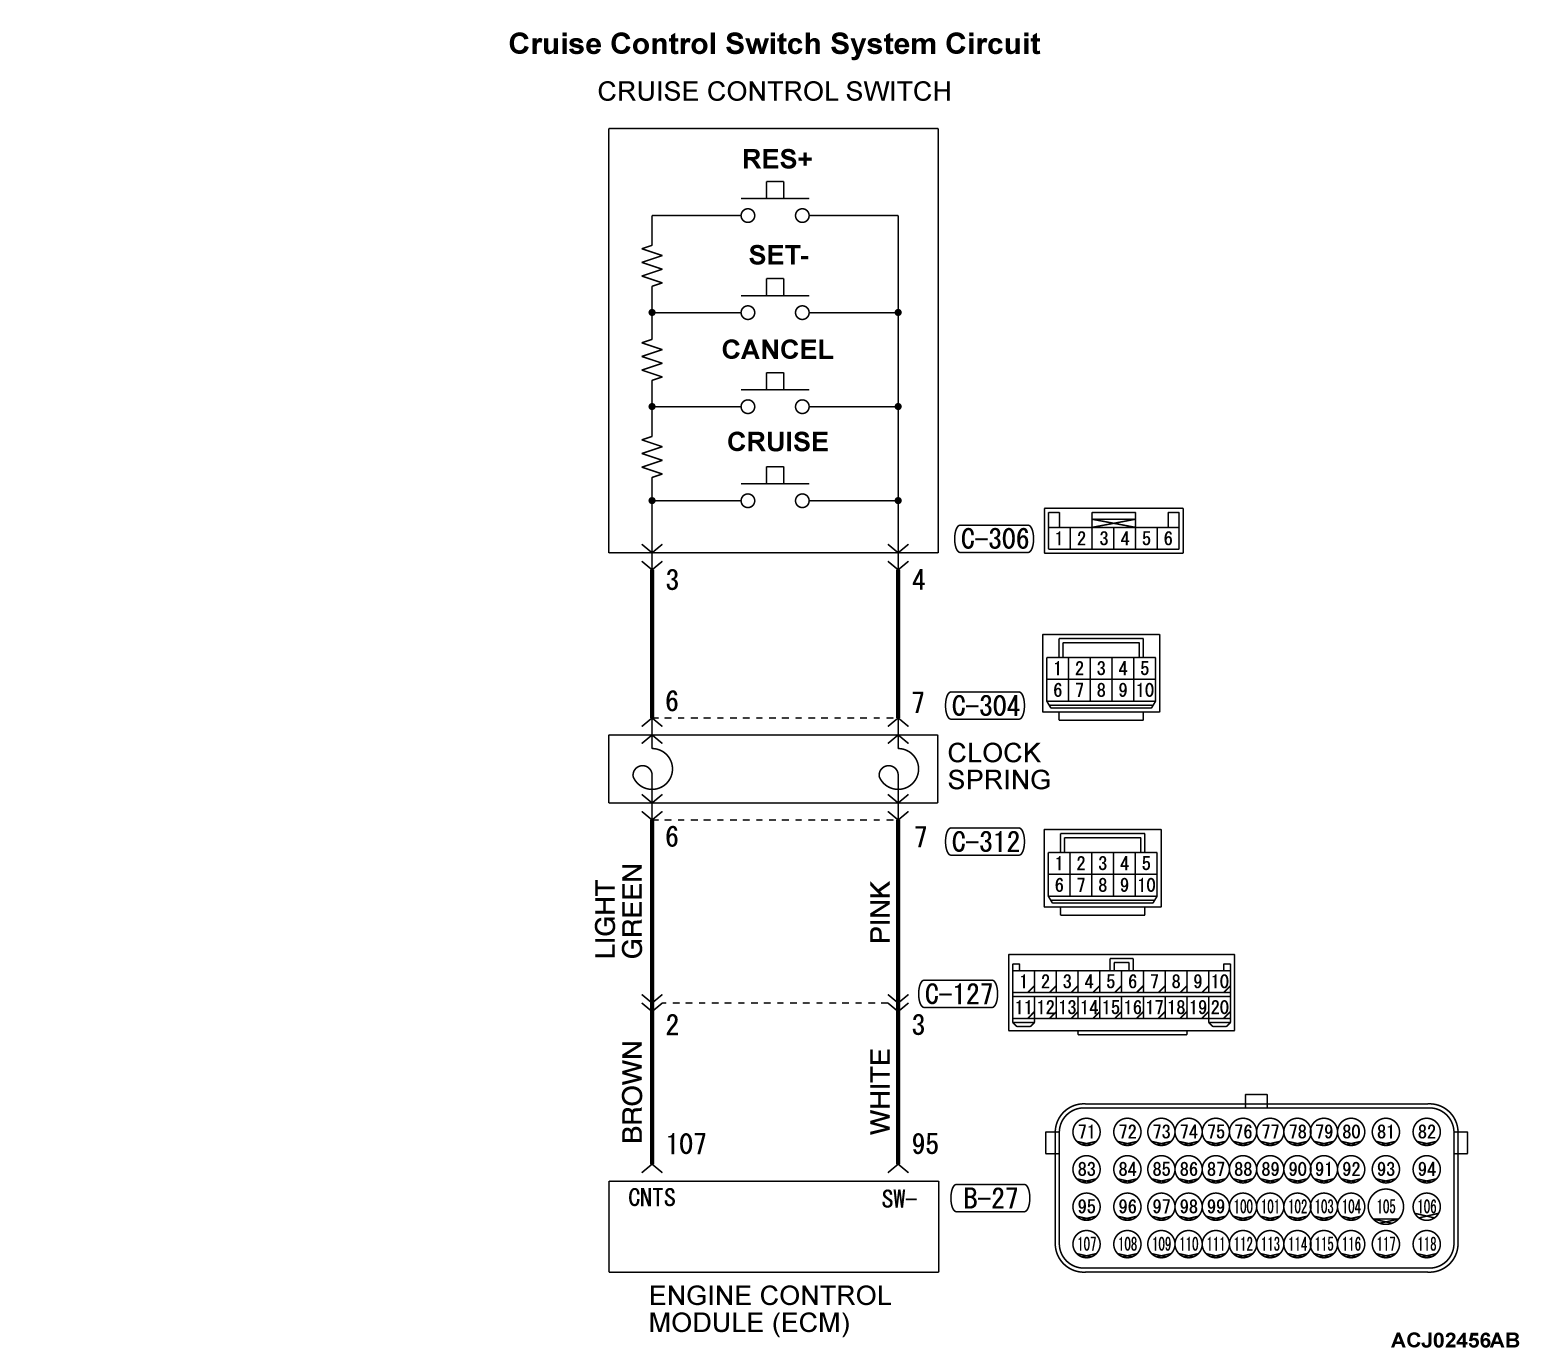
This circuit judges the signals of each switch ("CRUISE ON/OFF", "CANCEL", "SET-" and "RES+") of the cruise control switch. The ECM detects the state of the cruise control switch by sensing the voltages shown below.
- When all switches are released: 4.7 - 5.0 volts
- When the "CRUISE ON/OFF" switch is pressed: 0 - 0.5 volt
- When the "CANCEL" switch is pressed: 1.0 - 1.8 volts
- When the "SET-" switch is pressed: 2.3 - 3.0 volts
- When the "RES+" switch is pressed: 3.5 - 4.2 volts
DTC SET CONDITIONS
Check Condition
- The "CRUISE" indicator light illuminates.
Judgment Criteria
- This DTC is set when the ECM terminal voltage is different from the standard value.
- Or, this DTC is set when the "SET-" switch or "RES+" switch is stuck to ON.
TROUBLESHOOTING HINTS (THE MOST LIKELY CAUSES FOR THIS CASE: )
- Damaged harness or connector.
- Malfunction of the cruise control switch.
- Malfunction of the clock spring.
- Malfunction of the ECM.
DIAGNOSIS
STEP 1. Using scan tool MB991958, check the data list item 75: Cancel switch, item 86: Main switch, item 91: Resume switch and item 92: Set switch.
(1)
| caution | To prevent damage to scan tool MB991958, always turn the ignition switch to the "LOCK" (OFF) position before connecting or disconnecting scan tool MB991958. |
(2) Turn the ignition switch to the "ON" position.
(3) Set scan tool MB991958 to data reading mode for cruise control system (Refer to  ).
).
 ).
).- Item 75: Cancel switch.
- When "CANCEL" switch is pressed, the display on scan tool MB991958 should be "ON".
- When "CANCEL" switch is released, the display on scan tool MB991958 should be "OFF".
- Item 86: Main switch.
- When "CRUISE ON/OFF" switch is pressed, the display on scan tool MB991958 should be "ON".
- When "CRUISE ON/OFF" switch is pressed again, the display on scan tool MB991958 should be "OFF".
- Item 91: Resume switch.
- When "RES+" switch is pressed, the display on scan tool MB991958 should be "ON".
- When "RES+" switch is released, the display on scan tool MB991958 should be "OFF".
- Item 92: Set switch.
- When "SET-" switch is pressed, the display on scan tool MB991958 should be "ON".
- When "SET-" switch is released, the display on scan tool MB991958 should be "OFF".
Is the switch operating properly?
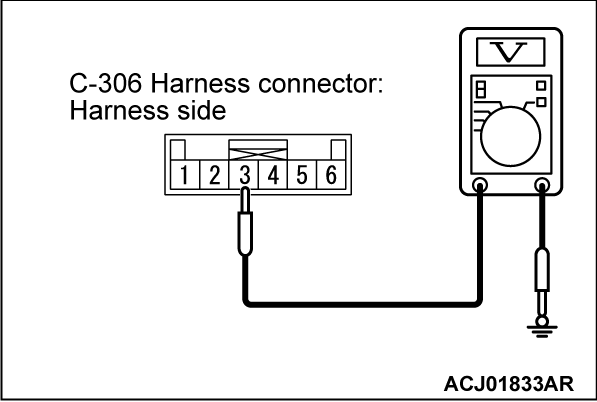
STEP 2. Measure the power supply voltage at cruise control switch connector C-306 by backprobing.
(1) Remove the cruise control switch from the steering wheel with the cruise control switch connector connected (Refer to  ).
).
 ).
).(2) Connect the negative (-) battery terminal that was disconnected when the driver's air bag module was removed.
(3) Do not disconnect cruise control switch connector C-306.
(4) Turn the ignition switch to the "ON" position.
(5) Do not operate the cruise control switch.
(6) Measure the power supply voltage between cruise control switch connector C-306 terminal number 3 and body ground by backprobing.
Is the measured voltage between 4.7 and 5.0 volts?
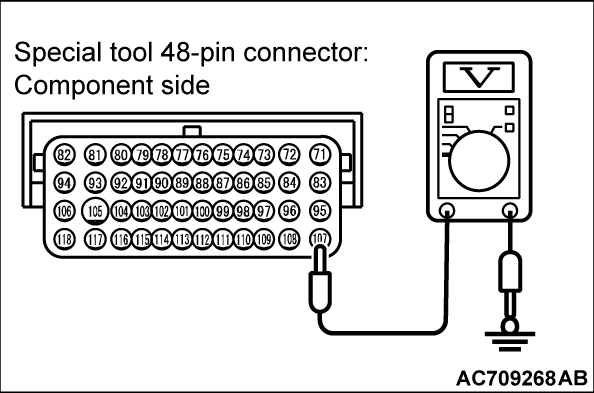
STEP 3. Measure the power supply voltage at ECM connector B-27.
(1) Remove the ECM [Refer to GROUP 13A, Engine Control Module (ECM)  ] <2.0L ENGINE> or [Refer to GROUP 13C, Engine Control Module (ECM)
  ] <2.4L ENGINE>.
 ] <2.0L ENGINE> or [Refer to GROUP 13C, Engine Control Module (ECM)
  ] <2.4L ENGINE>.
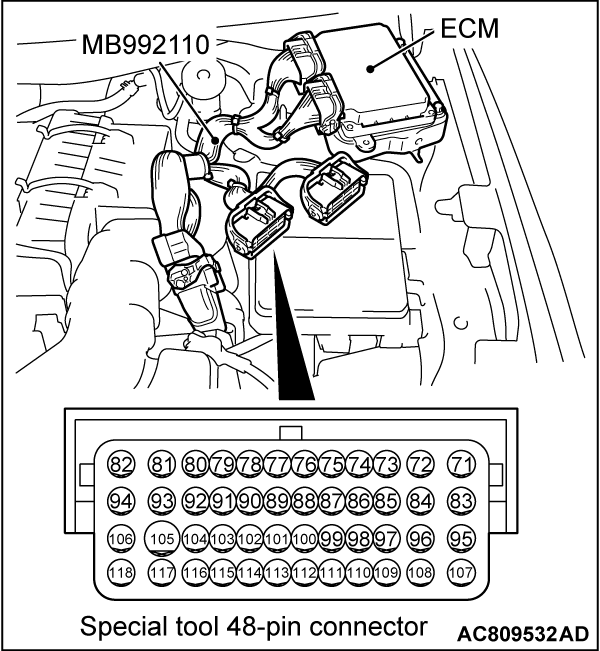
(2) Connect special tool MB992110 between the ECM and the body-side harness connector.
(3) Turn the ignition switch to the "ON" position.
(4) Do not operate the cruise control switch.
(5) Measure the power supply voltage between special tool 48-pin connector terminal number 107 (ECM connector B-27 terminal number 107) and body ground.
Is the measured voltage between 4.7 and 5.0 volts?
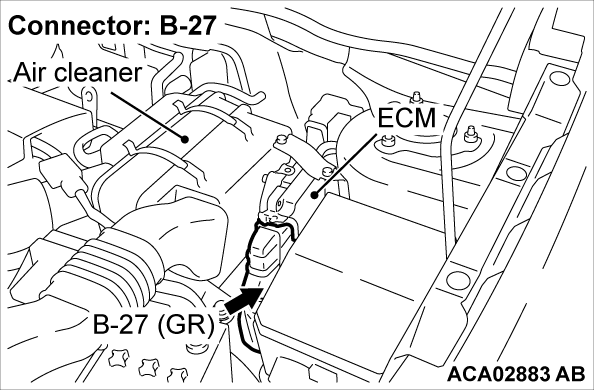
STEP 4. Check ECM connector B-27 for loose, corroded or damaged terminals, or terminals pushed back in the connector.
Refer to GROUP 00E, Harness Connector Inspection  .
.
 .
.Are the connector and terminals in good condition?
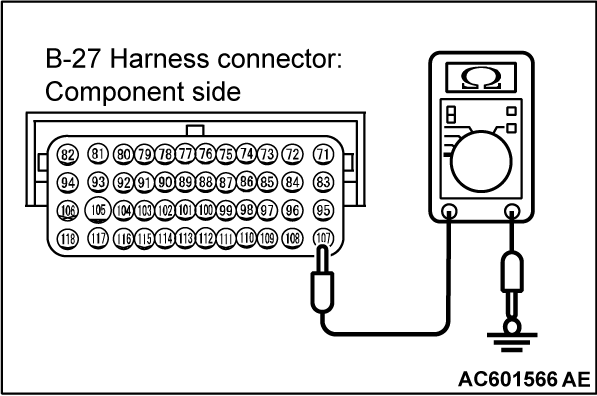
STEP 5. Check the harness wire for short circuit to body ground between the ECM connector B-27 terminal number 107 and the cruise control switch connector C-306 terminal number 3.
(1) Disconnect ECM connector B-27 and measure at the harness connector side [Refer to GROUP 13A, Engine Control Module (ECM)  ] <2.0L ENGINE> or [Refer to GROUP 13C, Engine Control Module (ECM)
  ] <2.4L ENGINE>.
 ] <2.0L ENGINE> or [Refer to GROUP 13C, Engine Control Module (ECM)
  ] <2.4L ENGINE>.
(2) Turn the ignition switch to the "LOCK" (OFF) position.
(3) Measure the continuity between ECM connector B-27 terminal number 107 and body ground.
Is the measured continuity open circuit?
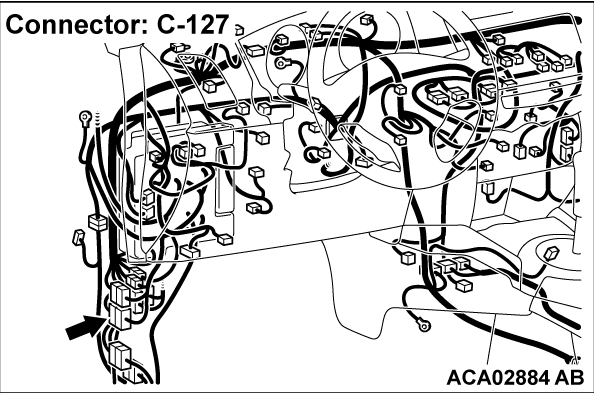
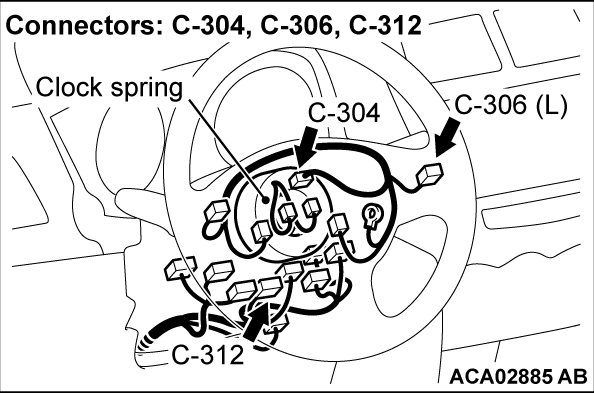
STEP 6. Check intermediate connector C-127, cruise control switch connector C-306, and clock spring connectors C-304 and C-312, for loose, corroded or damaged terminals, or terminals pushed back in the connector.
Refer to GROUP 00E, Harness Connector Inspection  .
.
 .
.Are the connectors and terminals in good condition?
STEP 7. Check the harness wire between ECM connector B-27 terminal number 107 and clock spring connector C-312 terminal number 6, and between clock spring connector C-304 terminal number 6 and cruise control switch connector C-306 terminal number 3, for damage.
Check harness wire for short circuit and damage.
Are the harness wires in good condition?
STEP 8. Check the clock spring.
STEP 10. Check ECM connector B-27, intermediate connector C-127, cruise control switch connector C-306, and clock spring connectors C-304 and C-312, for loose, corroded or damaged terminals, or terminals pushed back in the connector.
Refer to GROUP 00E, Harness Connector Inspection  .
.
 .
.Are the connectors and terminals in good condition?
STEP 11. Check the harness wire between ECM connector B-27 terminal number 107 and clock spring connector C-312 terminal number 6, and between clock spring connector C-304 terminal number 6 and cruise control switch connector C-306 terminal number 3, for damage.
Check harness wire for open circuit and damage.
Are the harness wires in good condition?
STEP 12. Check the clock spring.
STEP 13. Using scan tool MB991958, check data list item 75: Cancel switch, item 86: Main switch, item 91: Resume switch and item 92: Set switch.
(2) Turn the ignition switch to the "ON" position.
(3) Set scan tool MB991958 to data reading mode for cruise control system (Refer to  .)
.)
 .)
.)- Item 75: Cancel switch.
- When "CANCEL" switch is pressed, the display on scan tool MB991958 should be "ON".
- When "CANCEL" switch is released, the display on scan tool MB991958 should be "OFF".
- Item 86: Main switch.
- When "CRUISE ON/OFF" switch is pressed, the display on scan tool MB991958 should be "ON".
- When "CRUISE ON/OFF" switch is pressed again, the display on scan tool MB991958 should be "OFF".
- Item 91: Resume switch.
- When "RES+" switch is pressed, the display on scan tool MB991958 should be "ON".
- When "RES+" switch is released, the display on scan tool MB991958 should be "OFF".
- Item 92: Set switch.
- When "SET-" switch is pressed, the display on scan tool MB991958 should be "ON".
- When "SET-" switch is released, the display on scan tool MB991958 should be "OFF".
Is the switch operating properly?
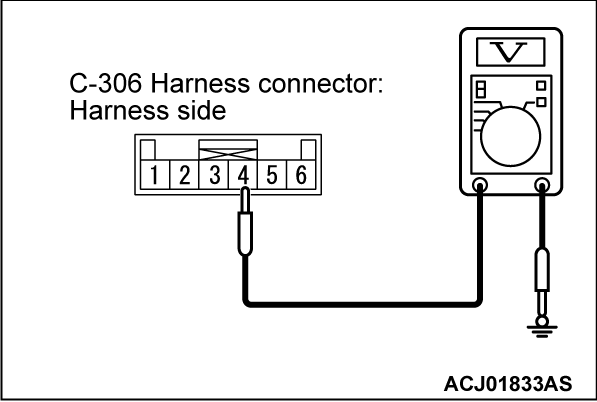
STEP 14. Measure the ground voltage at cruise control switch connector C-306 by backprobing.
(1) Remove the cruise control switch from the steering wheel with the cruise control switch connector connected (Refer to  .)
.)
 .)
.)(2) Connect the negative (-) battery terminal that was disconnected when the driver's air bag module was removed.
(3) Do not disconnect cruise control switch connector C-306.
(4) Turn the ignition switch to the "ON" position.
(5) Press and hold the "ON/OFF" switch, and measure the ground voltage between cruise control switch connector C-306 terminal number 4 and body ground by backprobing.
Is the measured voltage 0.5 volt or less?
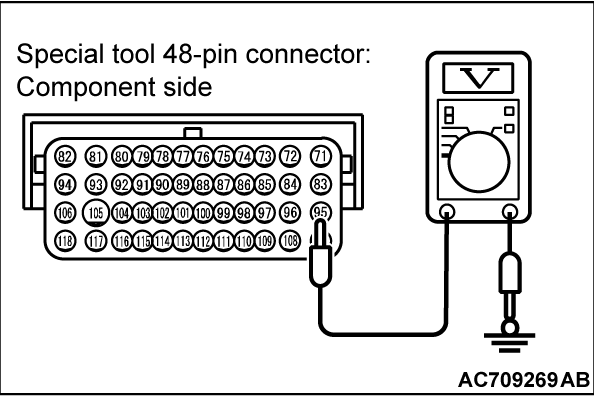
STEP 15. Measure the ground voltage at ECM connector B-27.
(1) Remove the ECM [Refer to GROUP 13A, Engine Control Module (ECM)  ] <2.0L ENGINE> or [Refer to GROUP 13C, Engine Control Module (ECM)
  ] <2.4L ENGINE>.
 ] <2.0L ENGINE> or [Refer to GROUP 13C, Engine Control Module (ECM)
  ] <2.4L ENGINE>.
(2) Connect special tool MB992110 between the ECM and the body-side harness connector.
(3) Turn the ignition switch to the "ON" position.
(4) Press and hold the "ON/OFF" switch, and measure the ground voltage between special tool 48-pin connector terminal number 95 (ECM connector B-27 terminal number 95) and body ground.
Is the measured voltage 0.5 volt or less?
STEP 16. Check ECM connector B-27 for loose, corroded or damaged terminals, or terminals pushed back in the connector.
Refer to GROUP 00E, Harness Connector Inspection  .
.
 .
.Are the connector and terminals in good condition?
STEP 17. Check intermediate connector C-127, cruise control switch connector C-306, and clock spring connectors C-304 and C-312, for loose, corroded or damaged terminals, or terminals pushed back in the connector.
Refer to GROUP 00E, Harness Connector Inspection  .
.
 .
.Are the connectors and terminals in good condition?
STEP 18. Check the harness wire between cruise control switch connector C-306 terminal number 4 and clock spring connector C-304 terminal number 7, and between clock spring connector C-312 terminal number 7 and ECM connector B-27 terminal number 95, for damage.
Check harness wire for open circuit and damage.
Are the harness wires in good condition?
STEP 19. Check the clock spring.
STEP 20. Check ECM connector B-27, intermediate connector C-127, cruise control switch connector C-306, and clock spring connectors C-304 and C-312, for loose, corroded or damaged terminals, or terminals pushed back in the connector.
Refer to GROUP 00E, Harness Connector Inspection  .
.
 .
.Are the connectors and terminals in good condition?
STEP 21. Check the harness wire between cruise control switch connector C-306 terminal number 4 and clock spring connector C-304 terminal number 7, and between clock spring connector C-312 terminal number 7 and ECM connector B-27 terminal number 95, for damage.
Check harness wire for short circuit and damage.
Are the harness wires in good condition?
STEP 22. Check the clock spring.
STEP 24. Using scan tool MB991958, check data list item 75: Cancel switch, item 86: Main switch, item 91: Resume switch and item 92: Set switch.
(2) Turn the ignition switch to the "ON" position.
(3) Set scan tool MB991958 to data reading mode for cruise control system (Refer to  .)
.)
 .)
.)- Item 75: Cancel switch.
- When "CANCEL" switch is pressed, the display on scan tool MB991958 should be "ON".
- When "CANCEL" switch is released, the display on scan tool MB991958 should be "OFF".
- Item 86: Main switch.
- When "CRUISE ON/OFF" switch is pressed, the display on scan tool MB991958 should be "ON".
- When "CRUISE ON/OFF" switch is pressed again, the display on scan tool MB991958 should be "OFF".
- Item 91: Resume switch.
- When "RES+" switch is pressed, the display on scan tool MB991958 should be "ON".
- When "RES+" switch is released, the display on scan tool MB991958 should be "OFF".
- Item 92: Set switch.
- When "SET-" switch is pressed, the display on scan tool MB991958 should be "ON".
- When "SET-" switch is released, the display on scan tool MB991958 should be "OFF".
Is the switch operating properly?
STEP 25. Read the cruise control system DTC.
(1) Disconnect the negative (-) battery terminal, to erase the DTC of the cruise control system.
(2) Connect the negative (-) battery terminal.
(3) Turn the ignition switch to the "ON" position, and press the "CRUISE ON/OFF" switch to turn the cruise control system to ON (turn on the "CRUISE" indicator light.)
(4) After turning the cruise control system to ON, when 2 minutes or more has elapsed without operating the cruise control switches, read the DTC of the cruise control system (Refer to  .)
.)
 .)
.)Is DTC 15 set?
STEP 26. Using scan tool MB991958, check data list item 75: Cancel switch, item 86: Main switch, item 91: Resume switch and item 92: Set switch.
(2) Turn the ignition switch to the "ON" position.
(3) Set scan tool MB991958 to data reading mode for cruise control system (Refer to  .)
.)
 .)
.)- Item 75: Cancel switch.
- When "CANCEL" switch is pressed, the display on scan tool MB991958 should be "ON".
- When "CANCEL" switch is released, the display on scan tool MB991958 should be "OFF".
- Item 86: Main switch.
- When "CRUISE ON/OFF" switch is pressed, the display on scan tool MB991958 should be "ON".
- When "CRUISE ON/OFF" switch is pressed again, the display on scan tool MB991958 should be "OFF".
- Item 91: Resume switch.
- When "RES+" switch is pressed, the display on scan tool MB991958 should be "ON".
- When "RES+" switch is released, the display on scan tool MB991958 should be "OFF".
- Item 92: Set switch.
- When "SET-" switch is pressed, the display on scan tool MB991958 should be "ON".
- When "SET-" switch is released, the display on scan tool MB991958 should be "OFF".
Is the switch operating properly?
STEP 27. Read the cruise control system DTC.
(1) Disconnect the negative (-) battery terminal, to erase the DTC of the cruise control system.
(2) Connect the negative (-) battery terminal.
(3) Turn the ignition switch to the "ON" position, and press the "CRUISE ON/OFF" switch to turn the cruise control system to ON (turn on the "CRUISE" indicator light.)
(4) After turning the cruise control system to ON, when 2 minutes or more has elapsed without operating the cruise control switches, read the DTC of the cruise control system (Refer to  .)
.)
 .)
.)Is DTC 15 set?
 The procedure is complete.
![[Previous]](../../../buttons/fprev.png)
![[Next]](../../../buttons/fnext.png)
