[Previous][Next]
REMOVAL AND INSTALLATION
 
 
dangerWhen servicing the high voltage system parts, always shut off the high voltage by removing the service plug (Refer to GROUP 54Da - Precautions on how to use the high-voltage vehicle ).
Pre-removal and post-installation operation
Discharging and Recharging refrigerant (Refer to .)
 
 
<EXCEPT VEHICLES FOR MEXICO>
 
 
<VEHICLES FOR MEXICO>
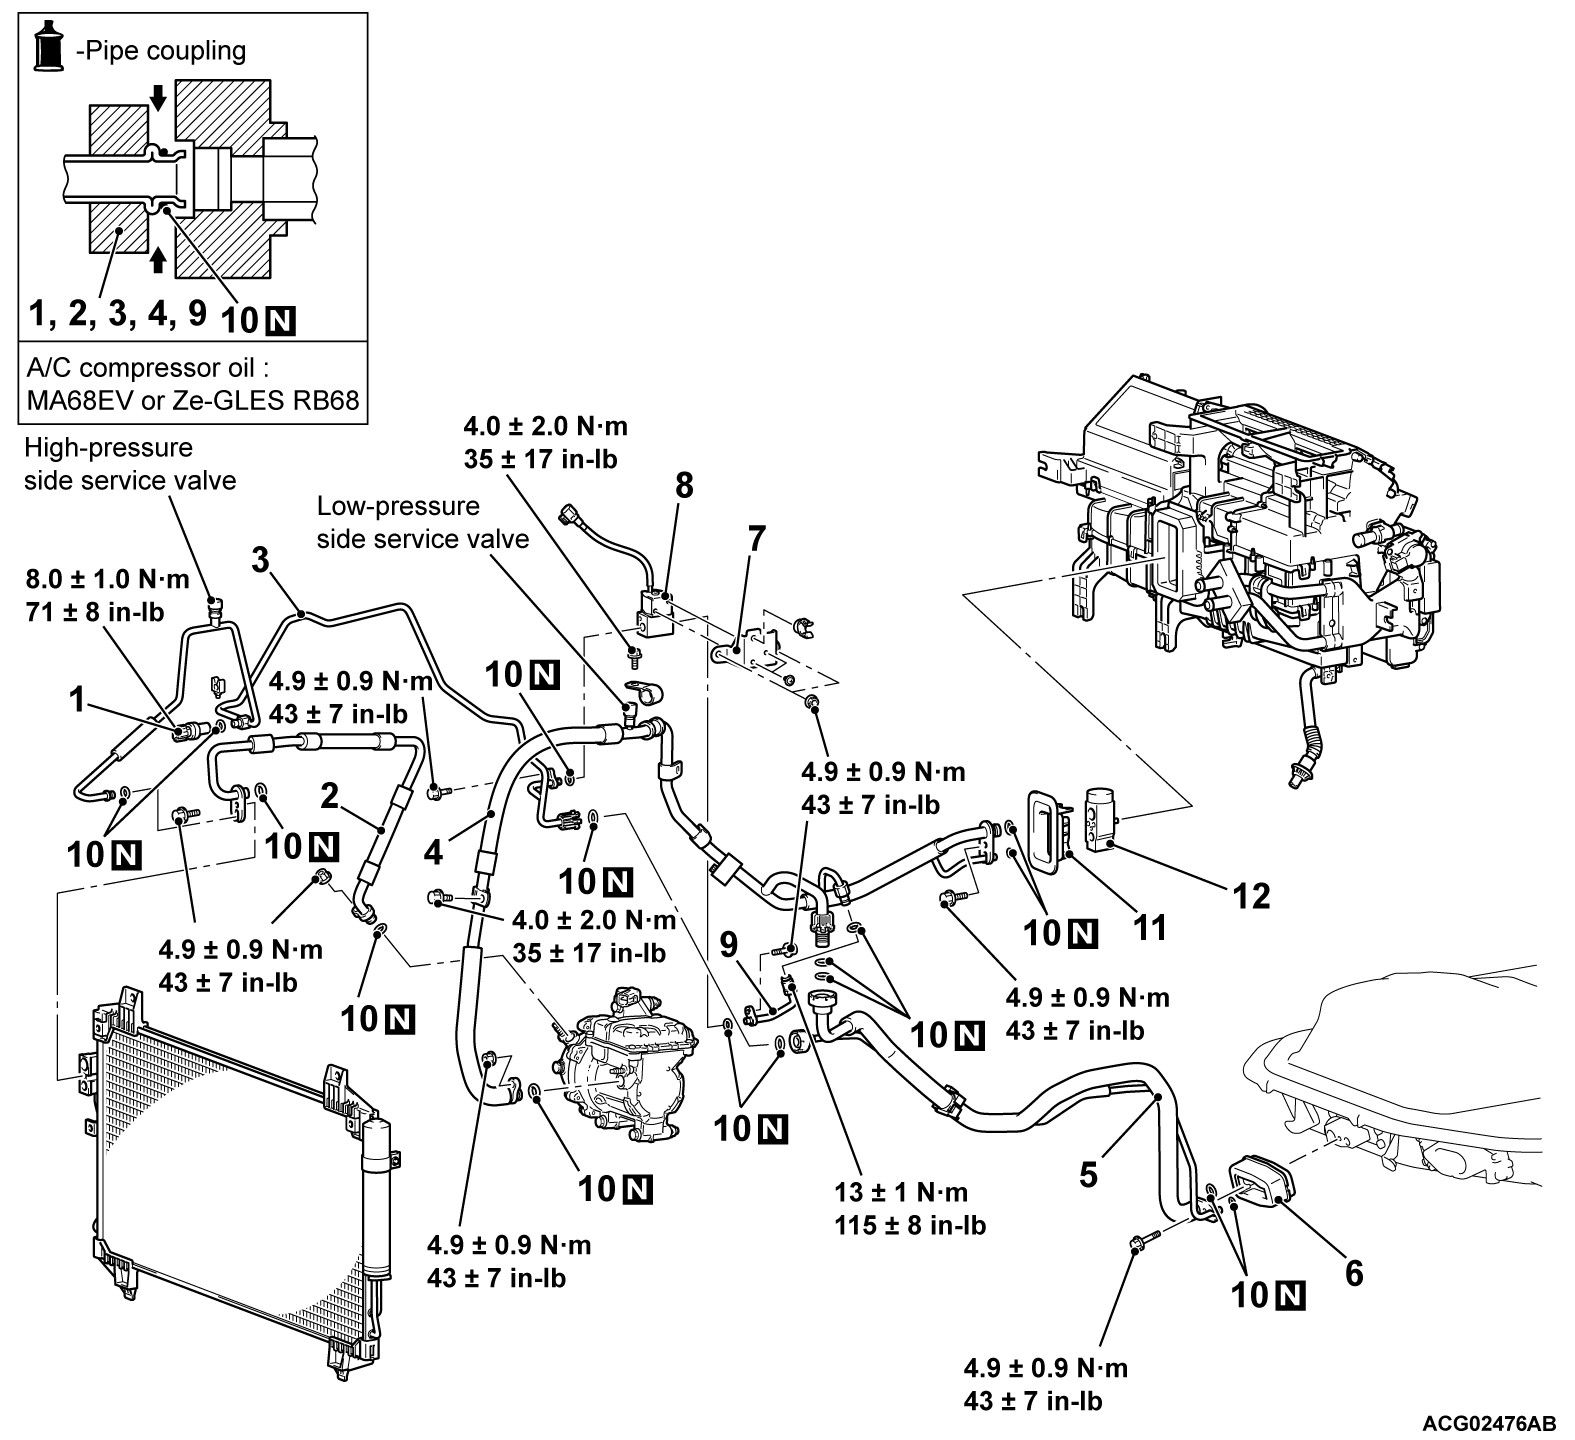
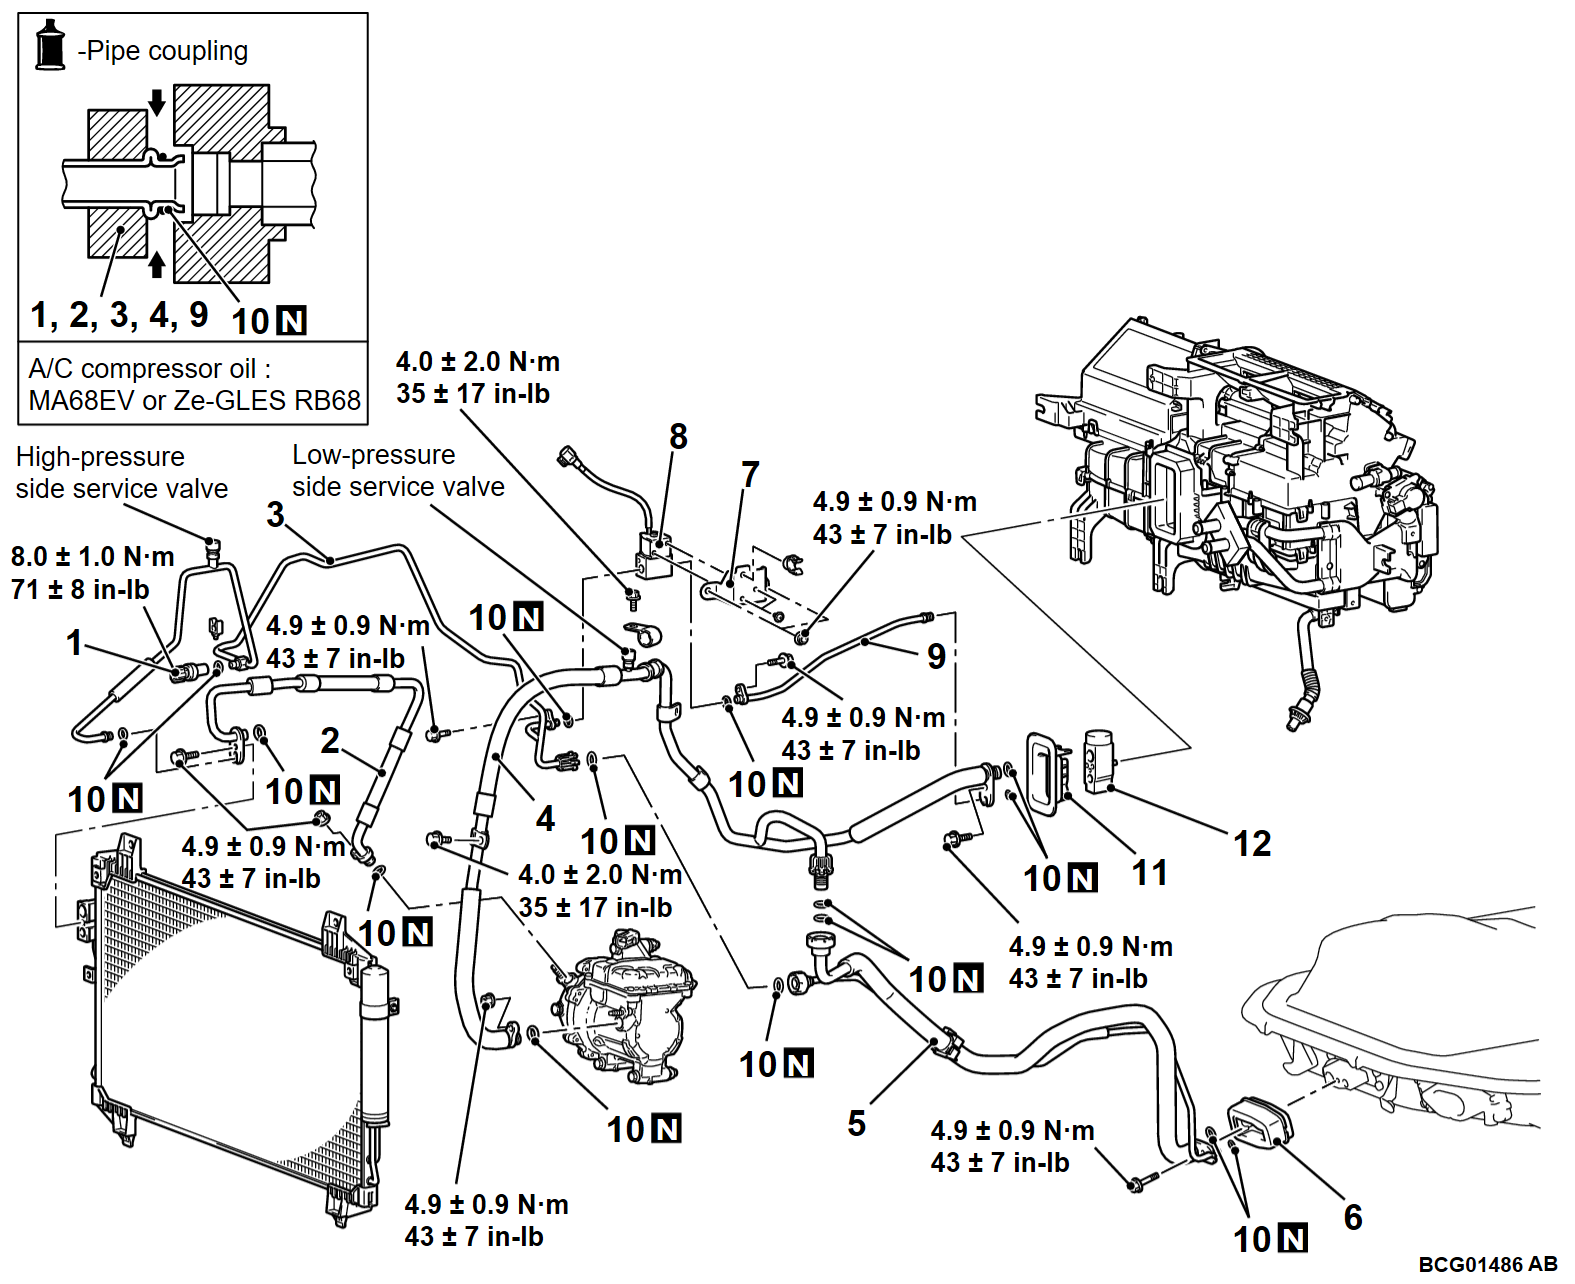
A/C pressure sensor removal steps
<<A>>1.A/C pressure sensor
<<A>>10.O-ring
A/C compressor discharge hose removal steps
Air Cleaner Intake Duct Removal and Installation (Refer to GROUP 15 - Air Cleaner ).
Headlight support panel upper (Refer to GROUP 51 - Radiator Grille ).
<<A>>>>B<<2.A/C compressor discharge hose
<<A>>10.O-ring
A/C condenser outlet pipe and A/C compressor suction hose removal steps
Dash panel heat protector (Refer to GROUP 42A - Loose Panel ).
<<B>>>>A<<3.A/C condenser outlet pipe A
<<B>>>>A<<4.A/C compressor suction hose
<<B>>>>A<<5.Battery cool pipe assembly
<<A>>6.Expansion valve cover assembly
<<A>>10.O-ring
A/C piping solenoid valve removal steps
Dash panel heat protector (Refer to GROUP 42A - Loose Panel ).
<<B>>>>A<<3.A/C condenser outlet pipe A
<<A>>10.O-ring
<<A>>9.A/C condenser outlet pipe B (at heater assembly side)
<<A>>10.O-ring
<<A>>7.A/C piping solenoid valve assembly
<<A>>8.A/C piping solenoid valve
Expansion valve removal steps
Dash panel heat protector (Refer to GROUP 42A - Loose Panel ).
<<B>>>>A<<4.A/C compressor suction hose connection (at heater assembly side)
<<A>>10.O-ring
<<A>>9.A/C condenser outlet pipe B connection (at heater assembly side)
<<A>>10.O-ring
<<A>>11.Expansion valve cover
<<A>>12.Expansion valve
 
 
REMOVAL SERVICE POINTS
 
 
<<A>> A/C PRESSURE SENSOR/ PIPE / HOSE REMOVAL
caution
  • Use the plug which is not breathable because A/C compressor oil or receiver have high hygroscopicity.
  • For the compressor oil and installation oil for the piping O-ring, use the oil MA68EV or Ze-GLES RB68 dedicated for the A/C compressor EV24AN5. If an oil other then the MA68EV or Ze-GLES RB68 is used, even if it is only a small amount, the electric insulation is considerably deteriorated and a leakage may occur.
Plug the nipple of condenser, compressor, and expansion valve to prevent the entry of dust and dirt.


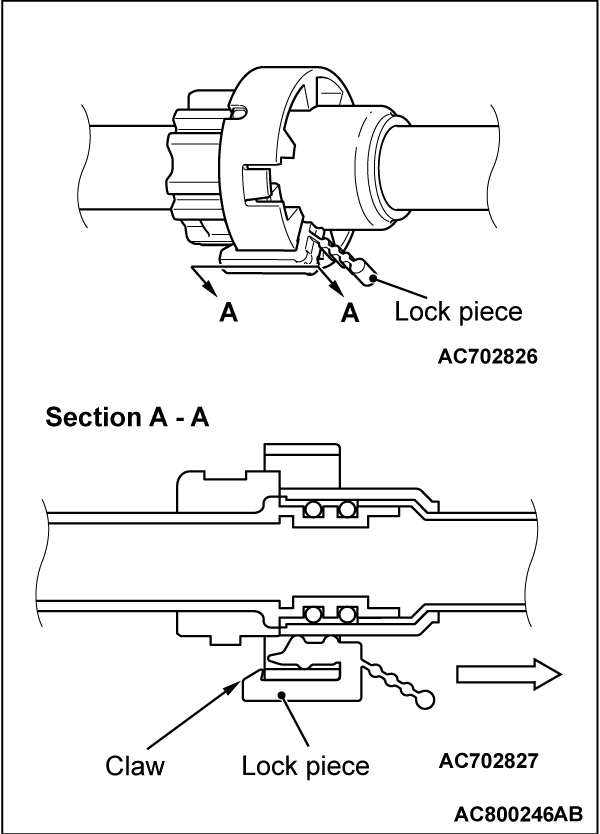
<<B>> A/C CONDENSER OUTLET PIPE A, B / A/C SUCTION HOSE / BATTERY COOL PIPE ASSEMBLY REMOVAL
caution
  • Use the plug which is not breathable because A/C compressor oil or receiver have high hygroscopicity.
  • For the compressor oil and installation oil for the piping O-ring, use the oil MA68EV or Ze-GLES RB68 dedicated for the A/C compressor EV24AN5. If an oil other then the MA68EV or Ze-GLES RB68 is used, even if it is only a small amount, the electric insulation is considerably deteriorated and a leakage may occur.
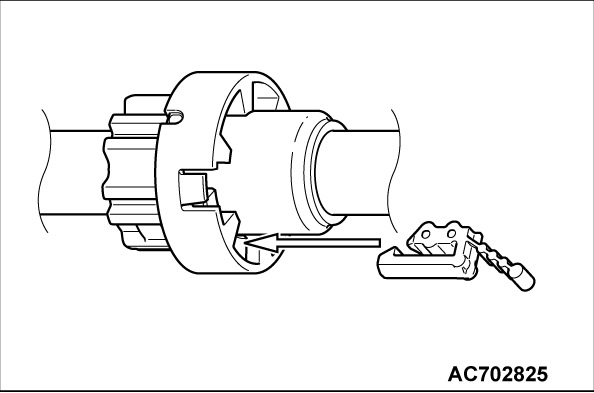
1. Raise the lock piece tab and pull it out to the direction of the arrow.
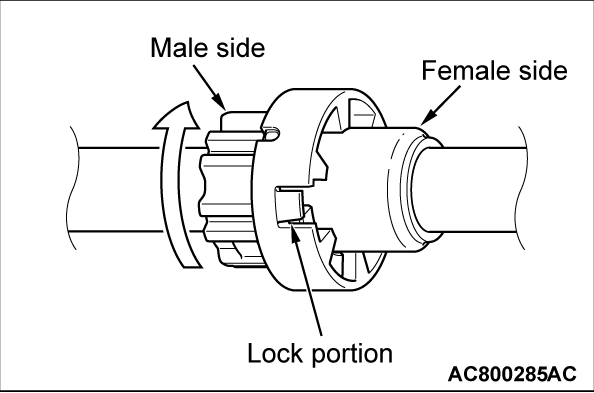
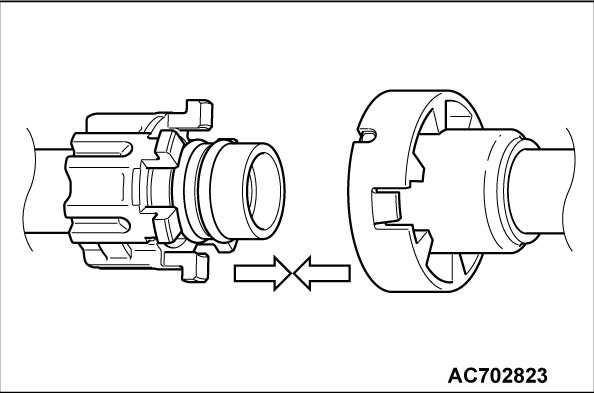
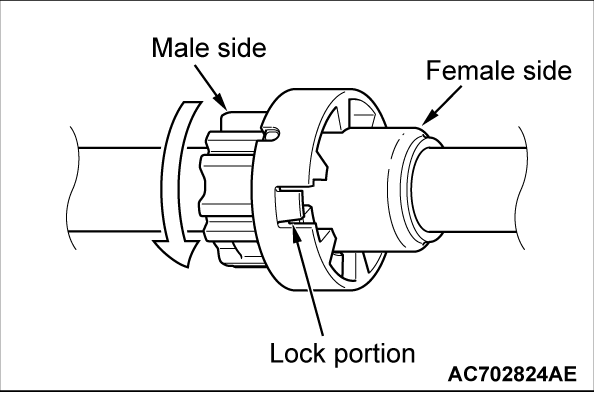
2. Raise the joint lock portion, rotate the male side to the direction of the arrow to unlock, and disconnect the pipe joint.


INSTALLATION SERVICE POINT
 
 
>>A<< A/C CONDENSER OUTLET PIPE A, B / A/C COMPRESSOR SUCTION HOSE / BATTERY COOL PIPE ASSEMBLY INSTALLATION
1. Connect the pipe and the joint.
2. Turn the male side to the direction of the arrow to lock.
3. Insert the lock piece to prevent reverse rotation.


>>B<< A/C COMPRESSOR DISCHARGE HOSE INSTALLATION
Assemble the clamp into the condenser assembly, and then assemble the A/C compressor discharge hose into the clamp.