[Previous][Next]
REMOVAL AND INSTALLATION
 
 
Post-installation Operation
  • Door Inside Handle Knob Play Check (Refer to GROUP 42A, Door Inside Handle Check ).
  • Learning Procedures of Power Window Fully Closed Position (Refer to GROUP 42A, On-Vehicle service ). <Driver’s door>
Front door trim removal steps
Tweeter connector
1.Front door sash trim
<<A>>2.Inside handle cover cap
<<B>>3.Door trim cap
<<C>>>>A<<4.Front door trim
5.Power window switch assembly
6.Power window switch panel
Power window switch connector
7.Power window switch
8.Remote-controlled mirror switch
9.Inside handle cover
10.Door beltline weatherstrip inner
11.Front door pull handle bracket
 
 
Rear door trim removal steps
<<A>>1.Inside handle cover cap
<<B>>2.Door trim cap
<<C>>>>A<<3.Rear door trim
4.Power window switch assembly
5.Power window switch panel
6.Power window switch
7.Inside handle cover
8.Door beltline weatherstrip inner
9.Rear door pull handle bracket
 
 
REMOVAL SERVICE POINTS
Required Special Tool:
  • MB990784: Ornament remover
 
 
<<A>> INSIDE HANDLE COVER CAP REMOVAL
Insert a flat-tipped screwdriver as shown in the figure to remove the inside handle cover cap.


<<B>> DOOR TRIM CAP REMOVAL
Insert a flat-tipped screwdriver as shown in the figure to remove the door trim cap.


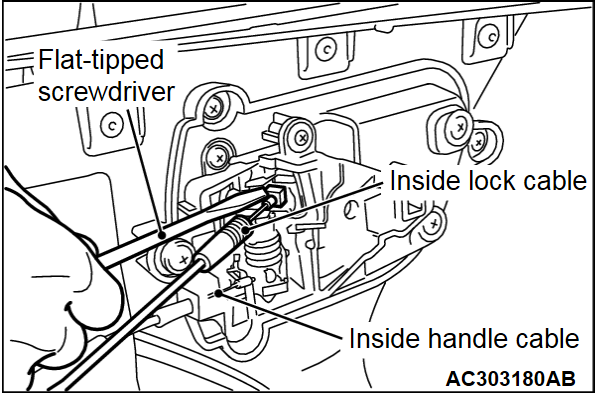
<<C>> FRONT/REAR DOOR TRIM REMOVAL
Using a flat-tipped screwdriver as shown in the figure, remove the inside lock cable and the inside handle cable, then remove the door trim.


INSTALLATION SERVICE POINT
 
 
>>A<< FRONT DOOR/REAR DOOR TRIM INSTALLATION
After the power window switch is installed or replaced, perform learning of the power window fully-closed position (Refer to GROUP 42A - Door Glass and Regulator ).