LEARNING PROCEDURE
When the TCM, the CVT assembly or the valve body assembly is replaced, adopt the system by using the scan tool (M.U.T.-IIISE).
WHEN REPLACING THE TCM
1. Turn the ignition switch to the "LOCK" (OFF) position. Then, connect scan tool (M.U.T.-IIISE) to the data link connector.
2. Turn the ignition switch to the "ON" position.
3. Execute the special function "Write calibration value (Calibration value Read&save)" on the scan tool (M.U.T.-IIISE) to read a serial number which is stored in the TCM.
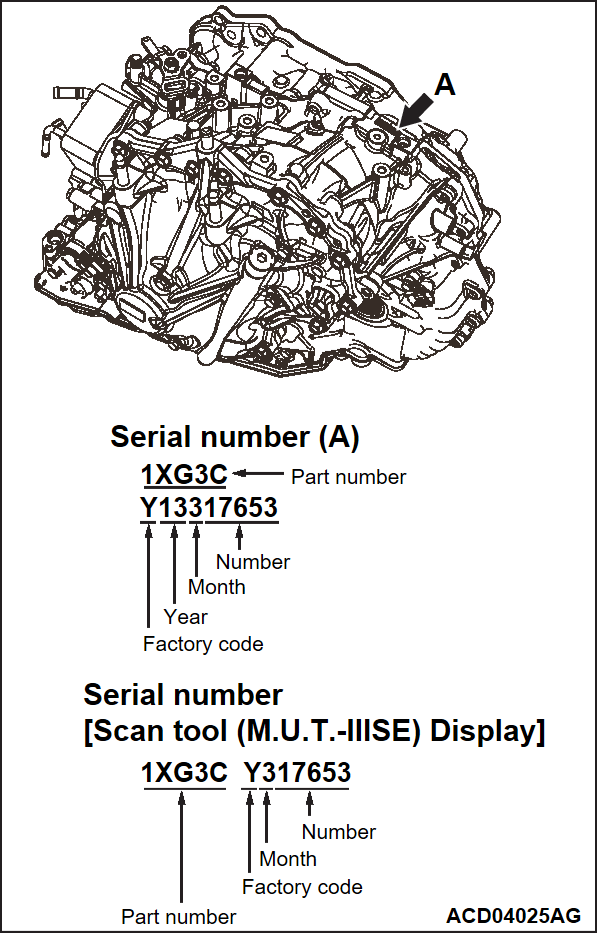
4. Make sure that the read serial number corresponds with the one stamped on the CVT assembly (see illustration).
5. Store the serial number in the scan tool (M.U.T.-IIISE).
| note | Be sure to write down the serial number. The serial number will be needed to compare it with the number imported into the scan tool (M.U.T.-IIISE) and to select the number. |
6. Turn the ignition switch to the "LOCK" (OFF) position.
8. Turn the ignition switch to the "ON" position.
9. Make sure that the selector lever is in the P or N range and that P or N is not displayed on the combination meter.
10. Execute the special function "Write calibration value (Saved calibration value writing)" on the scan tool (M.U.T.-IIISE) to write the serial number into the TCM.
11. The shift range symbol (P or N) in the combination meter should illuminate.
| note | If the shift range symbol (P or N) in the combination meter does not illuminate, observe the following procedure.
|
12. Make sure that the serial number on "Saved calibration value writing" completion screen corresponds with the serial number of the CVT assembly (or the valve body assembly) that was written down earlier.
| note | If it does not correspond, observe the following procedure.
|
13. Turn the ignition switch to the "LOCK" (OFF) position.
14. Observe the operations below:
- Wait until the engine is warmed up. Then road test the vehicle for approx. one minute at 40 km/h (25 mph) or more. Consequently, check whether the CVT is in the following conditions.
- No CVT-related diagnostic trouble code is set.
- A diagnostic trouble code is set, but you cannot identify any trouble symptoms (e.g. abnormal noise).
- There is no fluid leak.
- Start the engine.
- Teach the system a meeting point. All of the following conditions must be satisfied for approximately 90 seconds.
- The vehicle is stationary.
- Engine speed: 500 - 850 r/min (Idling)
- Brake pedal: Depress
- Accelerator pedal: Release
- Selector lever position: D
- Transmission fluid temperature: 40 - 100°C (104 - 212°F)
- Turn the ignition switch to the "LOCK" (OFF) position.
15. Operation complete.
WHEN REPLACING THE CVT ASSEMBLY
1. Note the serial number, which is stamped on the new CVT assembly.
3. Connect scan tool (M.U.T.-IIISE) to the data link connector.
4. Turn the ignition switch to the "ON" position.
5. Import a serial number from the CD-R*, which is supplied with a new CVT assembly, into the scan tool (M.U.T.-IIISE).
| note | *: Follow the steps below to import a serial number from the CD-R into the scan tool (M.U.T.-IIISE).
|
6. Move the selector lever to the R range.
7. Depress the accelerator pedal while depressing the brake pedal. (Engine stops.) Use the scan tool (M.U.T.-IIISE) special function to execute "Calibration value reset (item No.1: Calibration value reset)" while holding them in applied position.
8. Set the selector lever to the P range.
9. Turn the ignition switch to the "LOCK" (OFF) position, and then wait for ten seconds.
10. Turn the ignition switch to the "ON" position.
11. Make sure that the selector lever is in the P or N range and that P or N is not displayed on the combination meter.
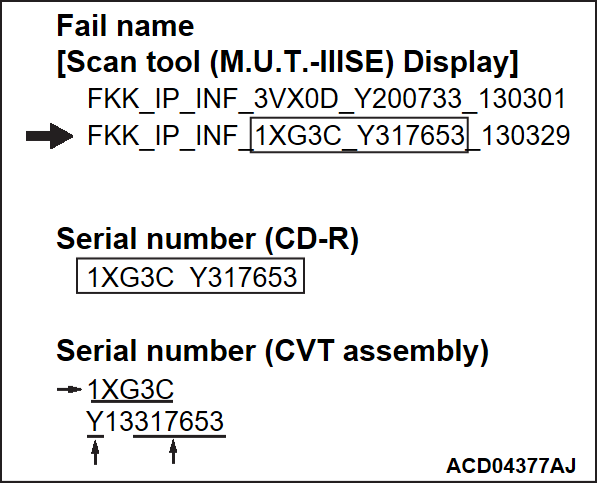
12. Select the same file name (shown in the illustration) as the serial number of CD-R or CVT assembly on the special function "Write calibration value (Saved calibration value writing)" screen and import the serial number into the TCM.
13. The shift range symbol (P or N) in the combination meter should illuminate.
| note | If the shift range symbol (P or N) in the combination meter does not illuminate, repeat the operations from Step 5. |
14. Make sure that the serial number on "Saved calibration value writing" completion screen corresponds with the serial number of the new CVT assembly (see illustration) that was written down earlier.
| note | If it does not correspond, repeat the operations from Step 5. |
15. Turn the ignition switch to the "LOCK" (OFF) position.
16. Observe the operations below:
- Wait until the engine is warmed up. Then road test the vehicle for approx. one minute at 40 km/h (25 mph) or more. Consequently, check whether the CVT is in the following conditions.
- No CVT-related diagnostic trouble code is set.
- A diagnostic trouble code is set, but you cannot identify any trouble symptoms (e.g. abnormal noise).
- There is no fluid leak.
- Start the engine.
- Teach the system a meeting point. All of the following conditions must be satisfied for approximately 90 seconds.
- The vehicle is stationary.
- Engine speed: 500 - 850 r/min (Idling)
- Brake pedal: Depress
- Accelerator pedal: Release
- Selector lever position: D
- Transmission fluid temperature: 40 - 100°C (104 - 212°F)
- Turn the ignition switch to the "LOCK" (OFF) position.
17. Turn the ignition switch to the "ON" position.
18. Execute the special function "CVT oil degradation level (item No.1: Clear CVT oil degradation level)" on the scan tool (M.U.T.-IIISE) to delete a transmission fluid deterioration level.
19. Operation complete.
WHEN REPLACING THE VALVE BODY ASSEMBLY
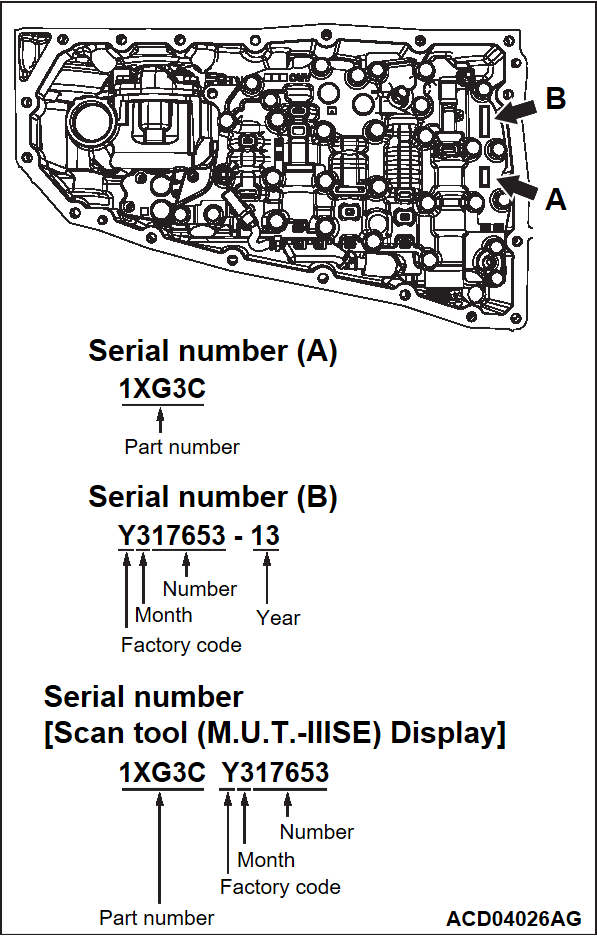
1. Note the serial number, which is stamped on the new valve body assembly.
3. Connect scan tool (M.U.T.-IIISE) to the data link connector.
4. Turn the ignition switch to the "ON" position.
5. Import a serial number from the CD-R*, which is supplied with a new valve body assembly, into the scan tool (M.U.T.-IIISE).
| note | *: Follow the steps below to import a serial number from the CD-R into the scan tool (M.U.T.-IIISE).
|
6. Move the selector lever to the R range.
7. Depress the accelerator pedal while depressing the brake pedal. (Engine stops.) Use the scan tool (M.U.T.-IIISE) special function to execute "Calibration value reset (item No.1: Calibration value reset)" while holding them in applied position.
8. Set the selector lever to the P range.
9. Turn the ignition switch to the "LOCK" (OFF) position, and then wait for ten seconds.
10. Turn the ignition switch to the "ON" position.
11. Make sure that the selector lever is in the P or N range and that P or N is not displayed on the combination meter.
12. Select the same file name (shown in the illustration) as the serial number of CD-R or valve body assembly on the special function "Write calibration value (Saved calibration value writing)" screen and import the serial number into the TCM.
13. The shift range symbol (P or N) in the combination meter should illuminate.
| note | If the shift range symbol (P or N) in the combination meter does not illuminate, repeat the operations from Step 5. |
14. Make sure that the serial number on "Saved calibration value writing" completion screen corresponds with the serial number of the new valve body assembly (see illustration) that was written down earlier.
| note | If it does not correspond, repeat the operations from Step 5. |
15. Turn the ignition switch to the "LOCK" (OFF) position, and then wait for ten seconds.
16. Set the vehicle to the following condition.
- The vehicle is stationary.
- Engine speed: 500 - 850 r/min (Idling)
- Brake pedal: Depress
- Air conditioning: OFF
- Accelerator pedal: Release
- Selector lever position: N
- Transmission fluid temperature: 50 - 100°C (122 - 212°F)
17. Depress and hold the brake pedal fully to secure the vehicle against rolling away, and execute the special function "Control valve learning mode (item No.1: Control valve learning mode)" on the scan tool (M.U.T.-IIISE).
18. Move the selector lever to the "D" position, and confirm that "Completed." is displayed on the scan tool (M.U.T.-IIISE) screen after 60 seconds.
| note | If "Complete" is not displayed on the scan tool (M.U.T.-IIISE) within 60 seconds, move back the selector lever to N range. Then execute the item No.1; Control valve learning mode again. |
19. Shift the selector lever to P position.
20. Turn the ignition switch to the "LOCK" (OFF) position, and then wait for ten seconds.
21. Set the vehicle to the following condition.
- The vehicle is stationary.
- Engine speed: 500 - 850 r/min (Idling)
- Brake pedal: Depress
- Air conditioning: OFF
- Accelerator pedal: Release
- Selector lever position: N
- Transmission fluid temperature: 50 - 100°C (122 - 212°F)
22. Depress and hold the brake pedal fully to secure the vehicle against rolling away, and execute the special function "Control valve learning mode (item No.1: Control valve learning mode)" on the scan tool (M.U.T.-IIISE).
23. Move the selector lever to the "R" position, and confirm that "Completed." is displayed on the scan tool (M.U.T.-IIISE) screen after 60 seconds.
| note | If "Complete" is not displayed on the scan tool (M.U.T.-IIISE) within 60 seconds, move back the selector lever to N range. Then execute the item No.1; Control valve learning mode again. |
24. Shift the selector lever to P position.
25. Turn the ignition switch to the "LOCK" (OFF) position, and then wait for ten seconds.
26. Observe the operations below:
- Wait until the engine is warmed up. Then road test the vehicle for approx. one minute at 40 km/h (25 mph) or more. Consequently, check whether the CVT is in the following conditions.
- No CVT-related diagnostic trouble code is set.
- A diagnostic trouble code is set, but you cannot identify any trouble symptoms (e.g. abnormal noise).
- There is no fluid leak.
- Start the engine.
- Teach the system a meeting point. All of the following conditions must be satisfied for approximately 90 seconds.
- The vehicle is stationary.
- Engine speed: 500 - 850 r/min (Idling)
- Brake pedal: Depress
- Accelerator pedal: Release
- Selector lever position: D
- Transmission fluid temperature: 40 - 100°C (104 - 212°F)
- Turn the ignition switch to the "LOCK" (OFF) position.
27. Turn the ignition switch to the "ON" position.
28. Execute the special function "CVT oil degradation level (item No.1: Clear CVT oil degradation level)" on the scan tool (M.U.T.-IIISE) to delete a transmission fluid deterioration level.
29. Operation complete.
![[Previous]](../../../buttons/fprev.png)
![[Next]](../../../buttons/fnext.png)


