DTC P0453: Evaporative Emission Control System Pressure Sensor High Input
CIRCUIT OPERATION
- The ECM terminal FPR5 supplies a 5-volt reference signal to the fuel tank differential pressure sensor. The fuel tank differential pressure sensor is grounded through the ECM terminal FPRE.
- The fuel tank differential pressure sensor returns a voltage signal to the ECM terminal F/PR that is proportional to the pressure in the fuel tank.
TECHNICAL DESCRIPTION
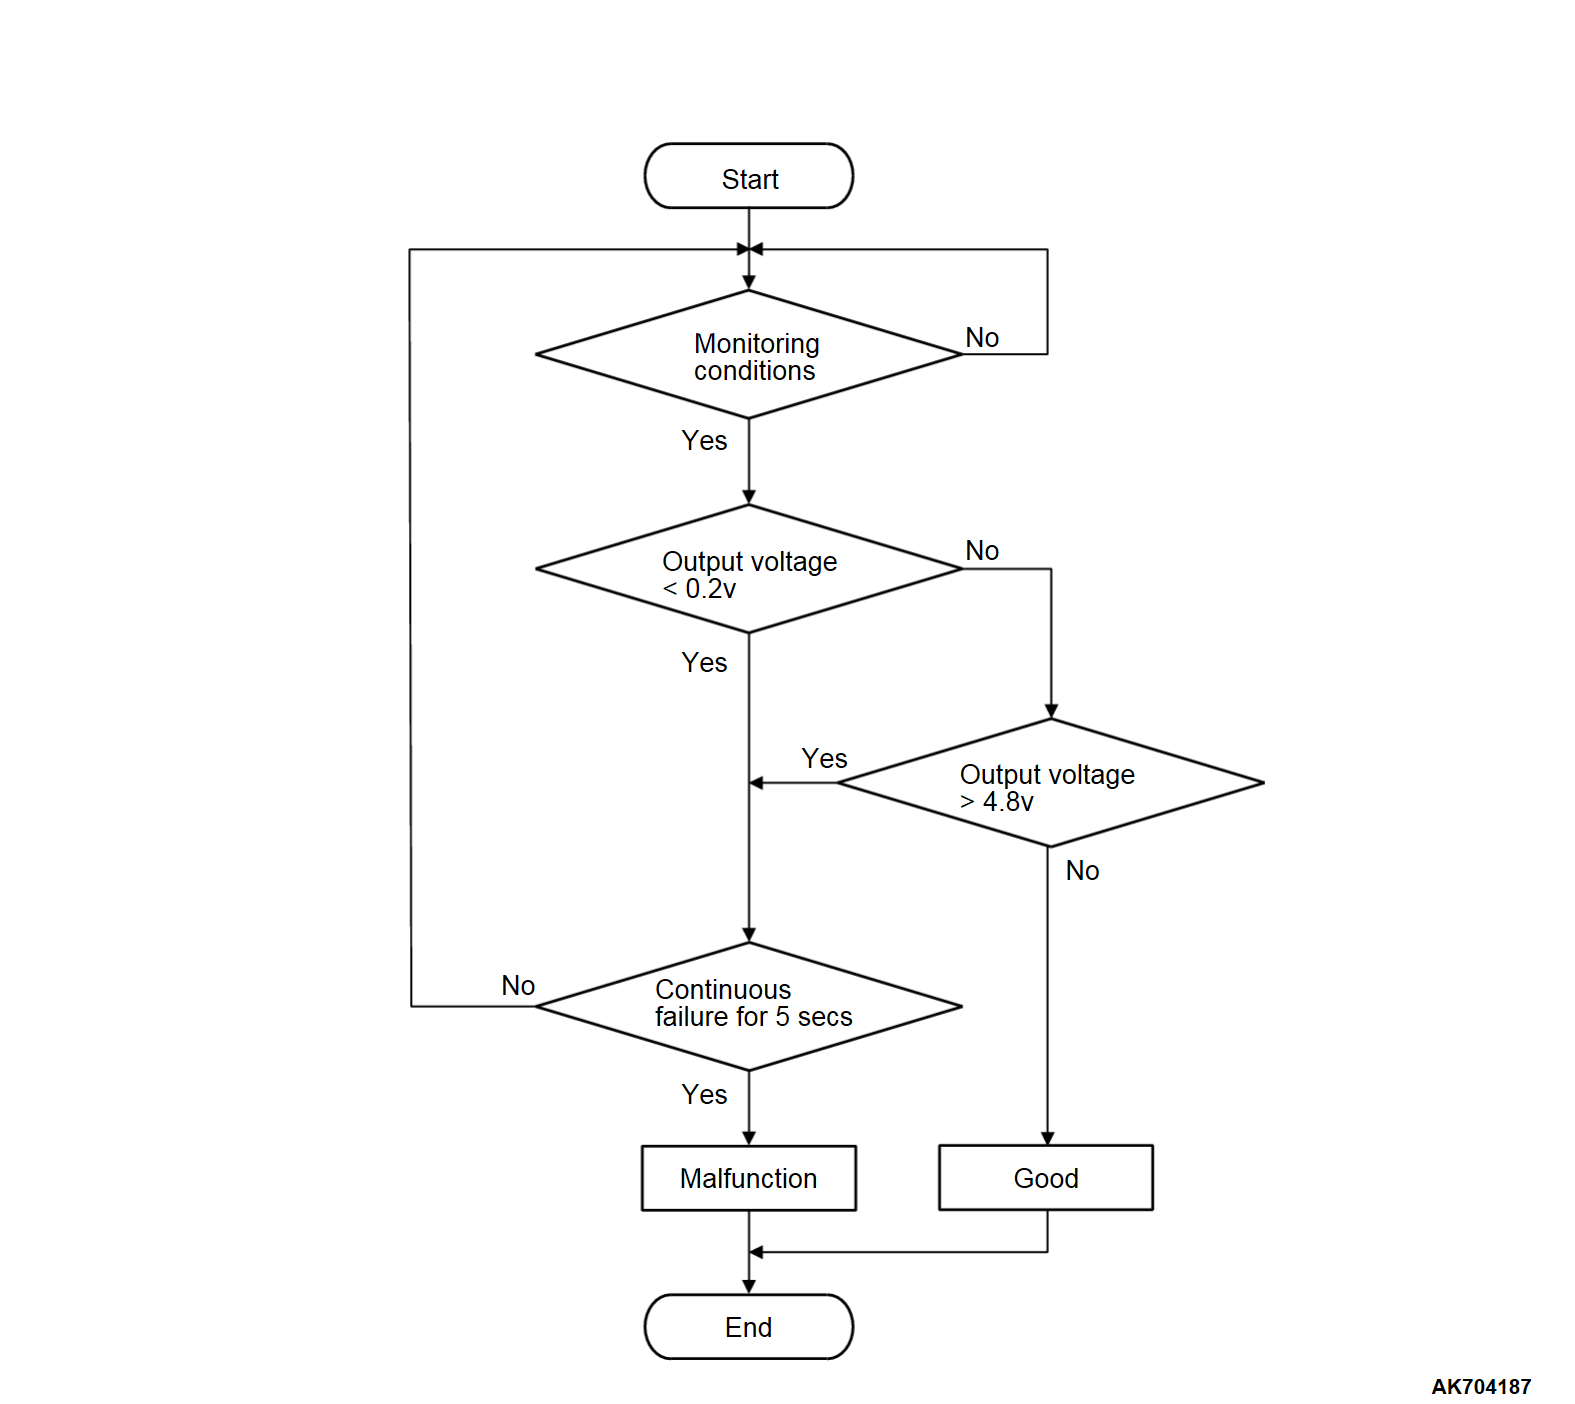
- To determine whether the fuel tank differential pressure sensor is defective, the ECM monitors the fuel tank differential pressure sensor output voltage.
- The ECM judges if the fuel tank differential pressure sensor output voltage is normal.
| note | In rare cases, this DTC may be also store under some fuel and driving conditions regardless of the fuel pressure sensor output voltage when the fuel system is clogged. |
DESCRIPTIONS OF MONITOR METHODS
- Fuel tank differential pressure sensor output voltage is out of specified range.
MONITOR EXECUTION
- Continuous.
MONITOR EXECUTION CONDITIONS (OTHER MONITOR AND SENSOR)
Other Monitor (There is no temporary DTC stored in memory for the item monitored below)
- Evaporative emission purge solenoid monitor
- Evaporative emission ventilation solenoid monitor
- Fuel temperature sensor monitor
- Fuel level sensor monitor
Sensor (The sensors below are determined to be normal)
- Mass airflow sensor
- Barometric pressure sensor
- Intake air temperature sensor
- Engine coolant temperature sensor
- Accelerator pedal position sensor
Check Conditions
- 2 seconds or more have passed since the starting sequence was completed.
- Remaining fuel level is 80 percent or less when the engine is started.
Judgment Criteria
- The fuel tank differential pressure sensor output voltage remains 4.8 volts or greater for 5 seconds.
FAIL-SAFE AND BACKUP FUNCTION
- None
TROUBLESHOOTING HINTS (THE MOST LIKELY CAUSES FOR THIS CODE TO BE SET ARE: )
- Connector damage.
- Harness damage.
- Fuel tank differential pressure sensor failed.
- ECM failed.
DIAGNOSIS
Required Special Tools:
- MB992744: Vehicle Communication Interface-Lite (V.C.I.-Lite)
- MB992745: V.C.I.-Lite Main Harness A
- MB992747: V.C.I.-Lite USB Cable Short
- MB992748: V.C.I.-Lite USB Cable Long
- MB991958: Scan Tool (M.U.T.-III Sub Assembly)
- MB991824: Vehicles Communication Interface (V.C.I.)
- MB991827: M.U.T.-III USB Cable
- MB991910: M.U.T.-III Main Harness A (Vehicles with CAN communication system)
STEP 1. Using scan tool (M.U.T.-III), check data list item 52: Fuel Tank Differential Pressure Sensor.
| caution | To prevent damage to scan tool (M.U.T.-III), always turn the ignition switch to the "LOCK" (OFF) position before connecting or disconnecting scan tool (M.U.T.-III). |
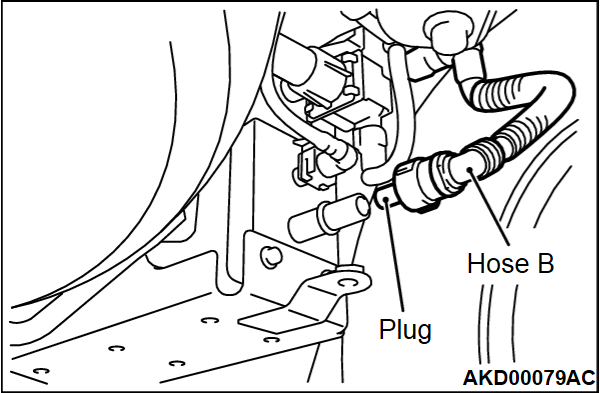
(2) Disconnect the hose B from the evaporative emission canister.
(3) Plug the disconnected end of hose B.
(4) Turn the ignition switch to the "ON" position.
(5) Remove the fuel cap.
(6) Set scan tool (M.U.T.-III) to the data reading mode for item 52, Fuel Tank Differential Pressure Sensor.
- Output voltage should be between 1,500 to 3,500 mV.
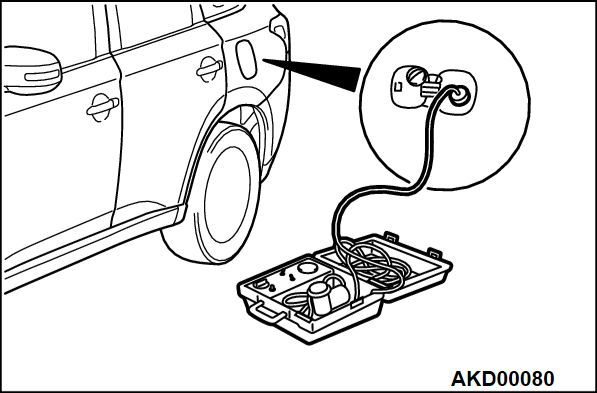
(7) Connect the evaporative emission system pressure pump (Miller number 6872A) to the fuel tank filler tube by using fuel tank adapter (MLR-8382) and pressurize the fuel tank.
- The fuel tank pressure reading should increase.
(8) Turn the ignition switch to the "LOCK" (OFF) position.
(9) Remove the evaporative emission system pressure pump (Miller number 6872A) and the fuel tank adapter (MLR-8382), and reinstall the fuel cap.
(10) Connect hose B to the evaporative emission canister.
Is the sensor operating properly?
STEP 2. Measure the ground voltage at fuel tank differential pressure sensor connector by backprobing.
(1) Do not disconnect the fuel tank differential pressure sensor connector.
(2) Turn the ignition switch to the "ON" position.
(3) Measure the voltage between terminal FPRE line and ground by backprobing.
- Voltage should be 0.5 volt or less.
(4) Turn the ignition switch to the "LOCK" (OFF) position.
Is the measured voltage 0.5 volt or less?
STEP 3. Check of open circuit in FPRE line between fuel tank differential pressure sensor connector and ECM connector.
STEP 4. Using scan tool (M.U.T.-III), check data list item 52: Fuel Tank Differential Pressure Sensor.
(1) Disconnect hose B from the evaporative emission canister.
(2) Plug the disconnected end of hose B.
(3) Turn the ignition switch to the "ON" position.
(4) Remove the fuel cap.
(5) Set scan tool (M.U.T.-III) to the data reading mode for item 52, Fuel Tank Differential Pressure Sensor.
- Output voltage should be between 1,500 to 3,500 mV.
(6) Connect the evaporative emission system pressure pump (Miller number 6872A) to the fuel tank filler tube by using fuel tank adapter (MLR-8382) and pressurize the fuel tank.
- The fuel tank pressure reading should increase.
(7) Turn the ignition switch to the "LOCK" (OFF) position.
(8) Remove the evaporative emission system pressure pump (Miller number 6872A) and the fuel tank adapter (MLR-8382), and reinstall the fuel cap.
(9) Connect hose B to the evaporative emission canister.
Is the sensor operating properly?
![[Previous]](../../../buttons/fprev.png)
![[Next]](../../../buttons/fnext.png)


