[Previous][Next]
REMOVAL AND INSTALLATION
 
 
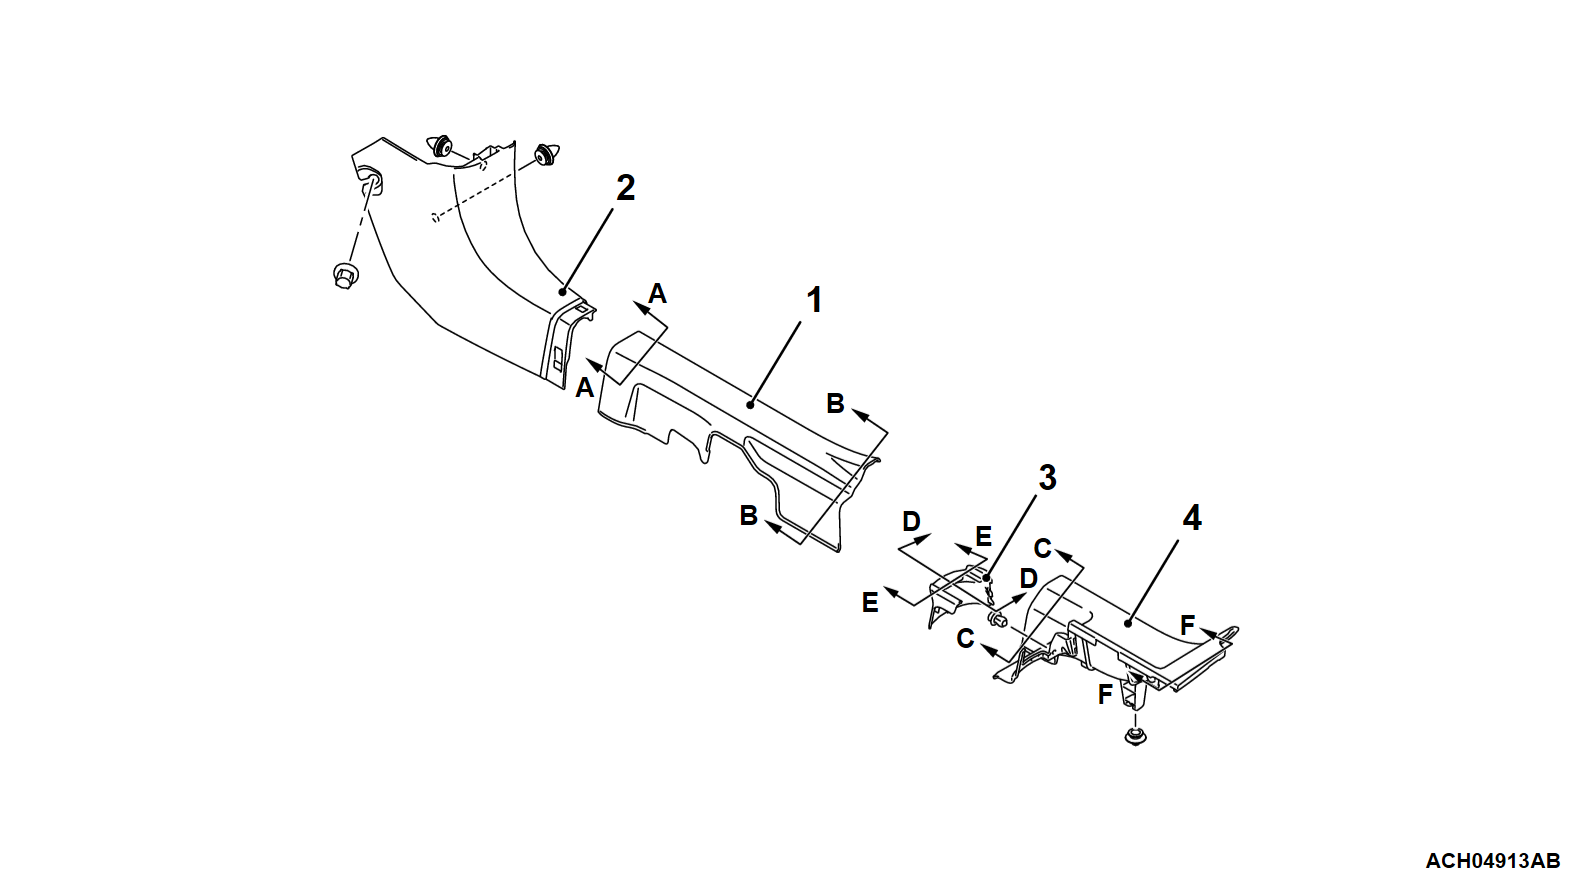
<Floor trim>
Removal steps
1.Front scuff plate
Hood lock release handle connection (Refer to GROUP 42A - Hood ).
2.Cowl side trim
3.Rear seat anchor cover
4.Rear scuff plate
 
 
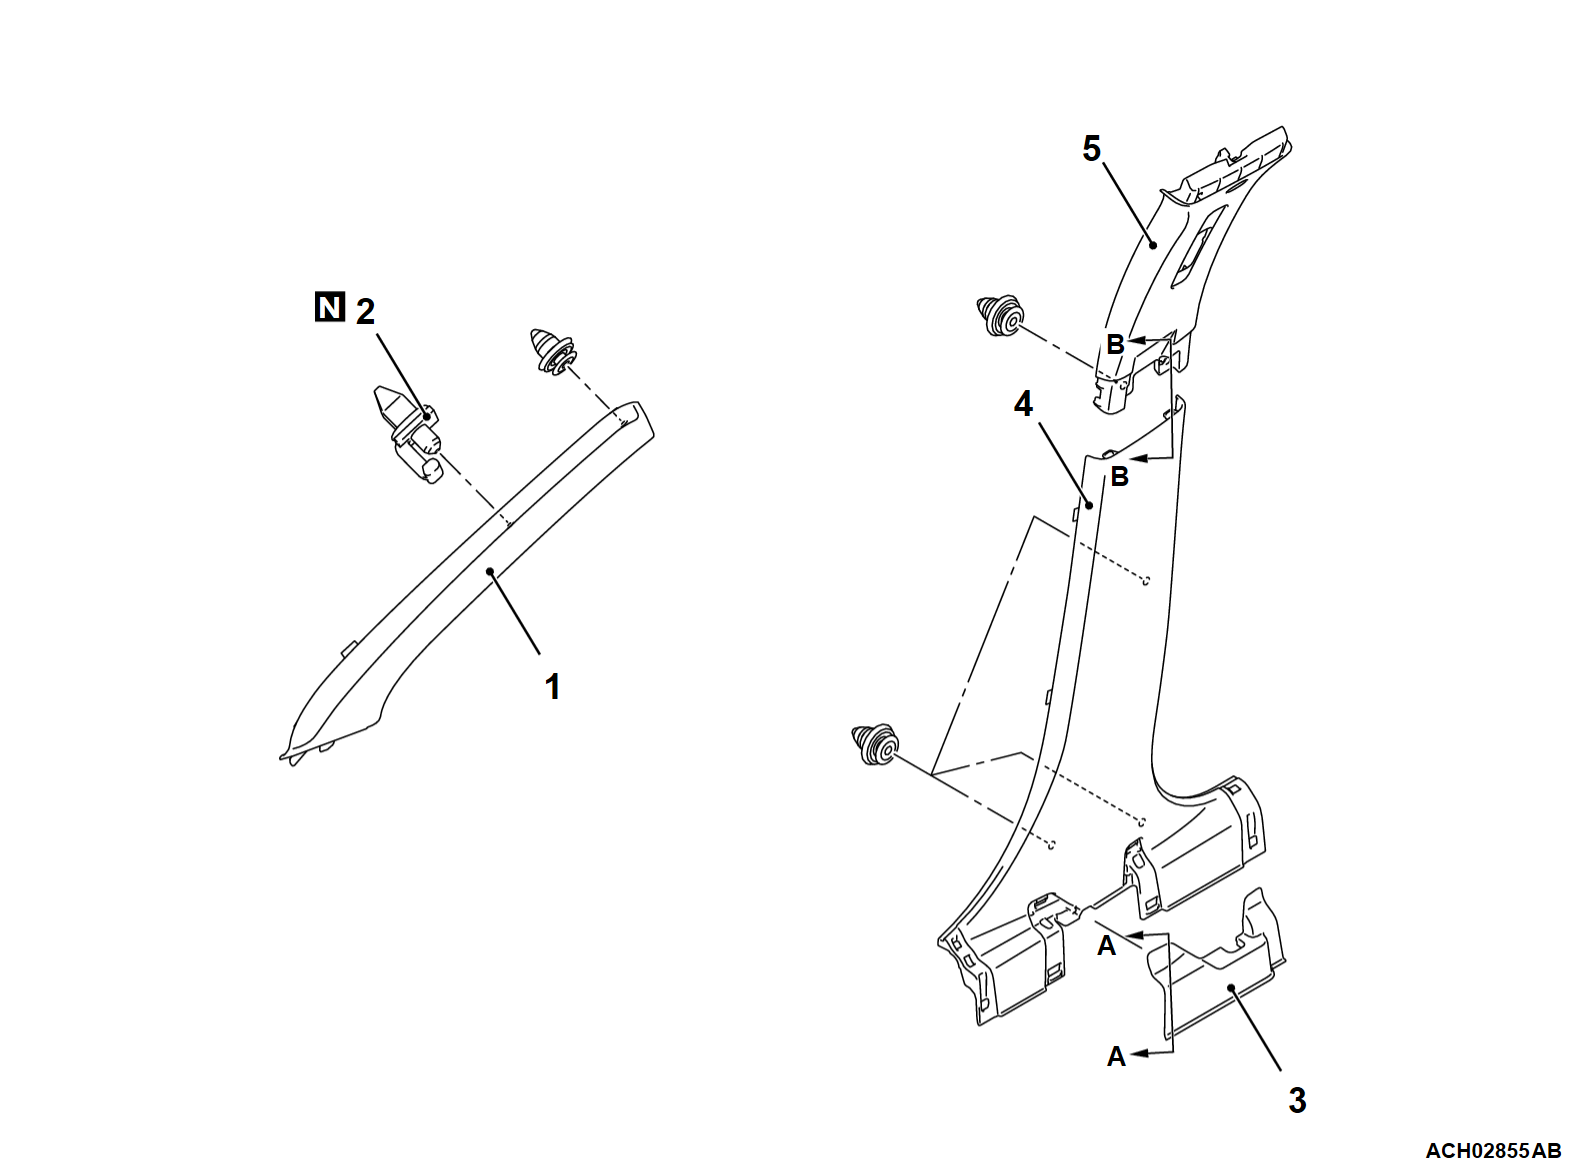
<Pillar trim>
Front pillar trim removal steps
Door opening weatherstrip inner (Refer to GROUP 42A - Window Glass Runchannel and Door Opening Weatherstrip ).
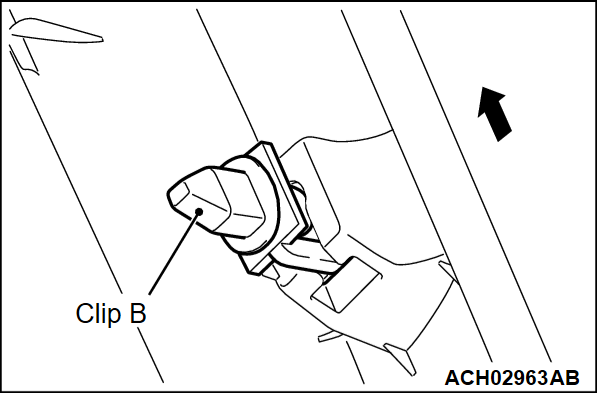
<<A>>>>B<<1.Front pillar trim
<<A>>>>B<<2.Trim clip B
Center pillar trim removal steps
3.Center pillar cover inner
Scuff plate (Refer to ).
Door opening weatherstrip inner (Refer to GROUP 42A - Window Glass Runchannel and Door Opening Weatherstrip ).
4.Center pillar trim lower
Seat belt pre-tensioner mounting bolt (Refer to GROUP 52B - Seat Belt with Pre-tensioner ).
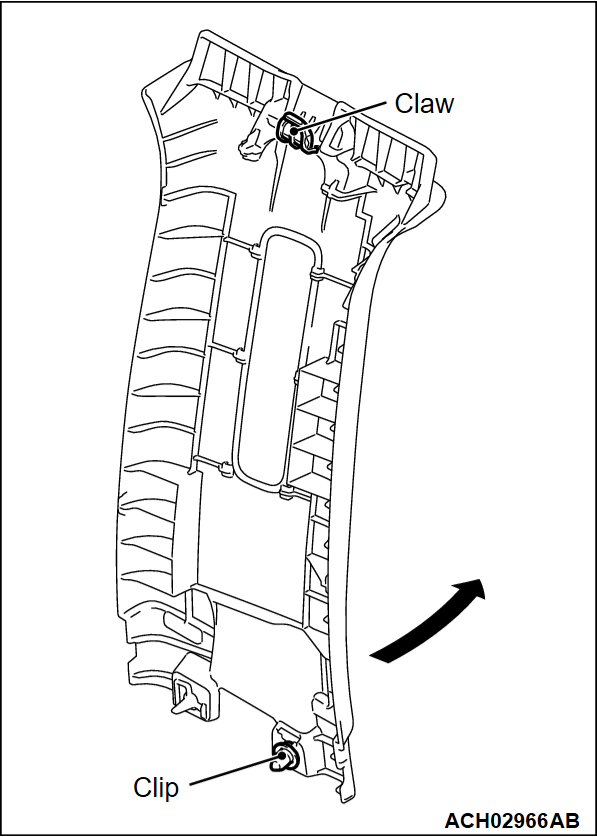
<<B>>>>A<<5.Center pillar trim upper
 
 
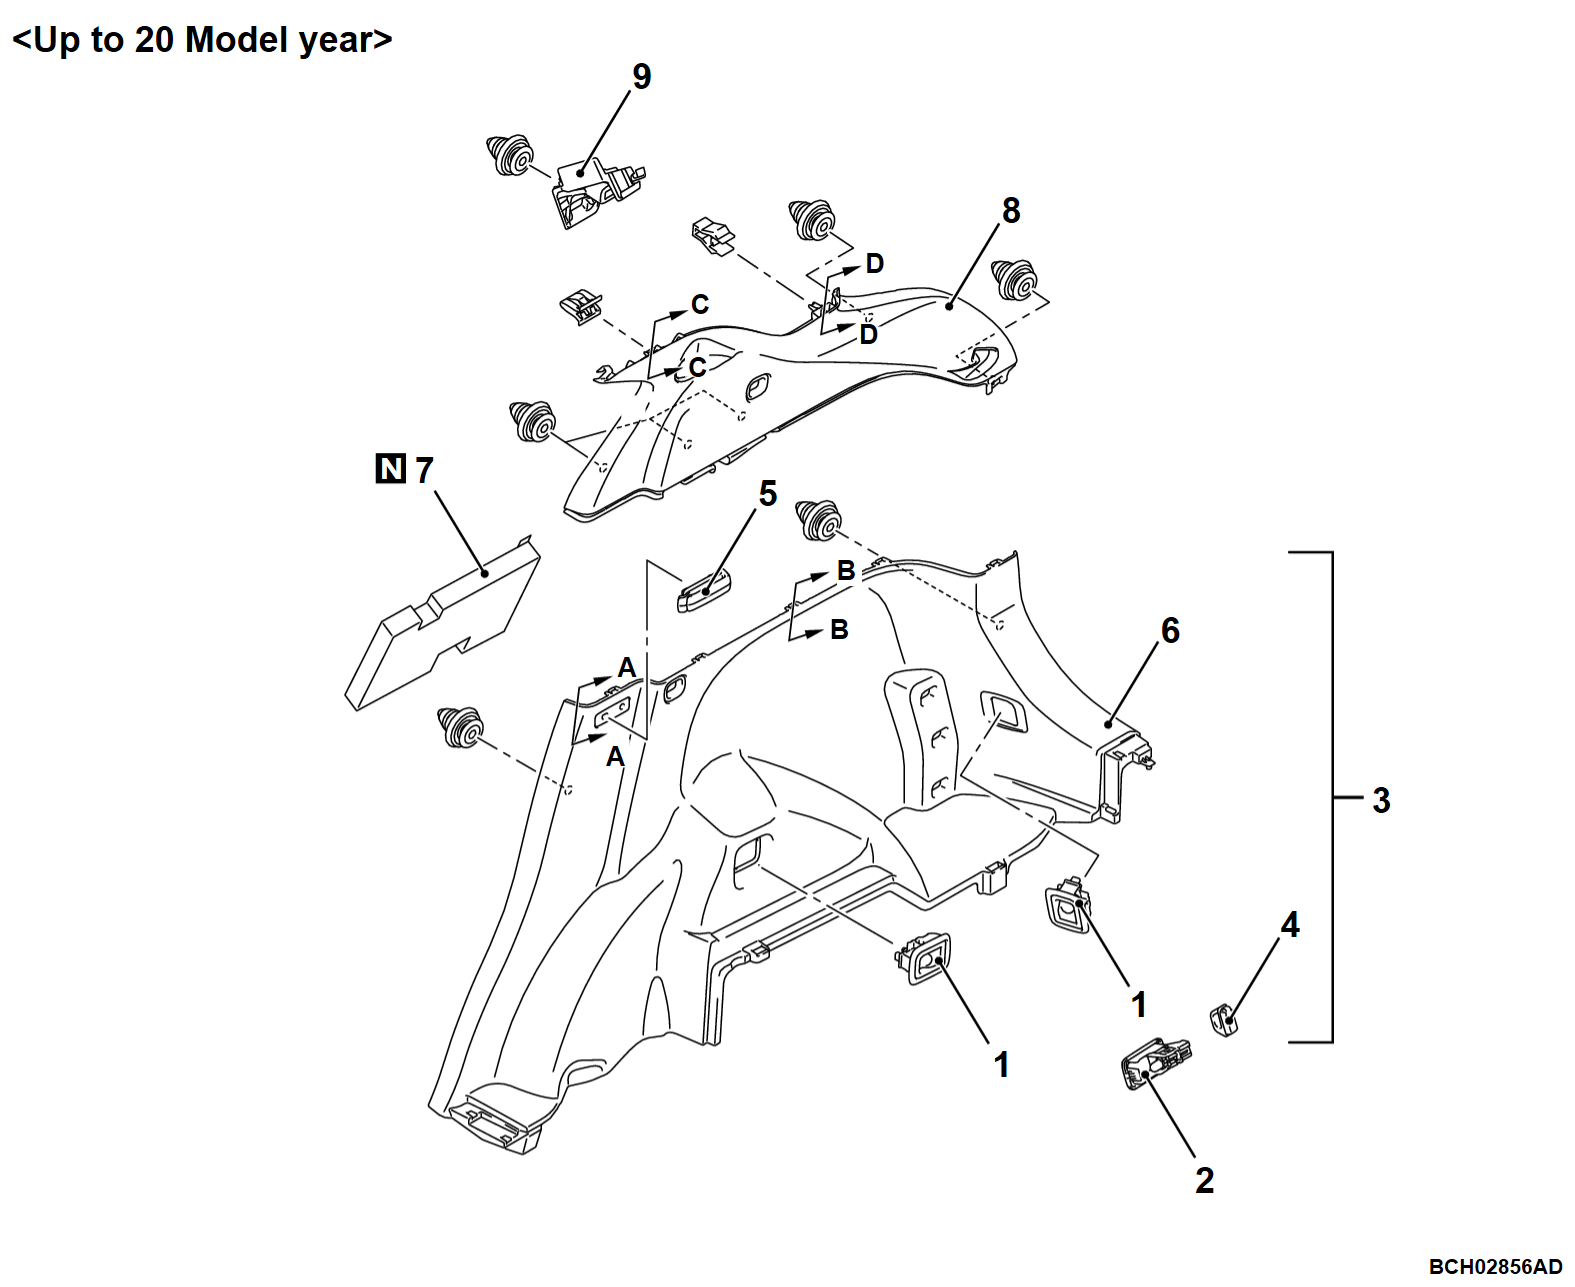
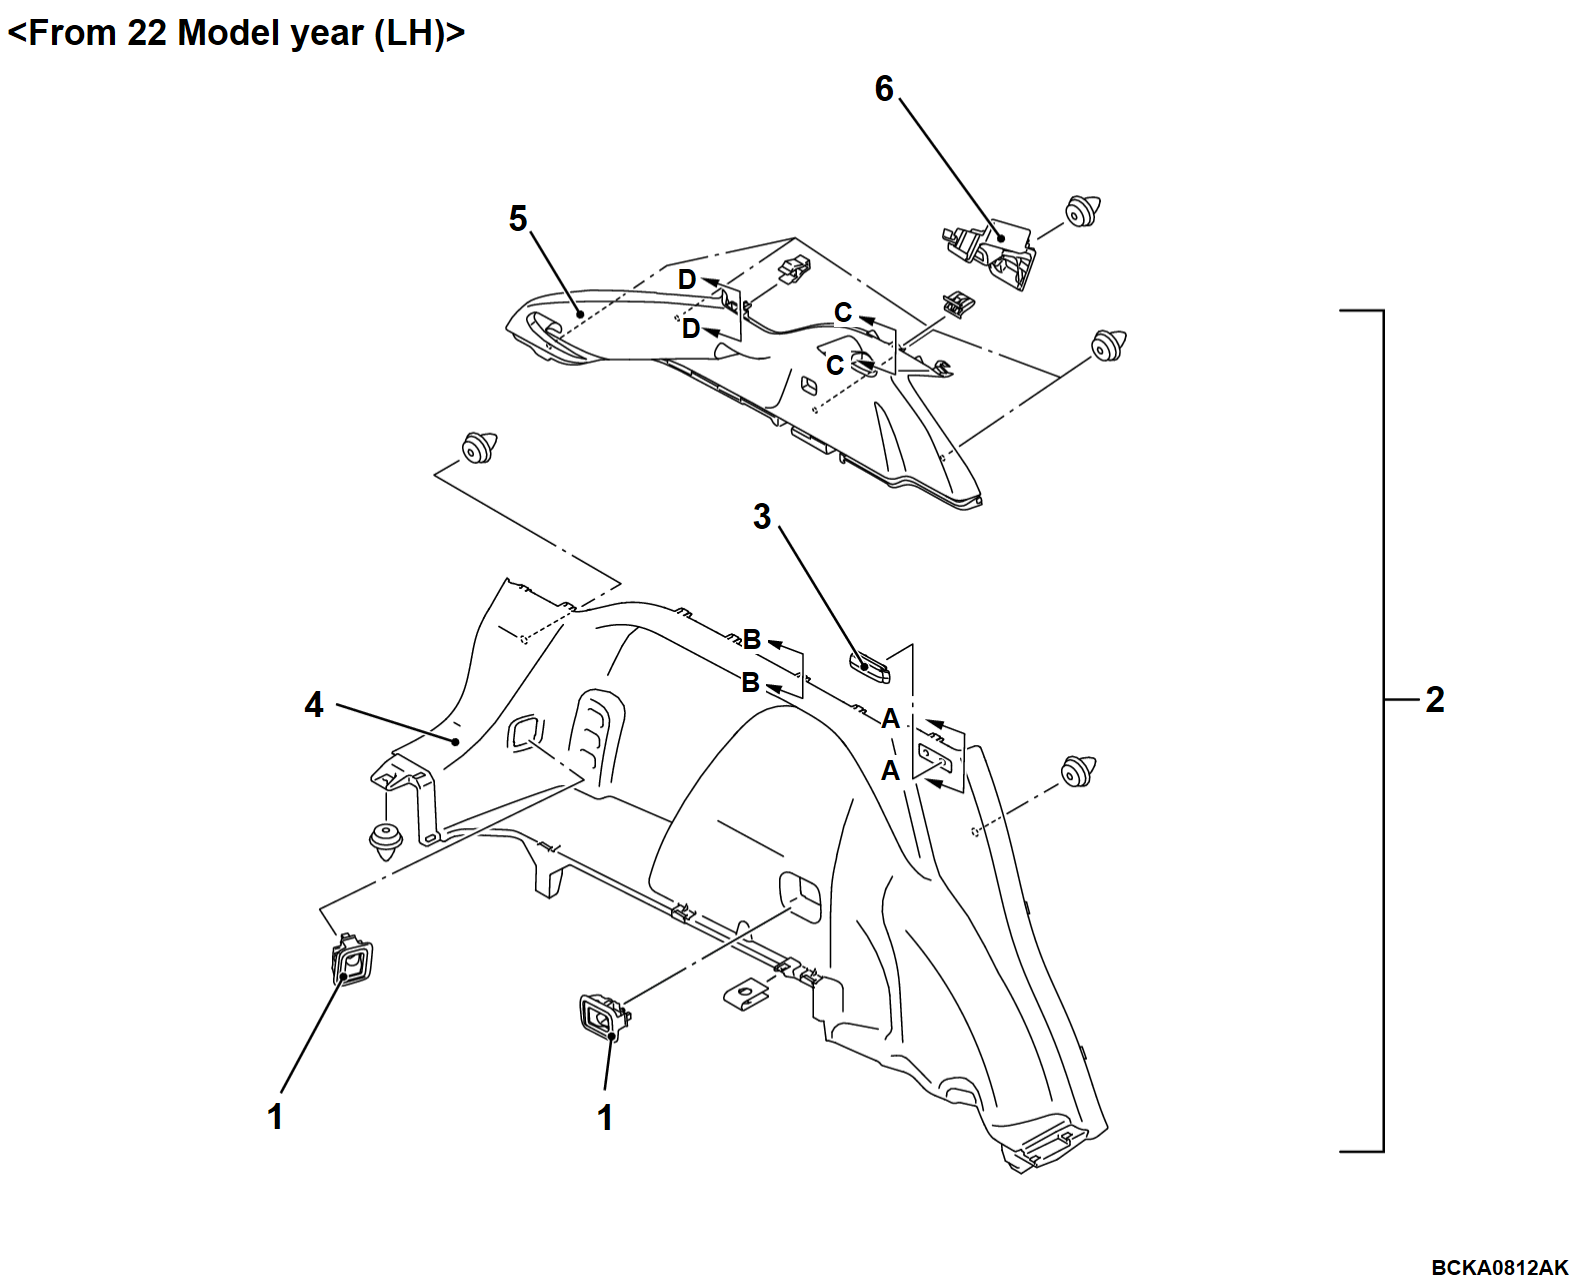
<Quarter trim>
Removal steps
1.Parcel strap hook
2.Cargo room light assembly
Rear end trim (Refer to ).
Rear scuff plate (Refer to ).
Door opening weatherstrip inner (Refer to GROUP 42A - Window Glass Runchannel and Door Opening Weatherstrip ).
3.Quarter trim lower assembly
4.Quarter trim hook
5.Rear seat belt clip
6.Quarter trim lower
7.Quarter panel silencer <Some models>
<<C>>8.Quarter trim upper
9.Quarter trim bracket
 
 
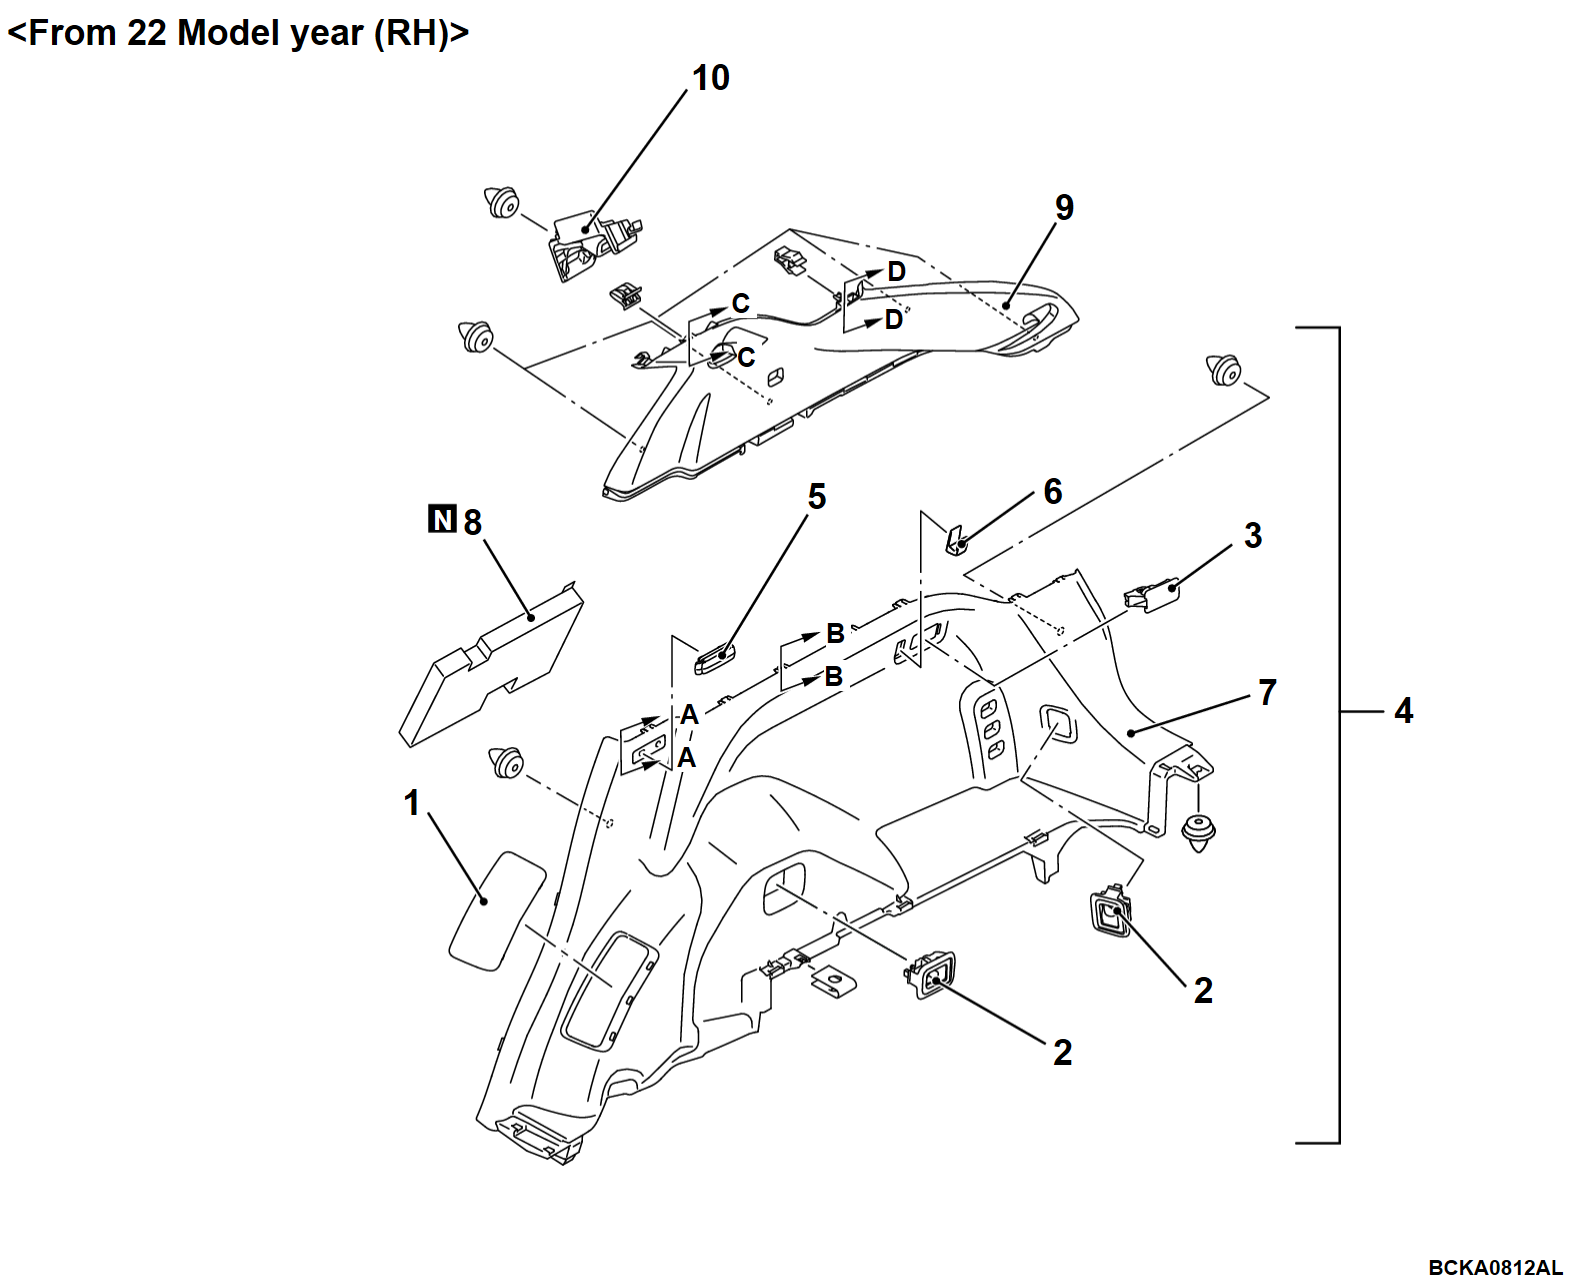
Removal steps
1.Quarter trim cap
2.Parcel strap hook
3.Cargo room light assembly
Rear end trim (Refer to ).
Rear scuff plate (Refer to ).
Door opening weatherstrip inner (Refer to GROUP 42A - Window Glass Runchannel and Door Opening Weatherstrip ).
4.Quarter trim lower assembly
5.Rear seat belt clip
6.Quarter trim hook
7.Quarter trim lower
8.Quarter panel silencer <Some models>
Rear seat belt mounting bolt (Refer to )
<<C>>9.Quarter trim upper
10.Quarter trim bracket
 
 
Removal steps
1.Parcel strap hook
Rear end trim (Refer to ).
Rear scuff plate (Refer to ).
Door opening weatherstrip inner (Refer to GROUP 42A - Window Glass Runchannel and Door Opening Weatherstrip ).
2.Quarter trim lower assembly
3.Rear seat belt clip
4.Quarter trim lower
Rear seat belt mounting bolt (Refer to )
<<C>>5.Quarter trim upper
6.Quarter trim bracket
 
 
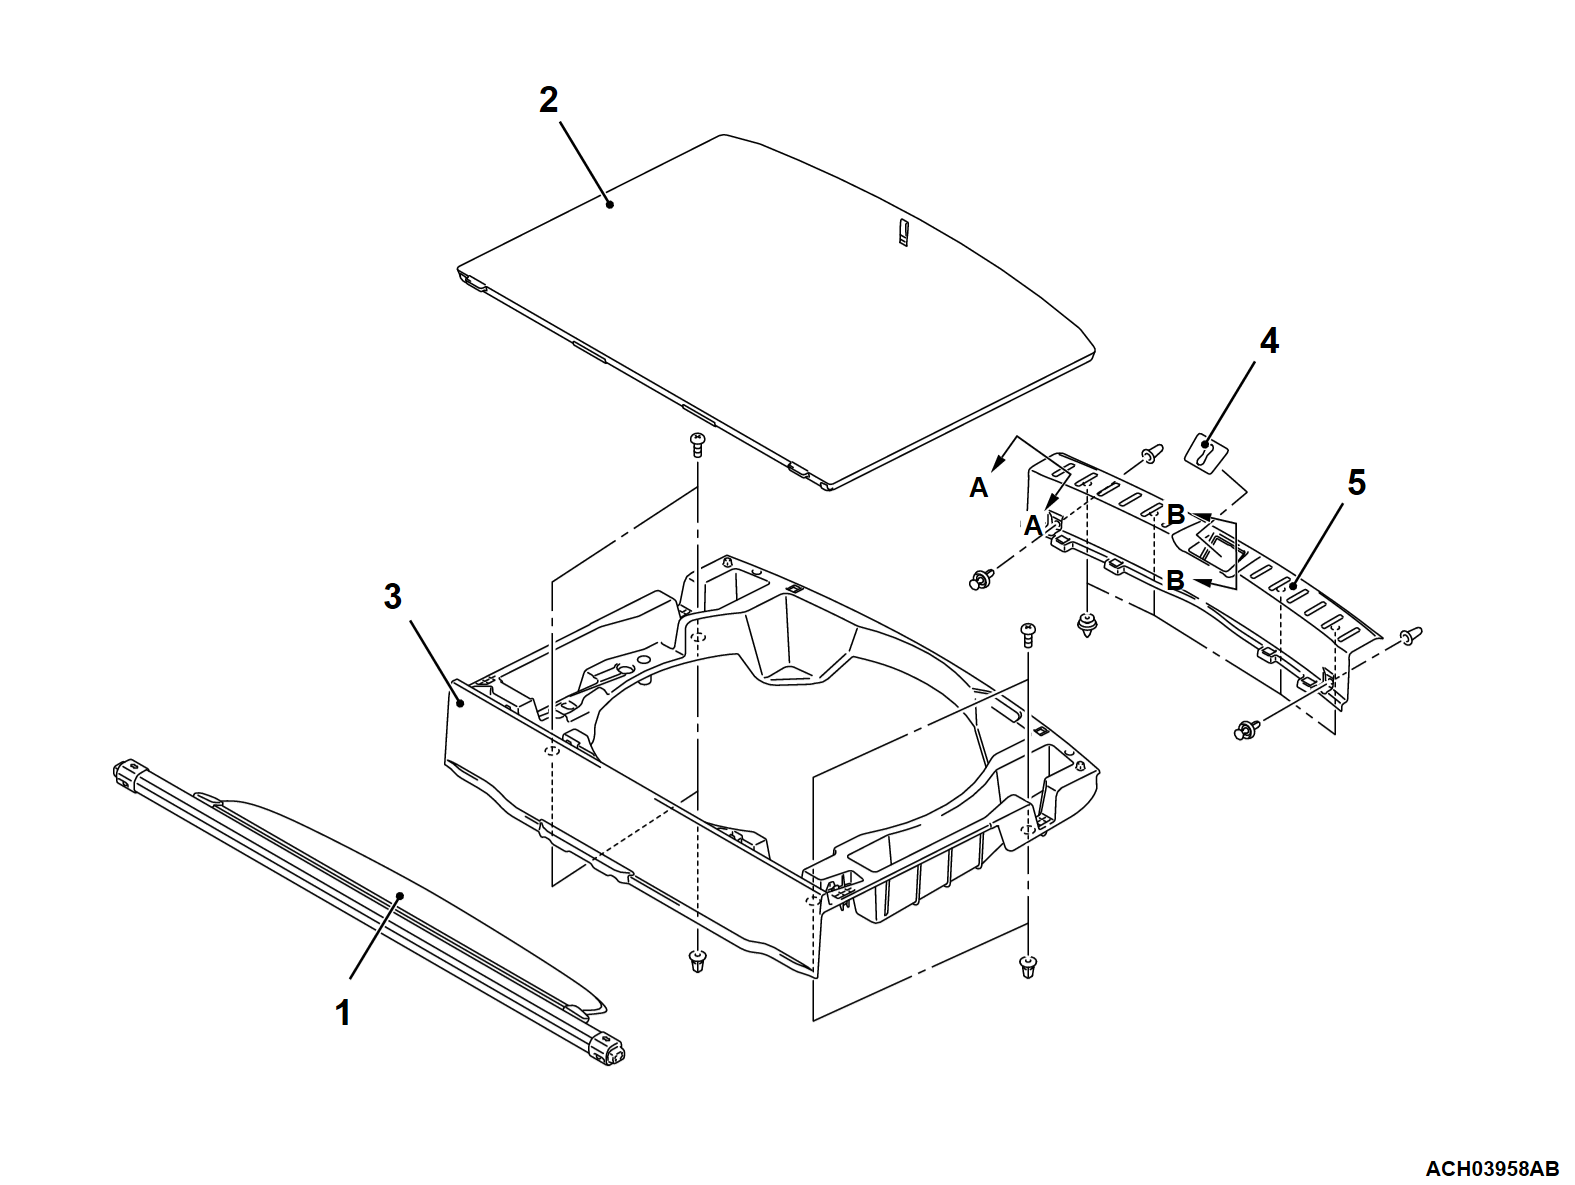
<Cargo room trim>
Temper spare tire <Up to 20 Model year>
Removal steps
1.Cargo floor cover
2.Cargo floor box lid
Spare tire
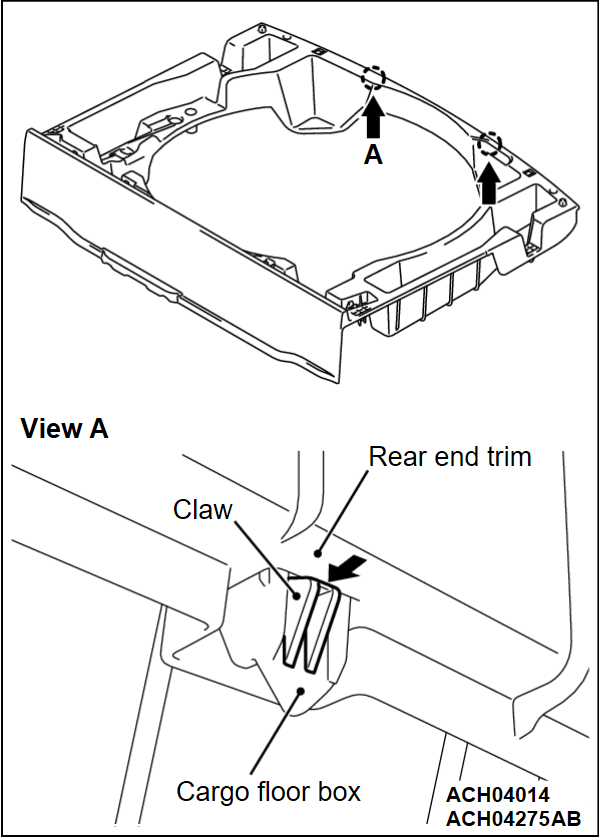
<<D>>3.Cargo floor box
4.Rear end trim cap
Liftgate opening weatherstrip (Refer to GROUP 42A - Liftgate ).
5.Rear end trim
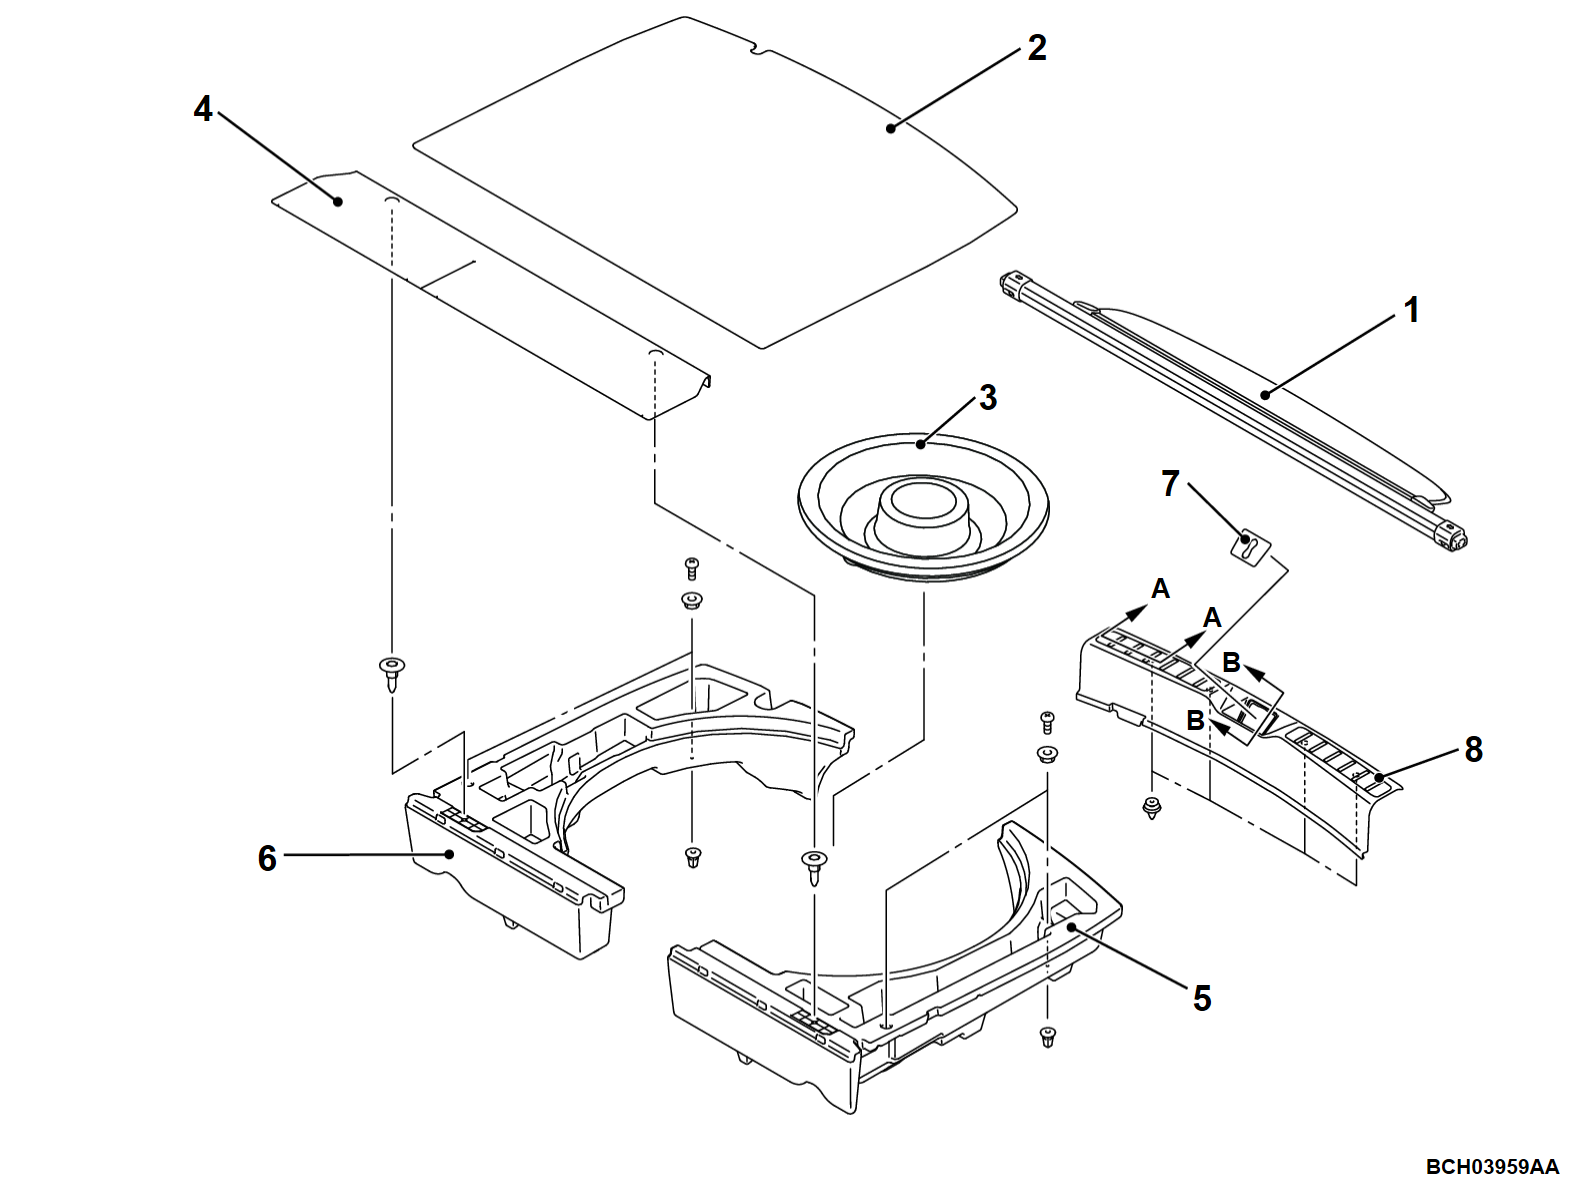
Temper spare tire <From 22 Model year>
Removal steps
1.Cargo floor cover
2.Cargo floor box lid
3.Spare tire pad
Spare tire
4.Cargo floor reinforcement
5.Cargo floor box LH
6.Cargo floor box RH
7.Rear end trim cap
Liftgate opening weatherstrip (Refer to GROUP 42A - Liftgate ).
8.Rear end trim
 
 
REMOVAL SERVICE POINTS
 
 
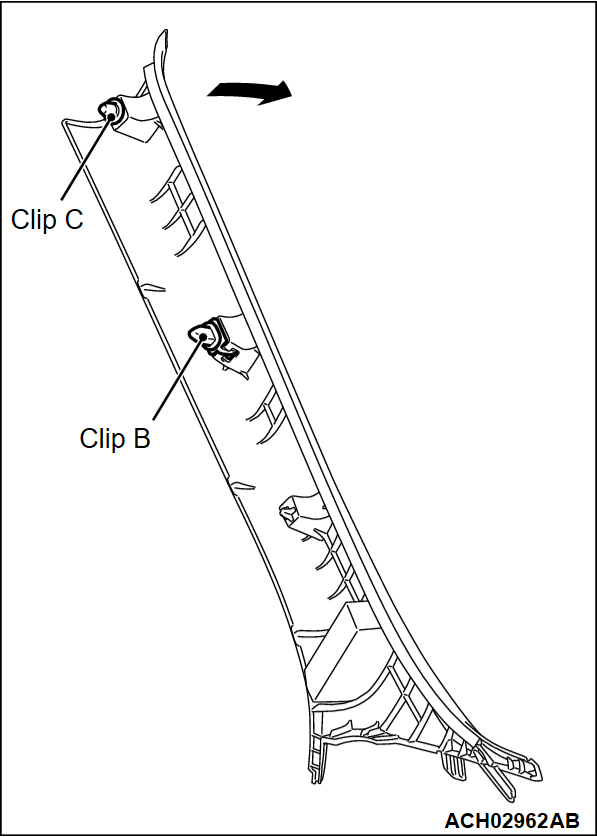
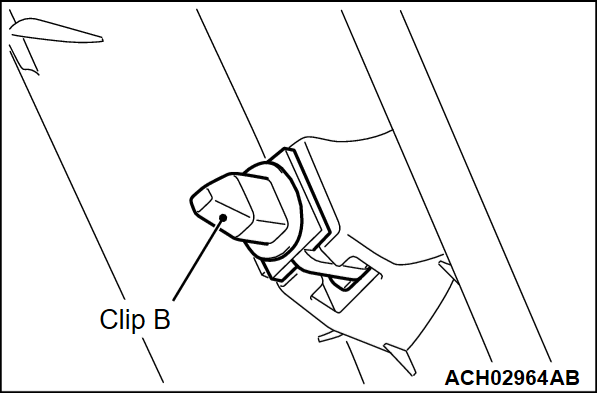
<<A>> FRONT PILLAR TRIM / TRIM CLIP B REMOVAL
1. Remove the engagement between clip C on the upper side of the front pillar trim and the body.
2. Have clip B lifted from the front pillar trim.
3.
cautionIf clip B is removed from the body, replace it with a new one.
Slide the front pillar trim upward to remove it. At this time, do not remove clip B from the body.


<<B>> CENTER PILLAR TRIM UPPER REMOVAL
1. Remove the engagement between the clip of the lower side of the center pillar trim upper and the body.
2.
cautionBe careful not to rotate the trim extremely to prevent the headlining from getting wrinkles. Pull out the trim in the bottom direction while keeping the rotation amount to a minimum.
Rotate the trim lower side to the inside of the vehicle by using the upper side of the center pillar trim upper as a fulcrum, and remove the engagement between the claw on the upper side of the trim and the body.


<<C>> QUARTER TRIM UPPER REMOVAL
1. Remove the anchor plate bolt of the rear seat belt LH/RH (Refer to GROUP 52A - Rear Seat Belt ).
2. Pull out the rear seat belt from the opening of the quarter trim upper.


<<D>> CARGO FLOOR BOX REMOVAL <Up to 20 Model year>
1. Remove each screw of the cargo floor box.
2. Press each claw of the cargo floor box to the direction shown in the figure to disengage the claw and the rear end trim.


INSTALLATION SERVICE POINTS
 
 
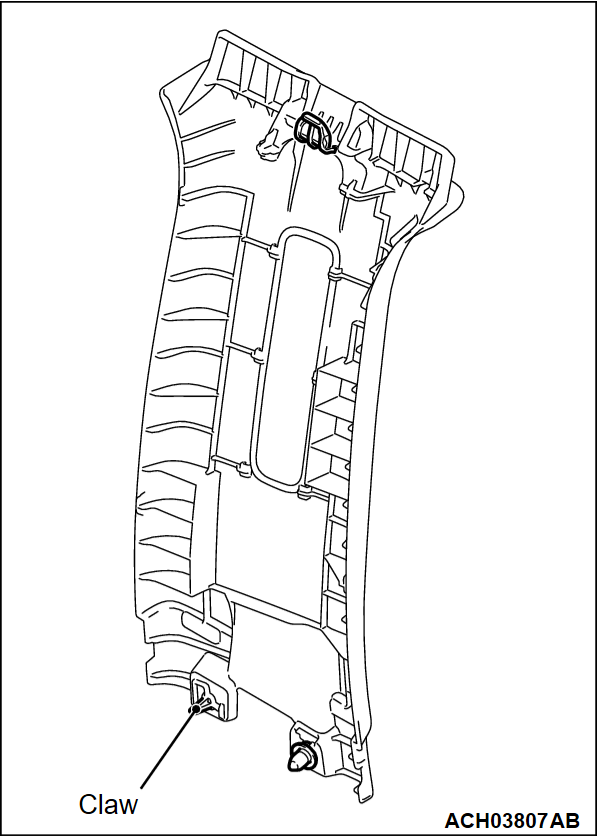
>>A<< CENTER PILLAR TRIM UPPER INSTALLATION
1. Securely engage the claw on the lower side of the center pillar trim upper to the hole on the body.
2. When the clip of the lower side of the center pillar trim upper is difficult to catch, recheck whether the claw on the upper side of the trim is properly engaged.


>>B<< TRIM CLIP B / FRONT PILLAR TRIM INSTALLATION
cautionIf clip B is removed from the body, replace it with a new one.
When clip B is replaced with a new item
1. Attach clip B to the front pillar trim.
2. Attach the front pillar trim to the body.