DTC B1530: Seat belt switch (passenger’s side) malfunction
DTC B1537: Seat belt switch (passenger’s side) circuit open
DTC B1538: Seat belt switch (passenger’s side) circuit (ground side) shorted
DTC B1539: Seat belt switch (passenger’s side) system fault power supply circuit (short-circuited to power supply)
DTC B1537: Seat belt switch (passenger’s side) circuit open
DTC B1538: Seat belt switch (passenger’s side) circuit (ground side) shorted
DTC B1539: Seat belt switch (passenger’s side) system fault power supply circuit (short-circuited to power supply)
| caution | If DTC B1530, B1537, B1538 or B1539 is set in the SRS-ECU, always diagnose the CAN main bus lines. |
CIRCUIT OPERATION
The SRS-ECU determines whether the seat belt is fastened or not according to the connection of the seat belt switch in the seat buckle.
DTC SET CONDITIONS
The DTC is set when the seat belt switch output current is not within the specified range.
Cause of trouble for each DTC is as follows.
| DTC | SYMPTOM |
| B1530 | Malfunction of seat belt switch |
| B1537 | Malfunction of the common terminal or open circuit in its harness |
| B1538 | Short to body ground in the common terminal harness |
| B1539 | Short to the power supply in the seat belt switch harness |
TROUBLESHOOTING HINTS
- Damaged wiring harnesses or connectors
- Malfunction of the seat belt switch (passenger’s side)
- Malfunction of the SRS-ECU
DIAGNOSIS
STEP 1. Using scan tool (M.U.T.-III), diagnose the CAN bus line.
(1)
| caution | To prevent damage to scan tool (M.U.T.-III), always turn the ignition switch to the "LOCK" (OFF) position before connecting or disconnecting scan tool (M.U.T.-III). |
(2) Turn the ignition switch to the "ON" position.
(3) Diagnose the CAN bus line.
(4) Turn the ignition switch to the "LOCK" (OFF) position.
Is the CAN bus line found to be normal?
STEP 2. Recheck for diagnostic trouble code.
Check again if the DTC is set.
(1) Erase the DTC.
(2) Turn the ignition switch to "ON" position.
(3) Check if the DTC is set.
(4) Turn the ignition switch to the "LOCK" (OFF) position.
Is the DTC set?
STEP 3. Resistance measurement at the SRS-ECU connector and the seat belt switch (passenger’s side) connector.
(1) Check that the negative battery terminal is disconnected. If the negative battery terminal is connected, disconnect it.
(2) Disconnect the seat belt switch (passenger’s side) connector.
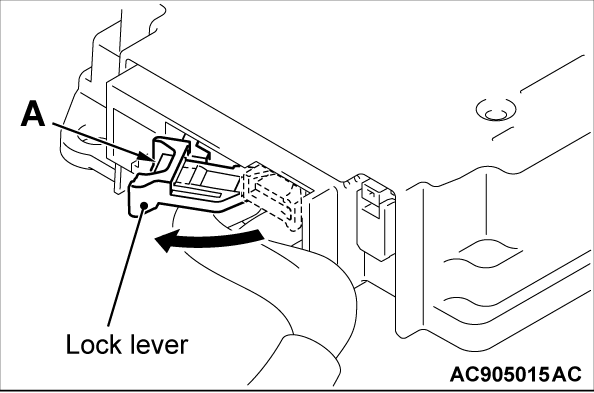
(3) While pushing the part "A" indicated in the figure of the harness side connector, turn the lock lever to the direction of the arrow to release the lock lever, and disconnect the SRS-ECU connector.
(4)
| caution | Do not insert a probe into the terminal from seat slide sensor connector harness side connector front side directly, as the connector contact pressure may be weakened. |
Check for continuity between the following terminals. It should be less than 2 ohms.
- Continuity PBS- line between SRS-ECU wiring harness side connector and the seat belt switch (passenger’s side) connector
- Continuity PBSO line between SRS-ECU wiring harness side connector and the seat belt switch (passenger’s side) connector
Is the check result normal?
STEP 4. Check the harness short circuit between seat belt switch (passenger’s side) connector and the SRS-ECU connector.
(1) Disconnect the negative battery terminal.
(2) Disconnect the seat belt switch (passenger’s side) connector.
(3) While pushing the part "A" indicated in the figure of the harness side connector, turn the lock lever to the direction of the arrow to release the lock lever, and disconnect the SRS-ECU connector.
(4) Measure the resistance between PBS-, PBSO line and body ground. It should be less than 2 ohms.
Is the check result normal?
STEP 5. Check the harness short circuit between seat belt switch (passenger’s side) connector and the SRS-ECU connector.
(1) Disconnect the negative battery terminal.
(2) Disconnect the seat belt switch (passenger’s side) connector.
(3) While pushing the part "A" indicated in the figure of the harness side connector, turn the lock lever to the direction of the arrow to release the lock lever, and disconnect the SRS-ECU connector.
(4) Connect the negative battery terminal.
(5) Ignition switch: ON.
(6) Measure the voltage between PBS-, PBSO line and body ground. Voltage should measure 1 volt or less.
Is the check result normal?
STEP 6. Seat belt switch (passenger’s side) check.
Checked whether the seat belt switch (passenger’s side) is normal (Refer to GROUP 52A, Front Seat Belt  ).
).
 ).
).Is the check result normal?
STEP 7. Recheck for diagnostic trouble code.
Check again if the DTC is set. The procedure is complete.
(1) Erase the DTC.
(2) Turn the ignition switch to the "ON" position.
(3) Check if the DTC is set.
(4) Turn the ignition switch to the "LOCK" (OFF) position.
Is DTC B1530, B1537, B1538 or B1539 set?
 The procedure is complete.
![[Previous]](../../../buttons/fprev.png)
![[Next]](../../../buttons/fnext.png)

