6. INTAKE AND EXHAUST VALVE CLEARANCE
INSPECT AND ADJUST
| note | Perform the valve clearance check and adjustment at the engine cold state. |
1. Remove the rocker cover center cover and all of the ignition coils.
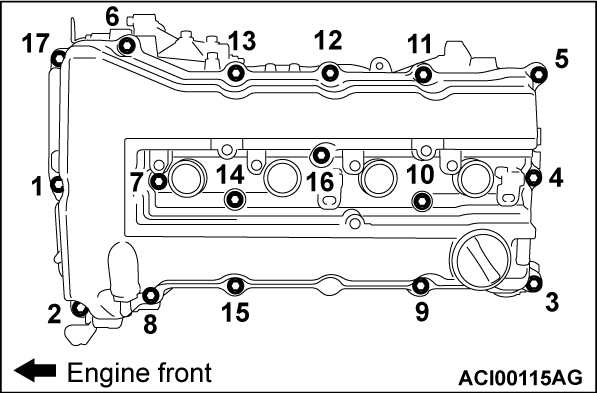
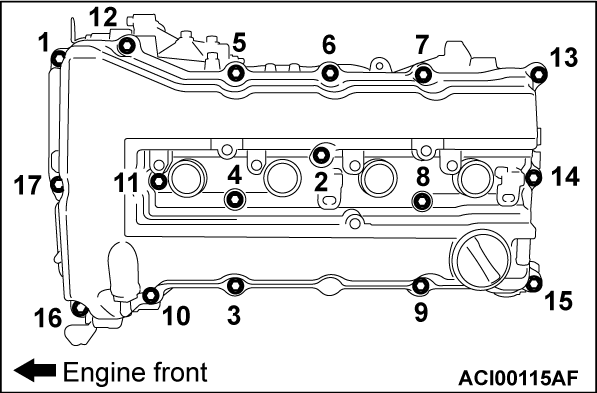
2. Loosen the rocker cover assembly mounting bolts in the order of number shown in the figure, and remove the rocker cover assembly.
3.
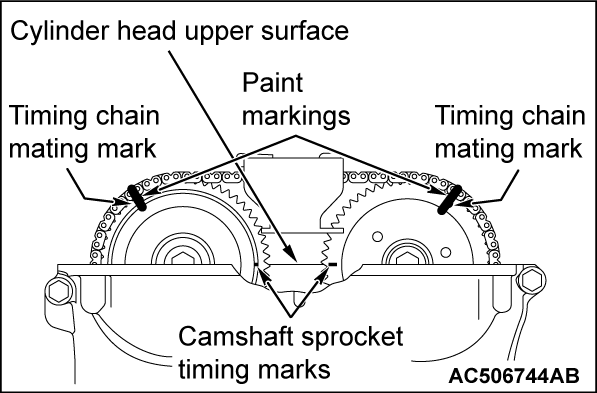
Turn the crankshaft clockwise so that the camshaft sprocket timing marks become horizontal to the cylinder head upper surface, and set the number 1 cylinder to the top dead center of compression. At this time, check that the crankshaft pulley timing mark is in the "T" mark position of the ignition timing indicator of the timing chain case assembly.
| caution | Turn the crankshaft clockwise. |
4. Put paint marks on both the camshaft sprocket and valve timing chain at the position of camshaft sprocket timing chain mating mark (circular hole).
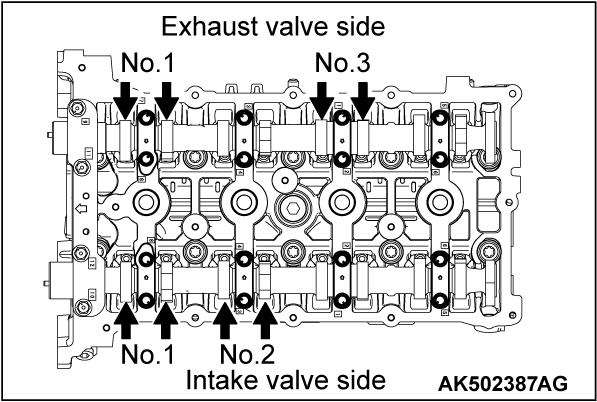
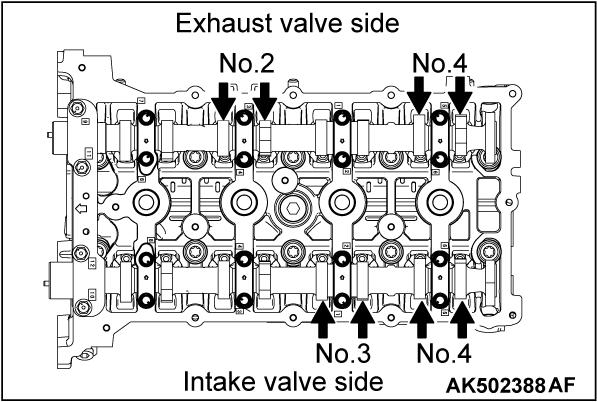
5. Using a thickness gauge, measure the valve clearance with the arrow shown in Figure. If deviated from the standard value, make note for the valve clearance.
Standard value:
- Intake valve 0.20 ± 0.03 mm (0.008 ± 0.0012 inch)
- Exhaust valve 0.30 ± 0.03 mm (0.012 ± 0.0012 inch)
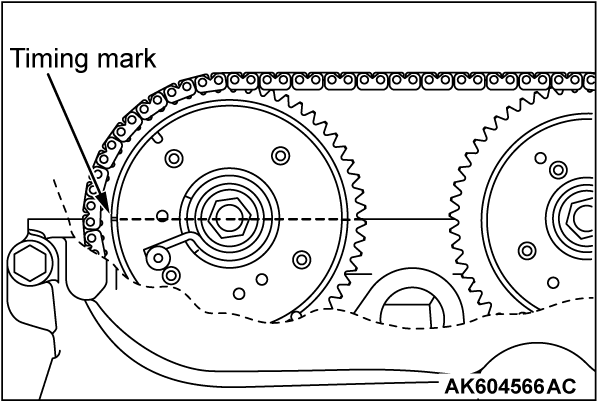
6. Turn the crankshaft clockwise 360 degrees, and put the timing mark on the exhaust camshaft sprocket in position shown in Figure. Therefore, number 4 cylinder goes to the compression top dead center.
7. Check the valve clearance with the arrow shown in Figure. In the same procedure as 4.
8. If the valve clearance is deviated from the standard value, remove the camshaft and the valve tappet. For the camshaft removal, refer to GROUP 11A - Camshaft Removal and Installation  <2.0L ENGINE>, GROUP 11C - Camshaft Removal and Installation
  <2.4L ENGINE>.
 <2.0L ENGINE>, GROUP 11C - Camshaft Removal and Installation
  <2.4L ENGINE>.
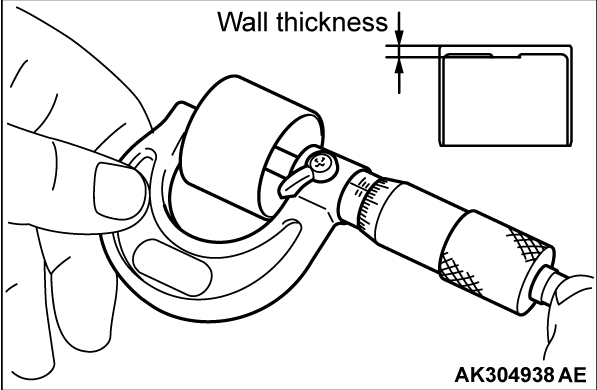
9. Using a micrometer, measure the thickness of the removed valve tappet.
10. Calculate the thickness of the newly installed valve tappet through the following equation.
A: thickness of newly installed valve tappet
B: thickness of removed valve tappet
C: measured valve clearance
Equation
- Intake valve: A = B + [C - 0.20 mm (0.008 inch)]
- Exhaust valve: A = B + [C - 0.30 mm (0.012 inch)]
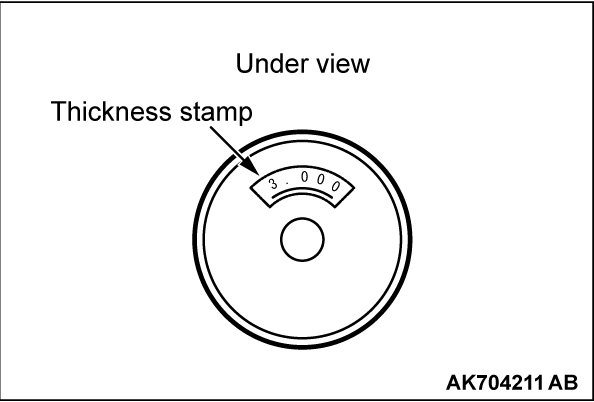
| note | The valve tappet ranges 3,000 - 3,690 mm (0.1181 - 0.1453 inch) and has 47 types per 0.015 mm (0.0006 inch). The thickness below a decimal point is stamped on the reverse side of the valve tappet. |
11. Install the valve tappet selected through the procedure 9, and put the camshaft in position. For the camshaft installation, refer to GROUP 11A - Camshaft Removal and Installation  <2.0L ENGINE>, GROUP 11C - Camshaft Removal and Installation
  <2.4L ENGINE>.
 <2.0L ENGINE>, GROUP 11C - Camshaft Removal and Installation
  <2.4L ENGINE>.
12. After installing the timing chain, measure the valve clearance using the procedure 3 to 6. Confirm the clearance is within the standard value.
13. Remove the sealant from the mating surfaces of rocker cover assembly, cylinder head, and timing chain case assembly, and degrease the surface where the sealant is applied.
14.
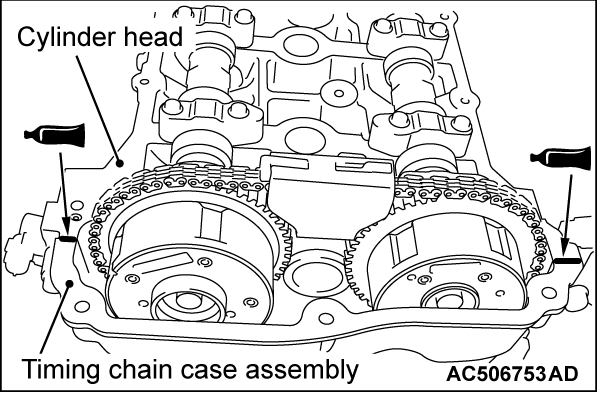
To the joints between the cylinder head and timing chain case assembly, apply the sealant with a diameter of 4 mm (0.16 inch) as shown in the figure. Then, install the rocker cover assembly to the cylinder head.
| caution | After the installation, until a sufficient period of time (one hour or more) elapses, do not apply the oil or water to the sealant application area or start the engine. |
Specified sealant: ThreeBond 1227D or equivalent
| note | Install the rocker cover assembly immediately after applying sealant. |
15. Tighten the rocker cover assembly mounting bolts to the specified torque in the order of number shown in the figure.
Tightening torque: 3.0 ± 1.0 N·m (27 ± 8 in-lb)
16. Tighten again the rocker cover assembly mounting bolts to the specified torque in the order of number shown in the figure.
Tightening torque: 5.5 ± 0.5 N·m (49 ± 4 in-lb)
17. Install the ignition coils and rocker cover center cover.
![[Previous]](../../../buttons/fprev.png)
![[Next]](../../../buttons/fnext.png)
