
|
SUBJECT: CROSSMEMBER CORROSION - SAFETY RECALL CAMPAIGN |
No: SR-20-003REV_1 |
||||||||||||||||||
|
DATE: July 2020 |
|||||||||||||||||||
|
MODEL: SEE BELOW |
|||||||||||||||||||
|
CIRCULATE TO: |
[ X ] GENERAL MANAGER |
[ X ] PARTS MANAGER |
[ X ] TECHNICIAN |
||||||||||||||||
|
[ X ] SERVICE ADVISOR |
[ X ] SERVICE MANAGER |
[ X ] WARRANTY PROCESSOR |
[ X ] SALES MANAGER |
||||||||||||||||
|
This bulletin supersedes SR-20-003, issued July 2020; changes include:
Revisions are italicized and indicated by <. |
This bulletin provides directions for inspection and repair of affected vehicles' Crossmembers.
The inside and outside surfaces of the Front Crossmembers used on certain vehicles, if exposed long term to snow melt water and anti-freezing agents, may corrode due to insufficient performance of the rust protection. Should significant corrosion occur over time, a lower control arm could eventually become detached resulting in loss of vehicle control and a potential collision.
2008 – 2010 Lancer*
2009 - 2010 Lancer Sportback*
2008 -2013 Outlander*
2011 – 2016 Outlander Sport / RVR*
*Currently or ever registered in Connecticut, Delaware, Illinois, Indiana, Iowa, Kentucky, Maine, Maryland, Massachusetts, Michigan, Minnesota, Missouri, New Hampshire, New Jersey, New York, Ohio, Pennsylvania, Rhode Island, Vermont, Virginia, West Virginia, Wisconsin, and Washington D.C.
NOTE: If you encounter a vehicle which has excessive Crossmember corrosion, but is not covered under this campaign (i.e., never registered in a salt belt state), contact your DPSM for further directions.
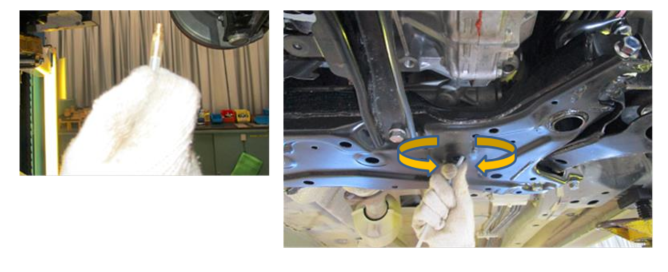
Inspect consistency of the Anti-Corrosion Agent (P/N: MZ341024EX) before use. The consistency should be smooth and creamy. If the consistency is chunky (like cottage cheese) do not use and discard the product.<
|
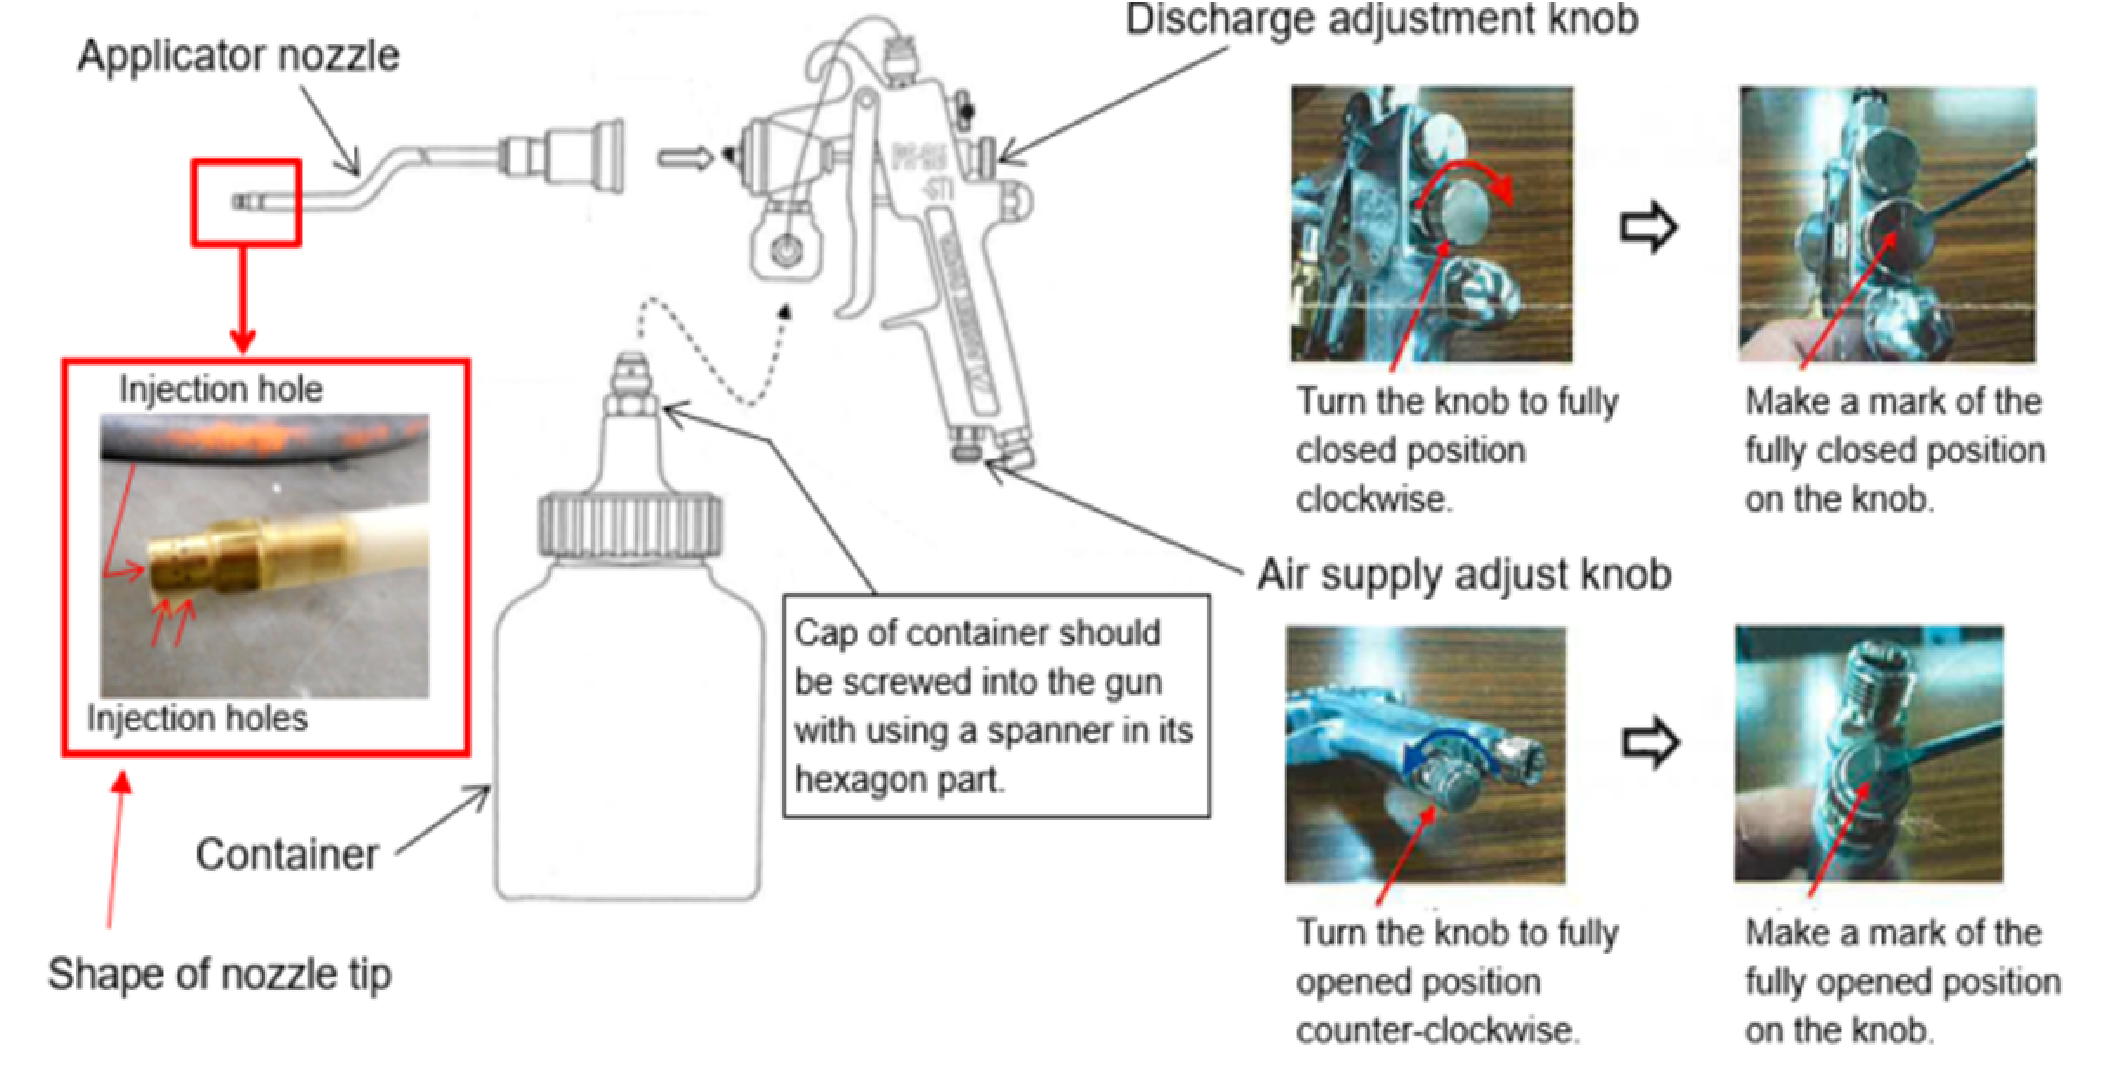
ANTI-CORROSION AGENT SPRAY GUN PART #: |
MZ341024EX - ANTI-CORROSION AGENT |
MZ321015 (Canada) - ANTI-CORROSION AGENT |
|
MZ341023EX |
Reference Page 12 |
Reference Page 15 |
|
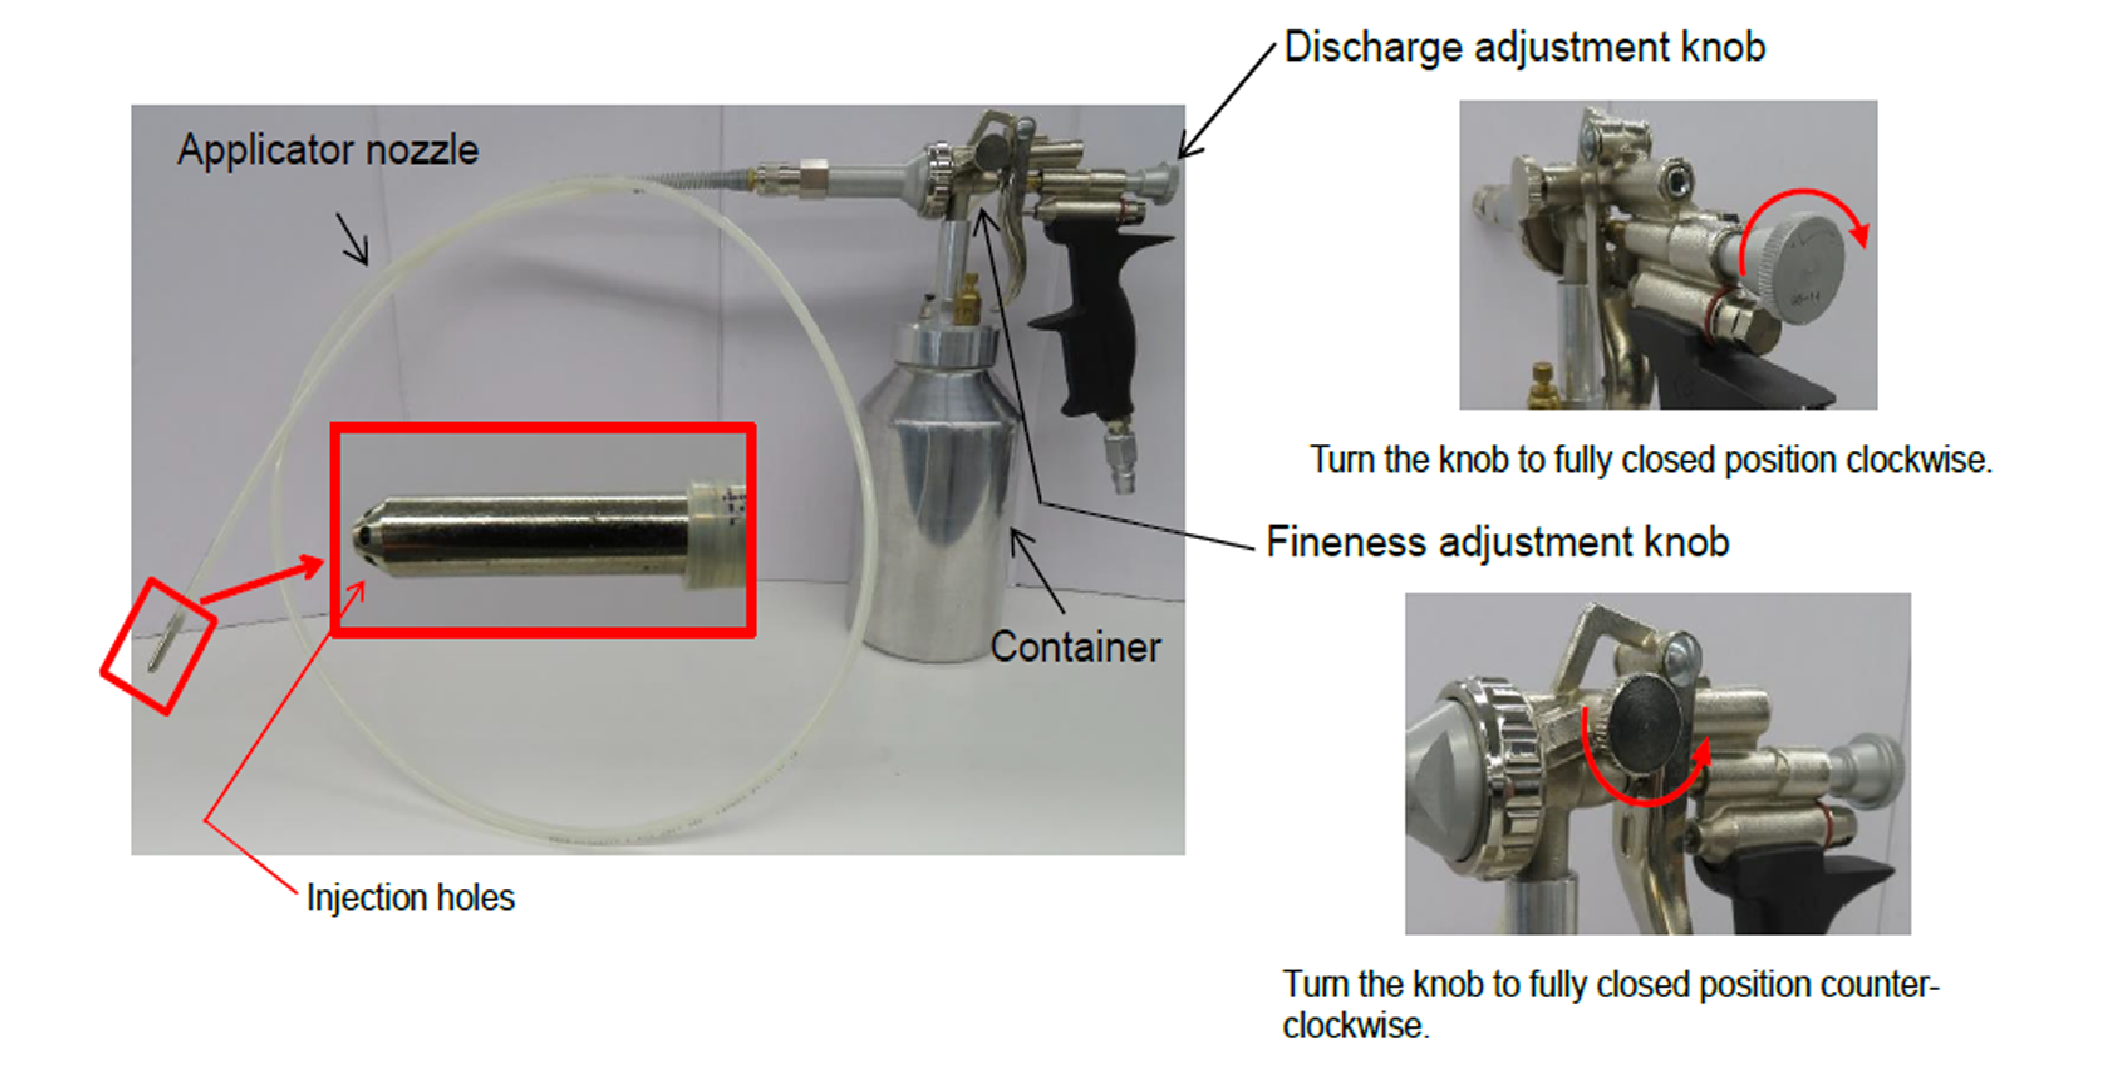
T99XXKXX01 |
Reference Page 17 |
Reference Page 22 |
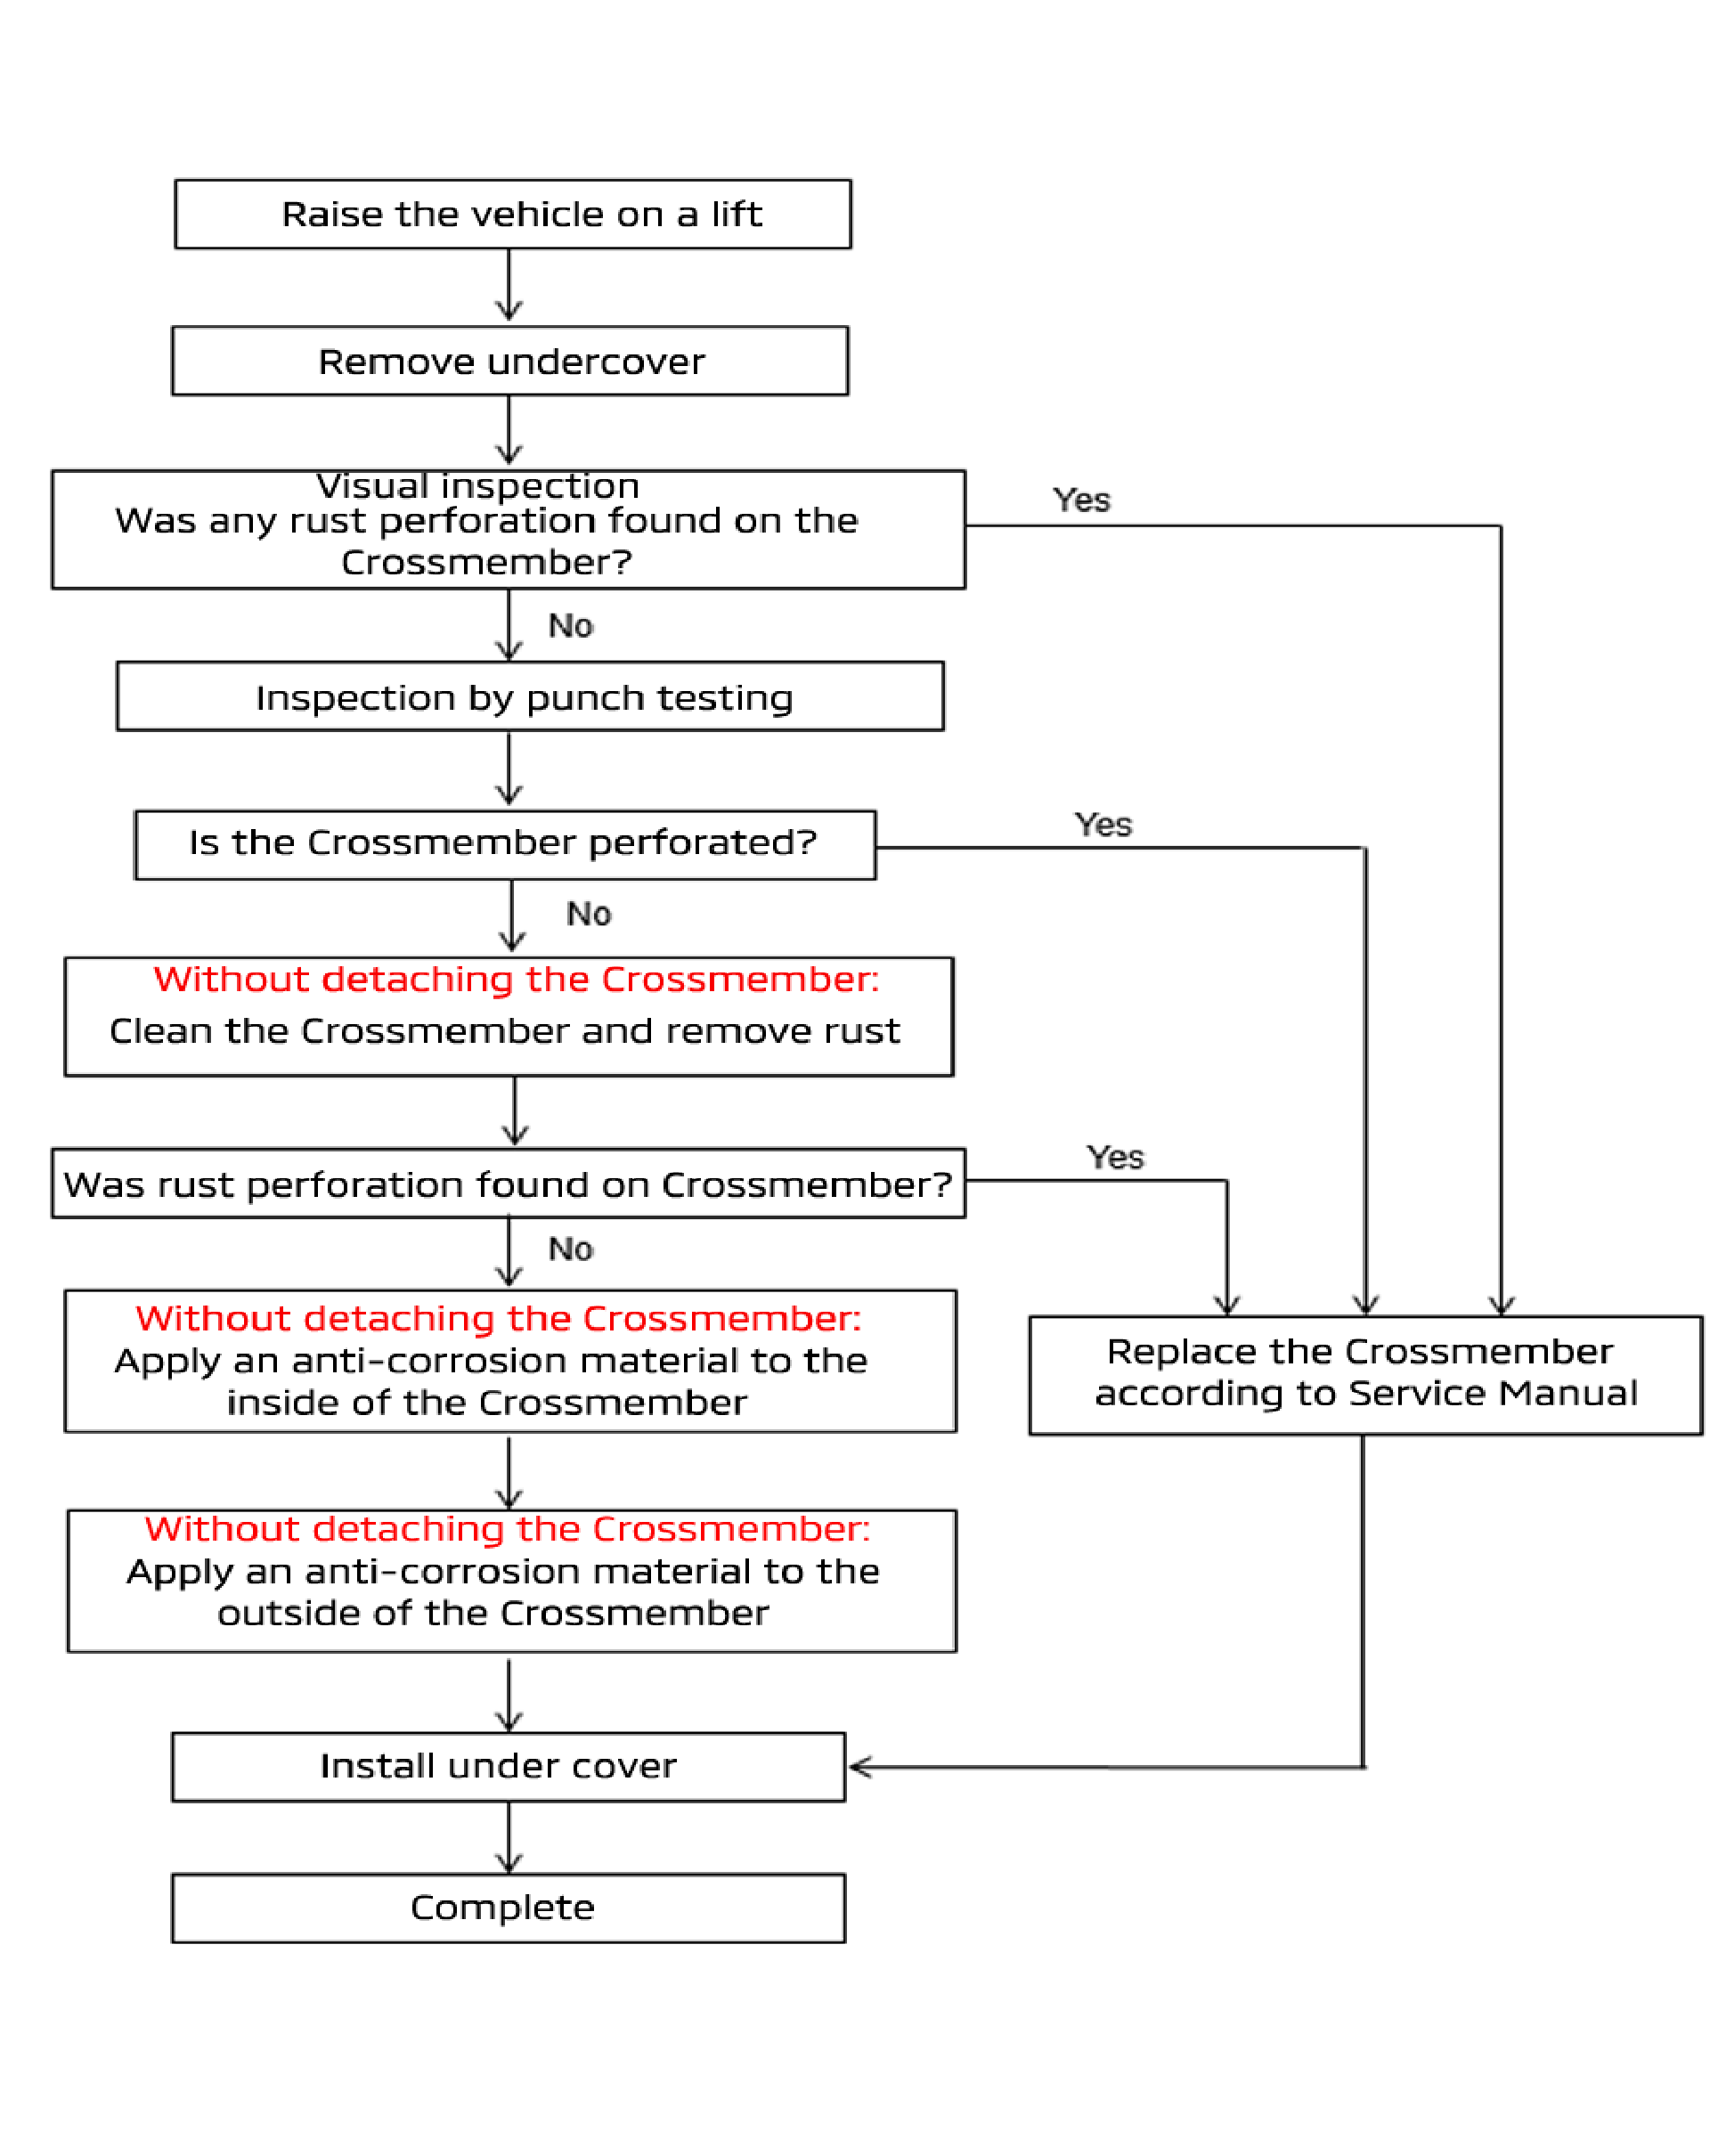
FLOW CHART
2. Review flow chart
NOTE: Crossmember removed from vehicle for illustration purposes.
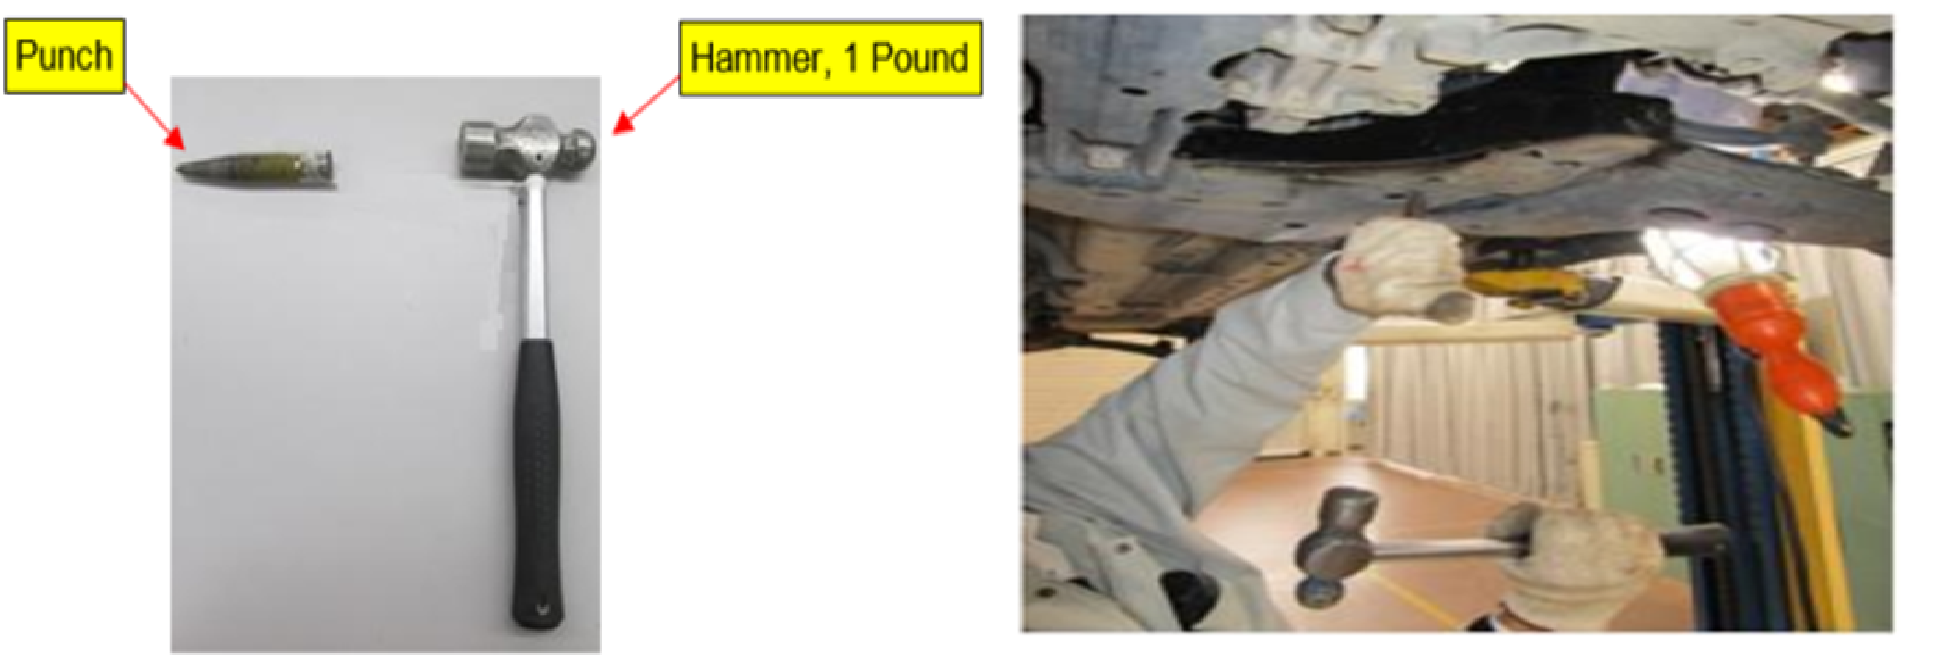
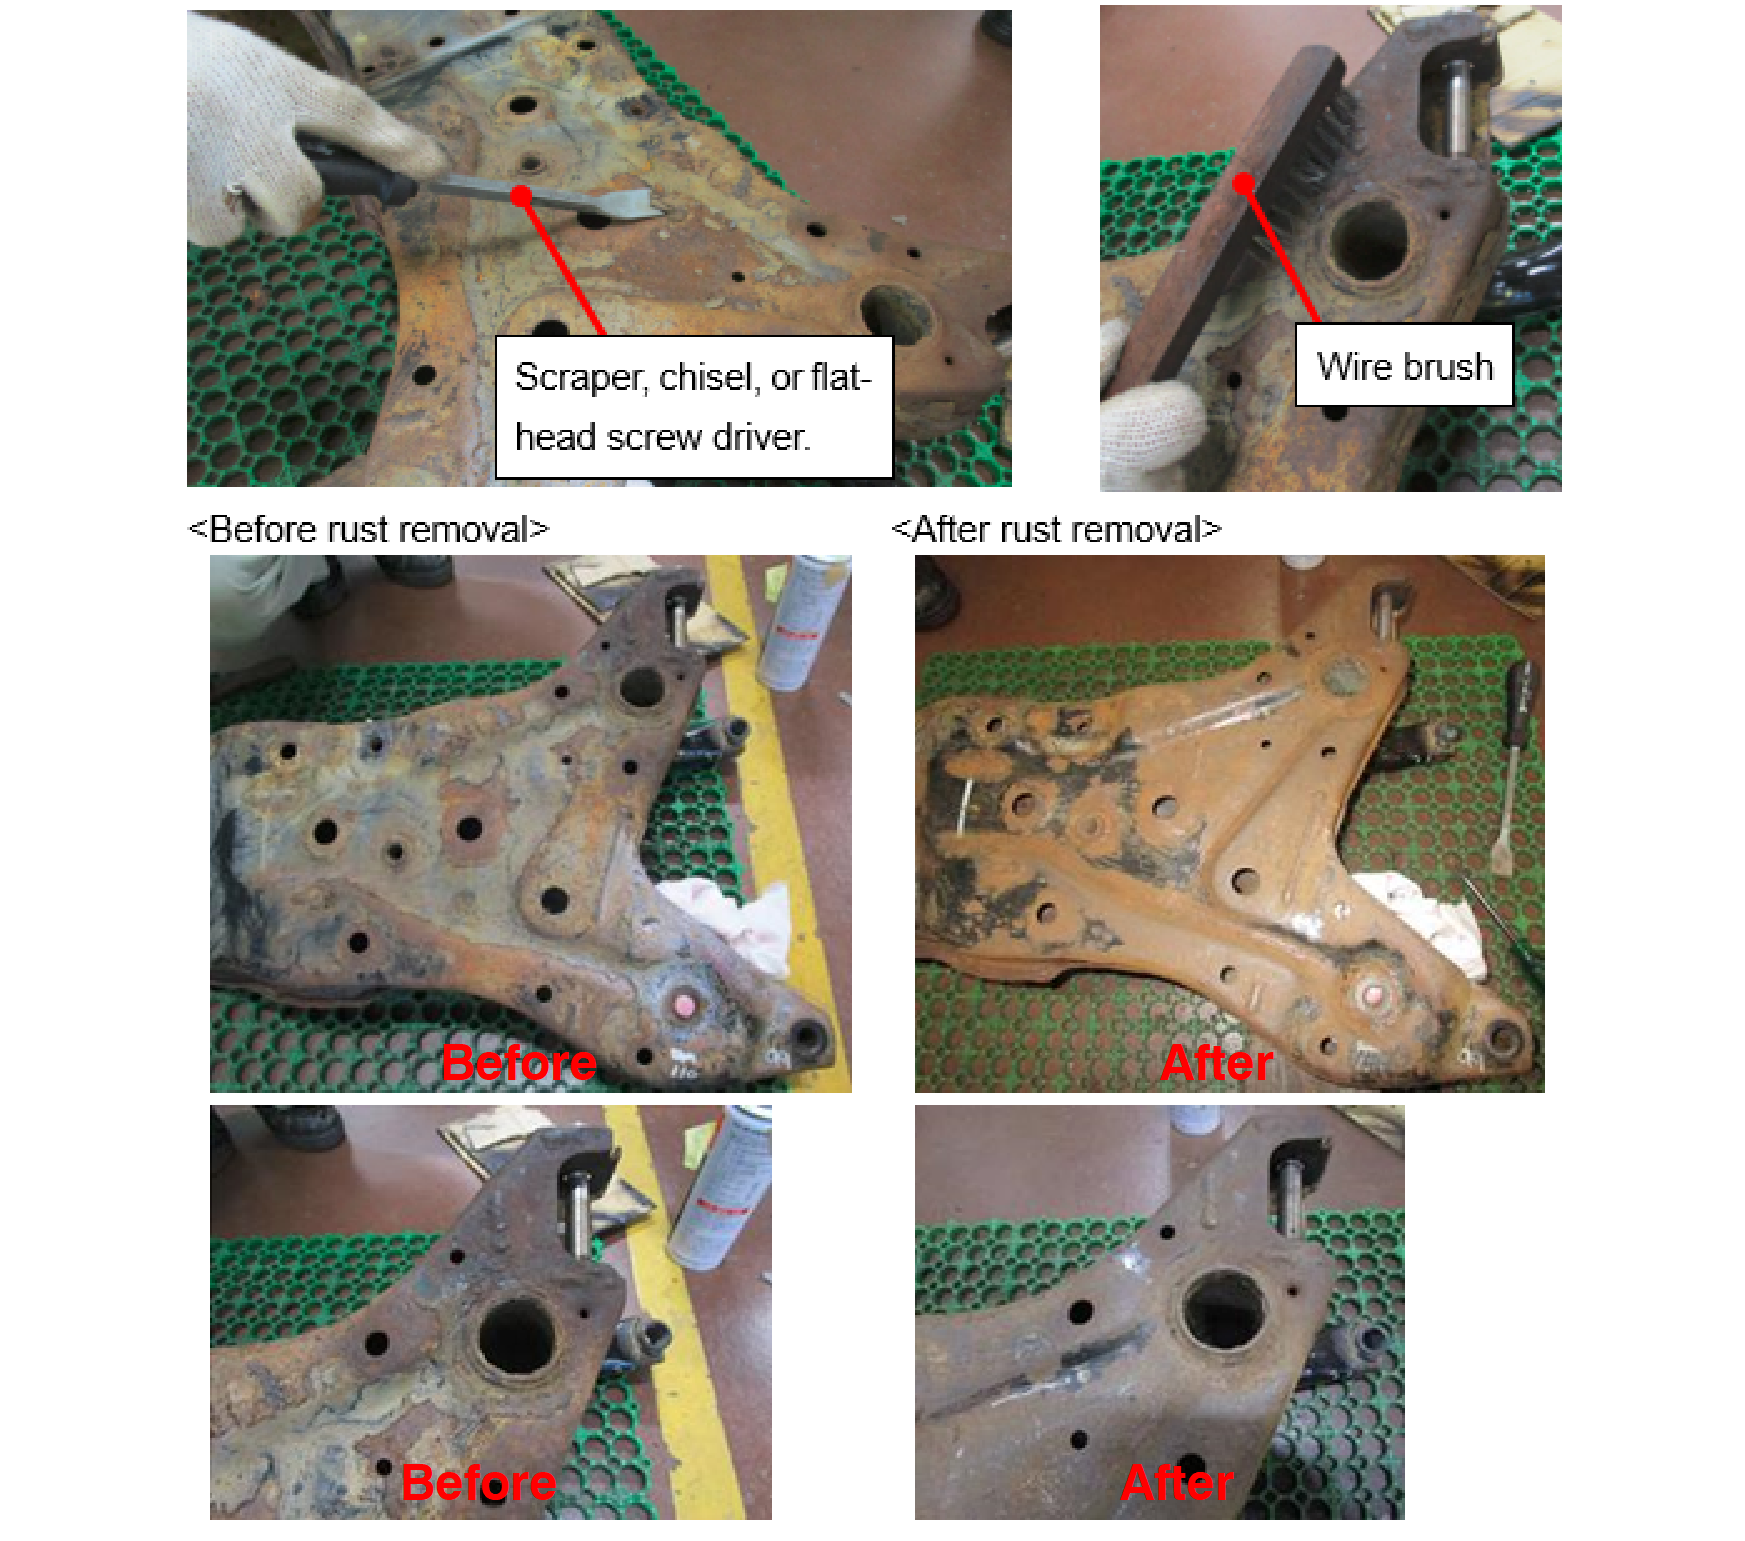
 Wear safety glasses, respirator, and protective gloves when punching, removing rust and cleaning the Crossmember.
NOTE: Crossmember removed from vehicle for illustration purposes only, in the photos below.
Wear safety glasses when applying anti-corrosion agent.
Wear safety glasses when applying anti-corrosion agent.
Wear safety glasses when applying anti-corrosion agent.
|
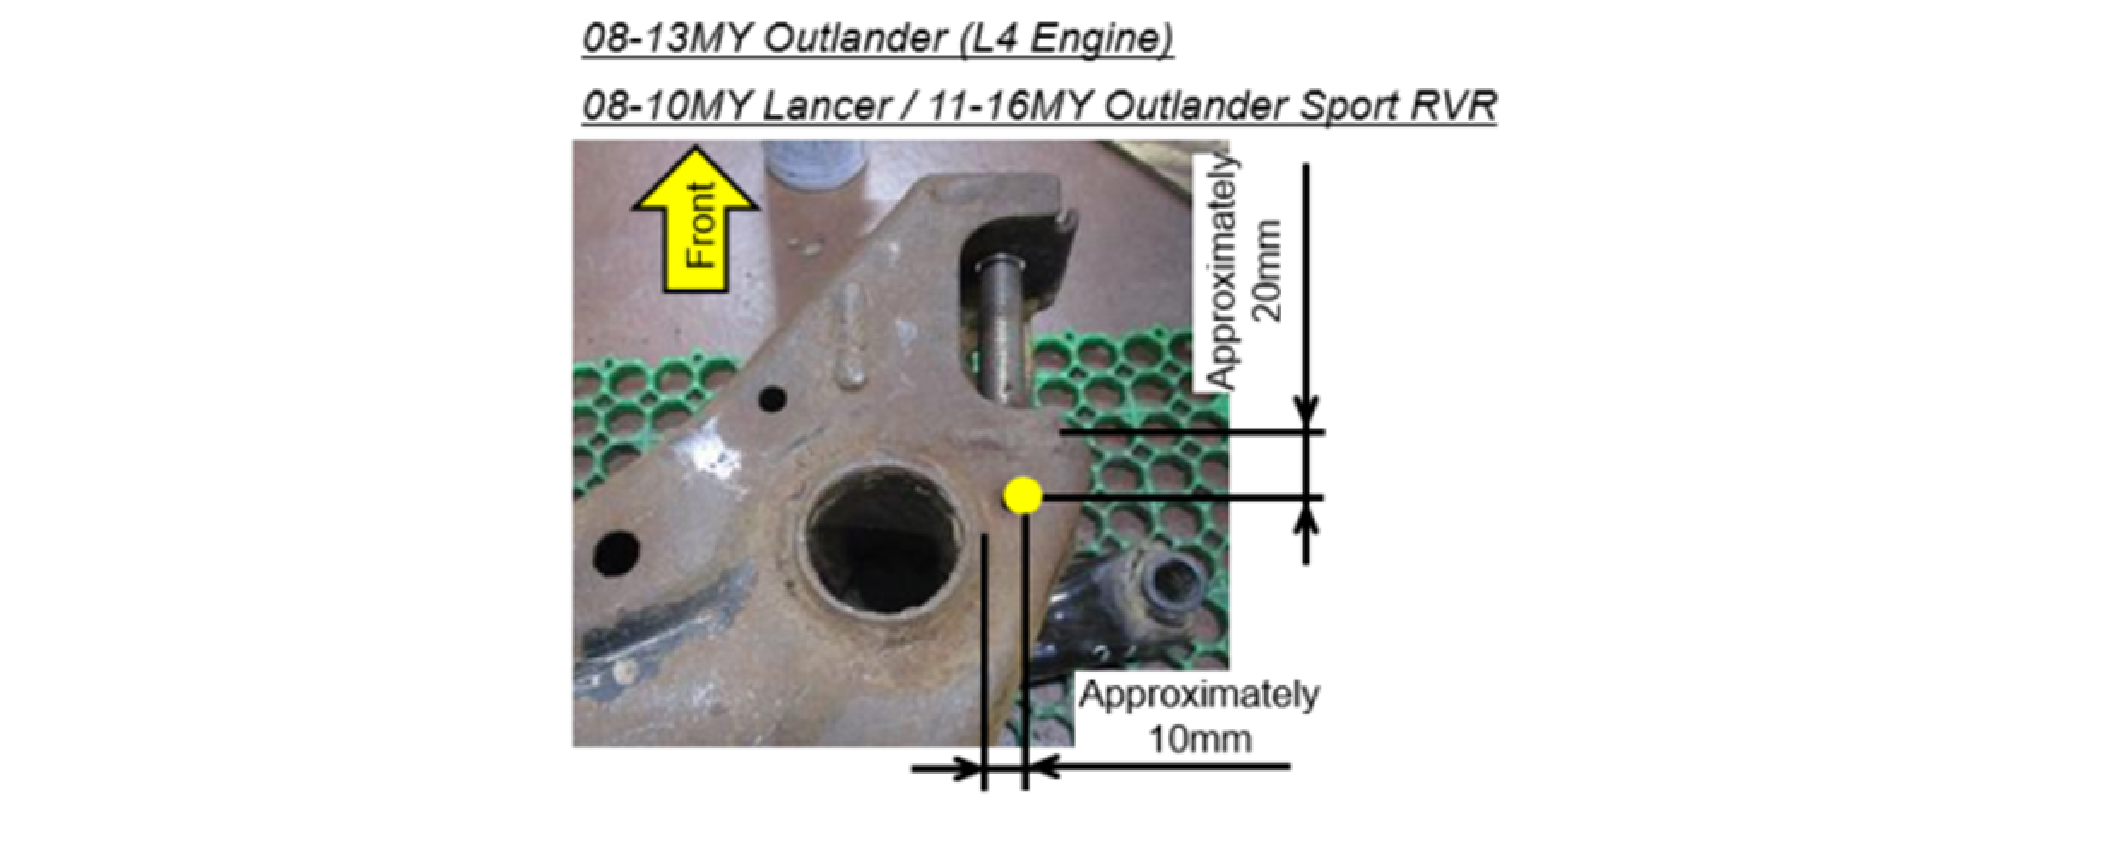
08-13MY Outlander (L4 Engine), 08-10MY Lancer / 11-16MY Outlander Sport / RVR |
|||||
|
Anti-Corrosion Agent |
|
MZ341024EX |
MZ321015 (used in Canada) |
MZ341024EX |
MZ321015 (used in Canada) |
|
Spray Gun |
|
MZ341023EX |
MZ341023EX |
T99XXKXX01 |
|
|
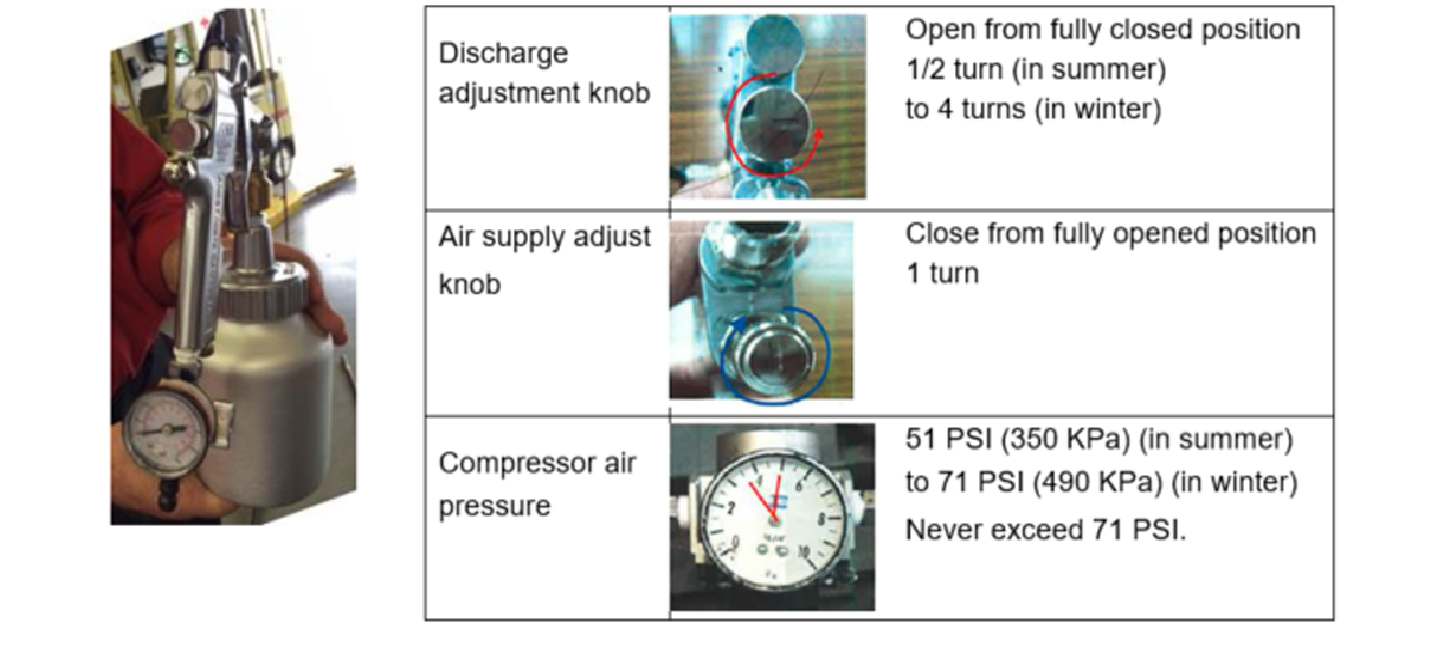
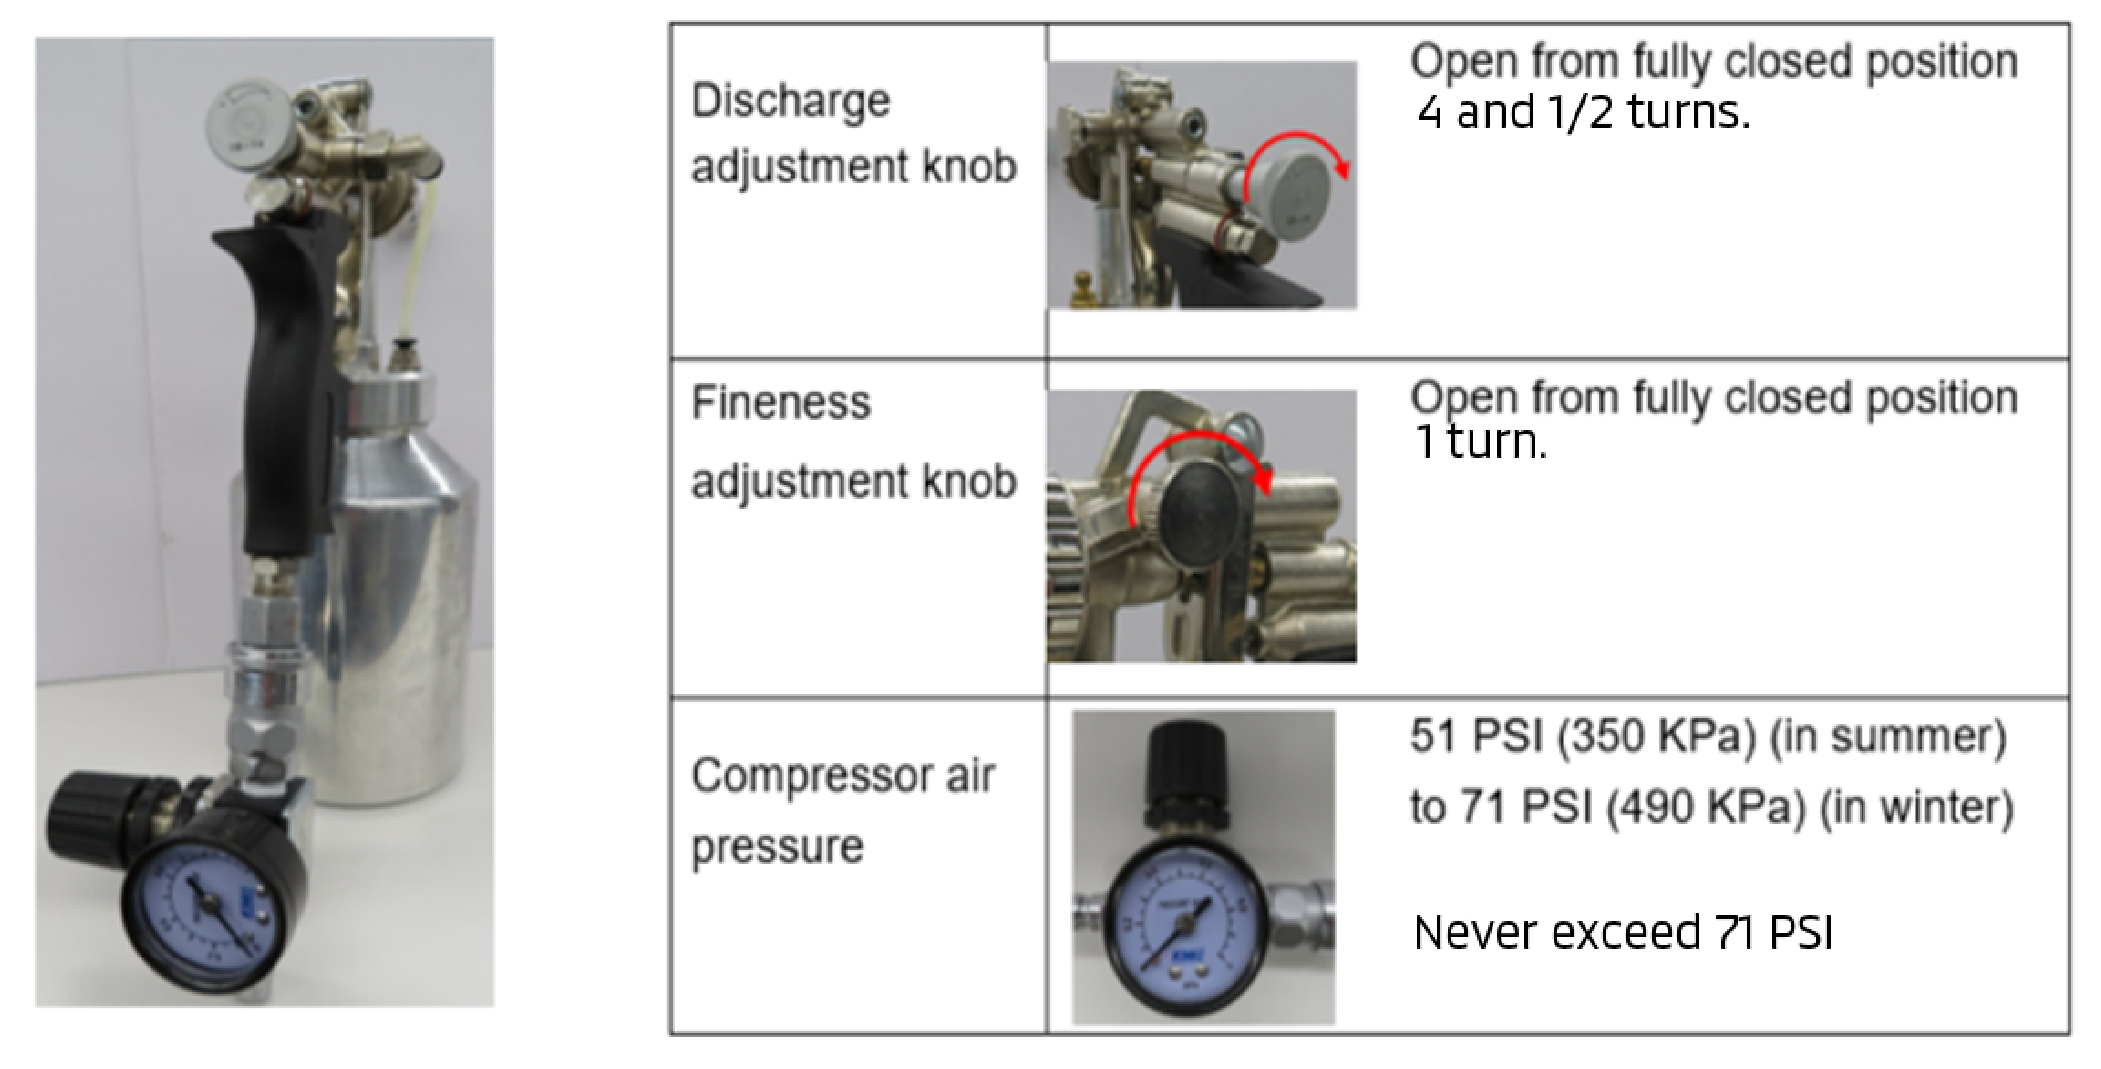
Spray Gun Setting |
Discharge adjustment knob |
½ turn (in summer) to 4 turns (in winter) |
- |
||
|
Air supply adjustment knob |
1 turn |
||||
|
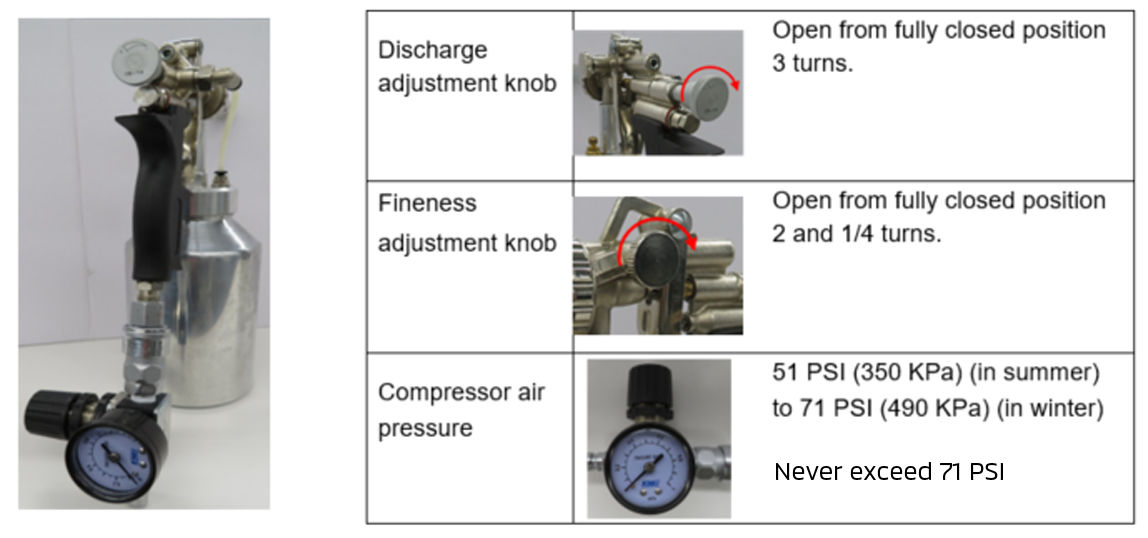
Discharge adjustment knob |
- |
4 and ½ turns |
3 turns |
||
|
Fineness adjustment knob |
1 turn |
2 and ¼ turns |
|||
|
Air pressure
|
51 PSI (350 Kpa) in summer - to - 71 PSI (490 Kpa) in winter |
||||
|
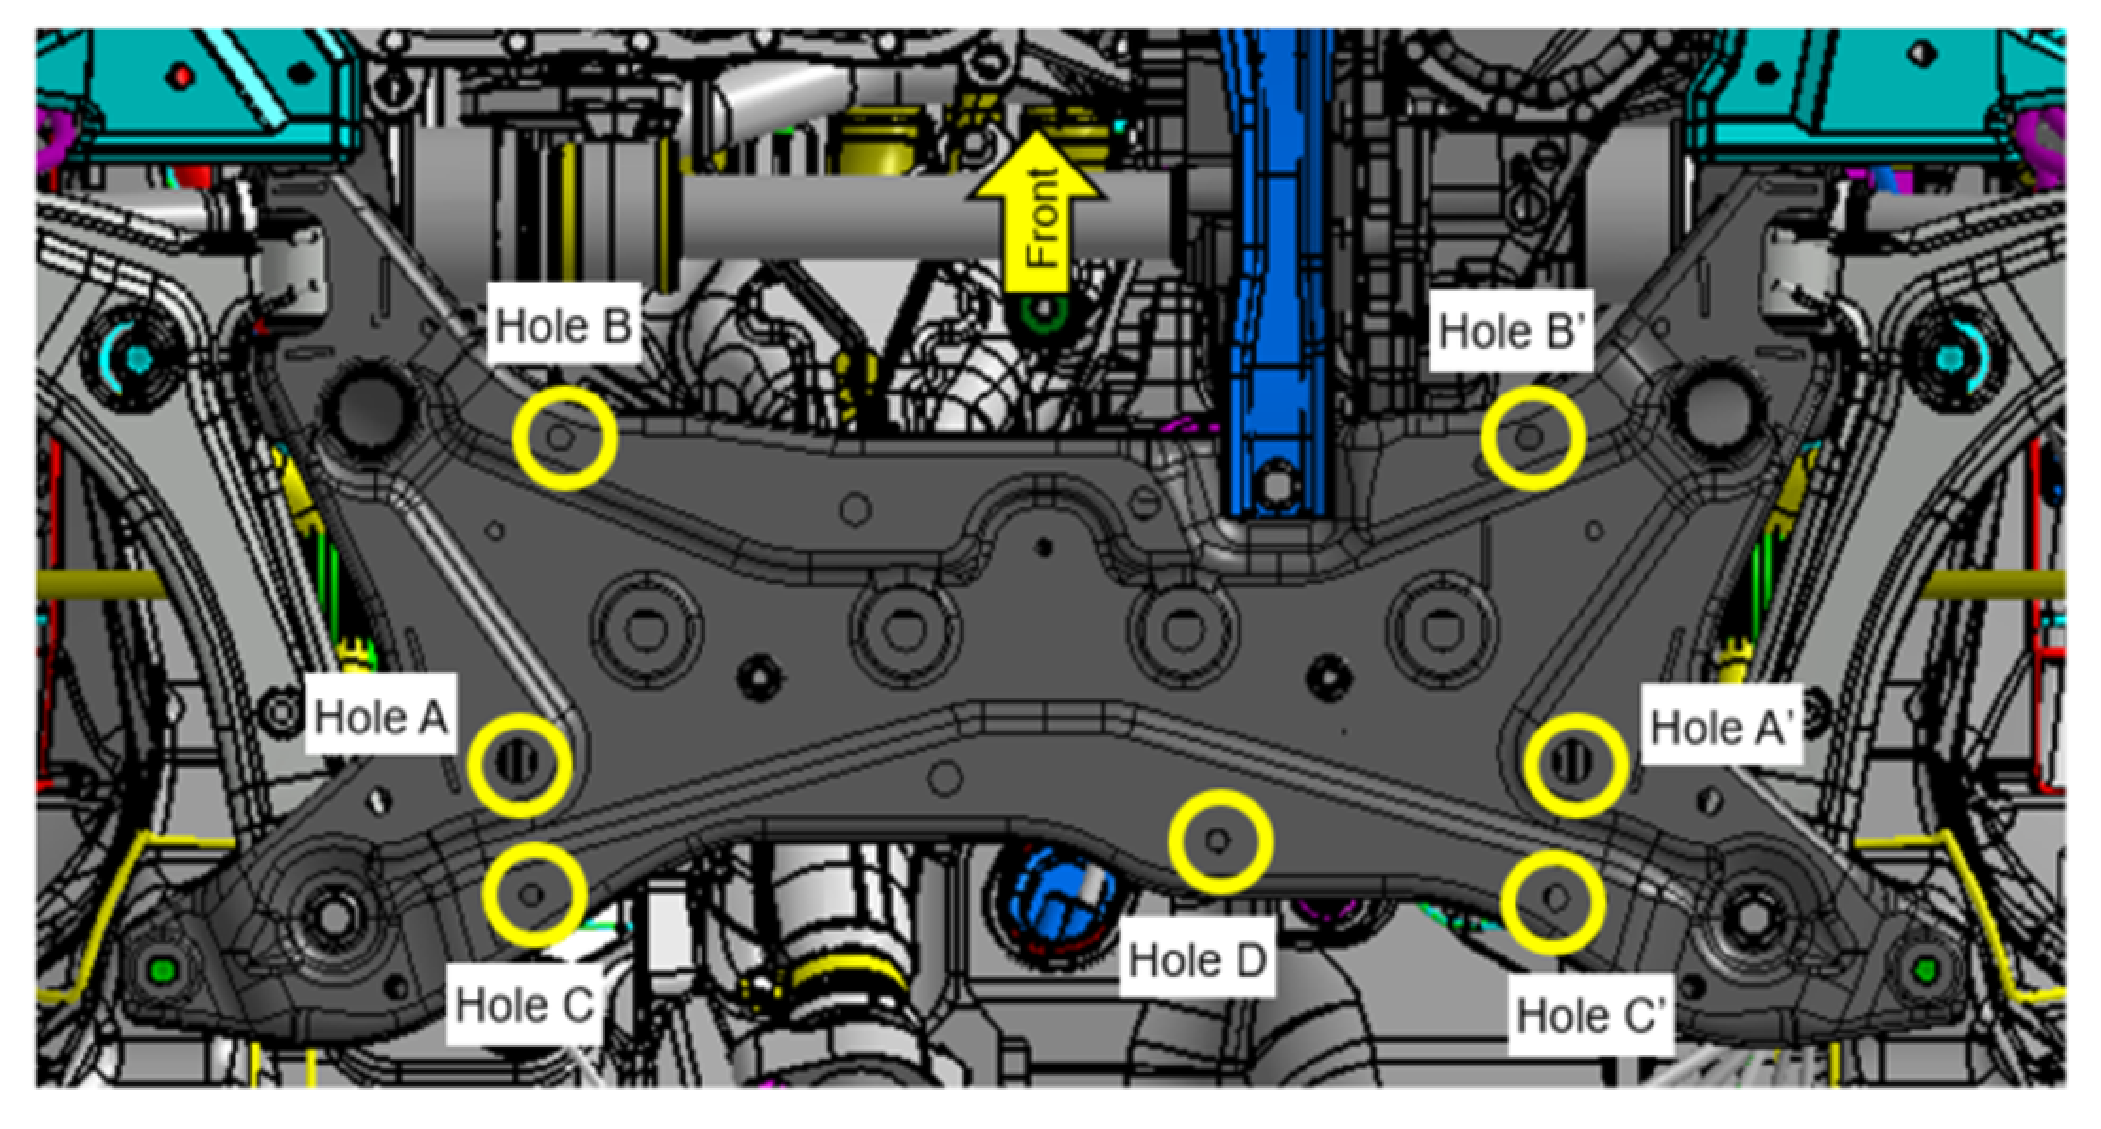
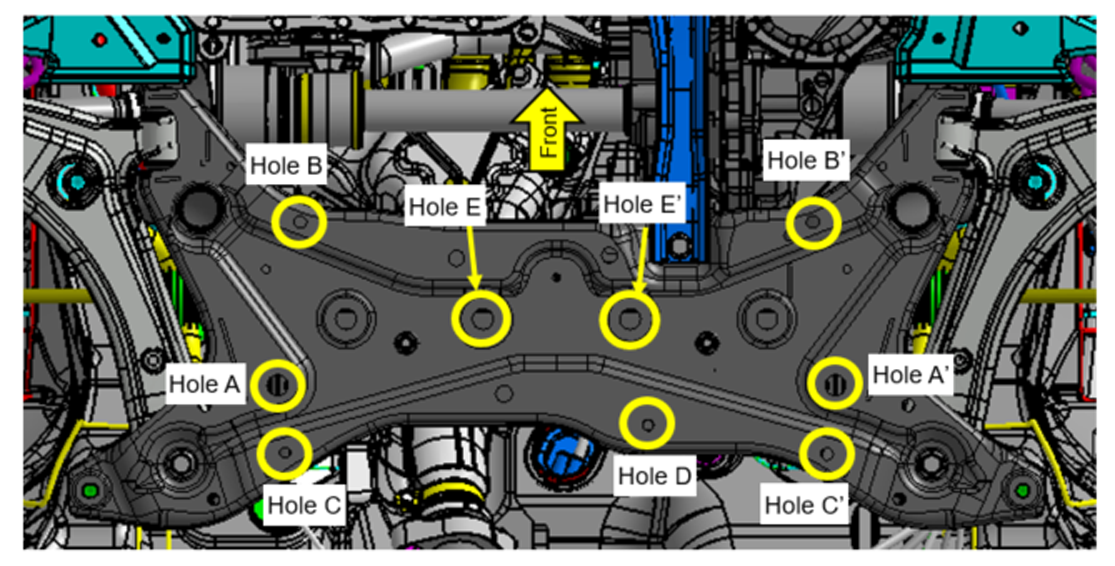
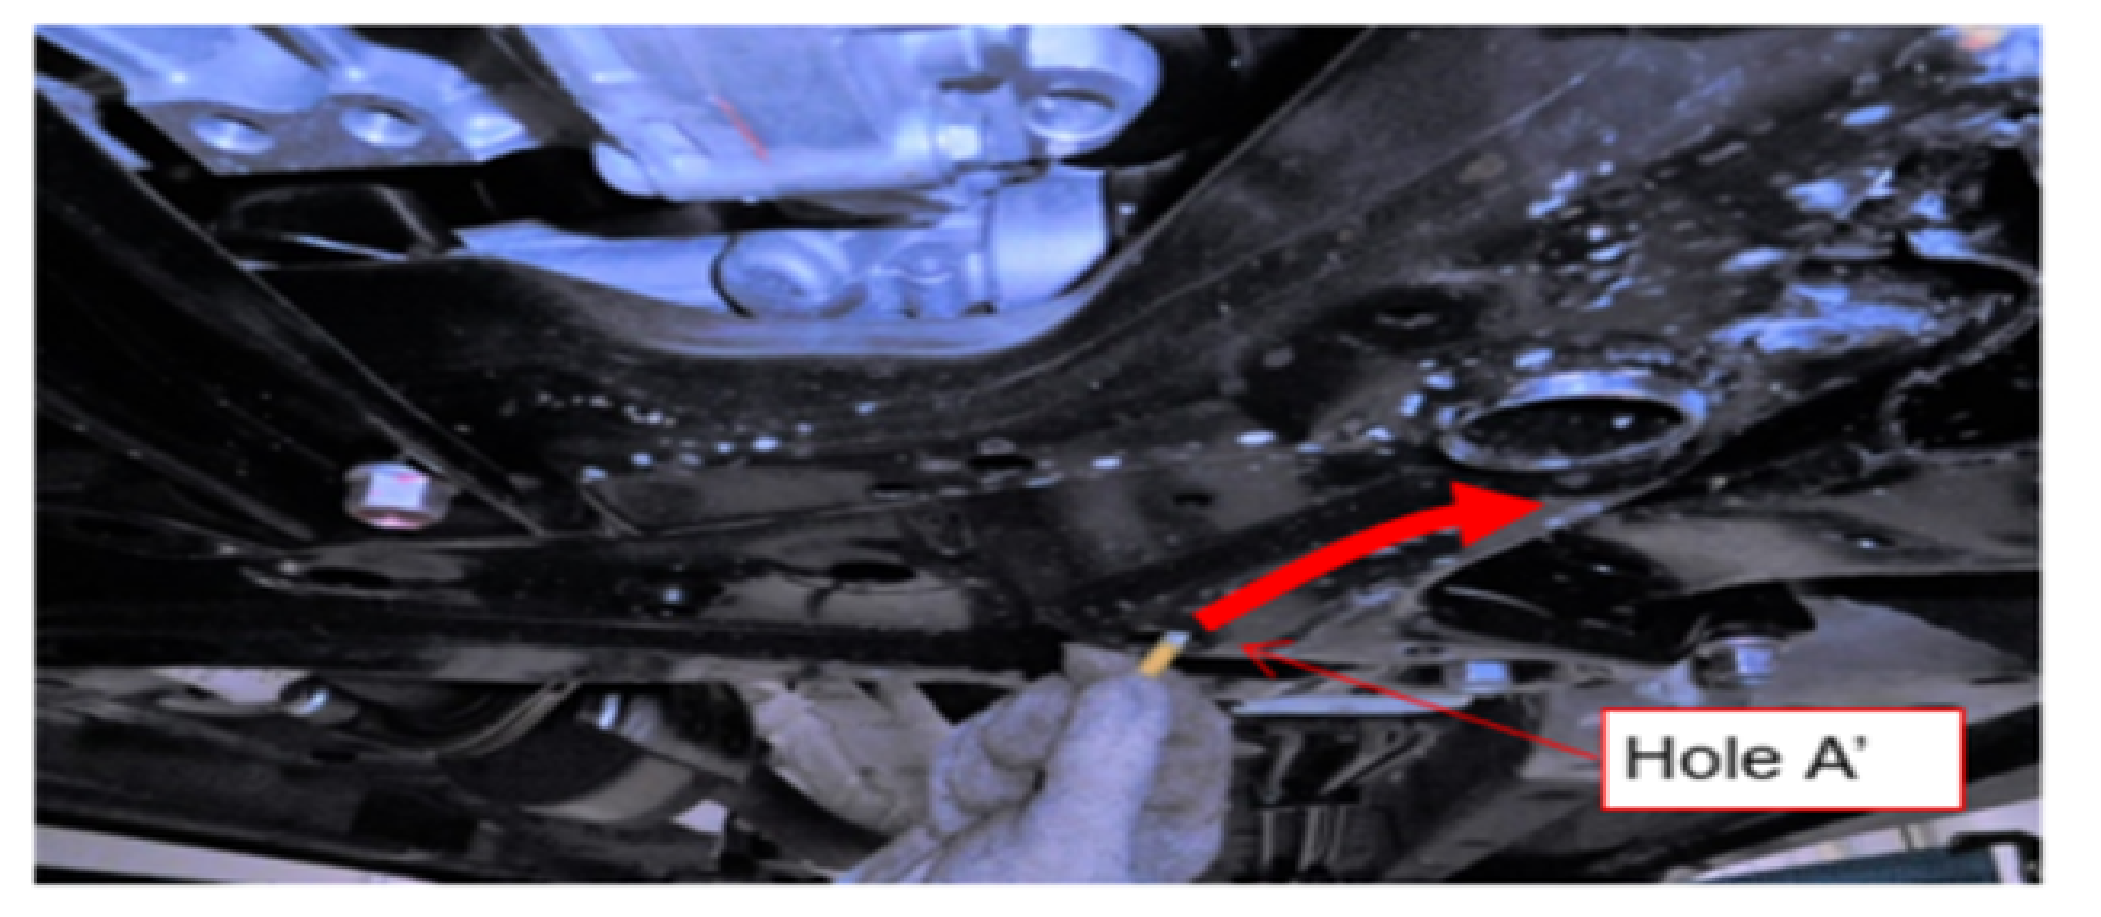
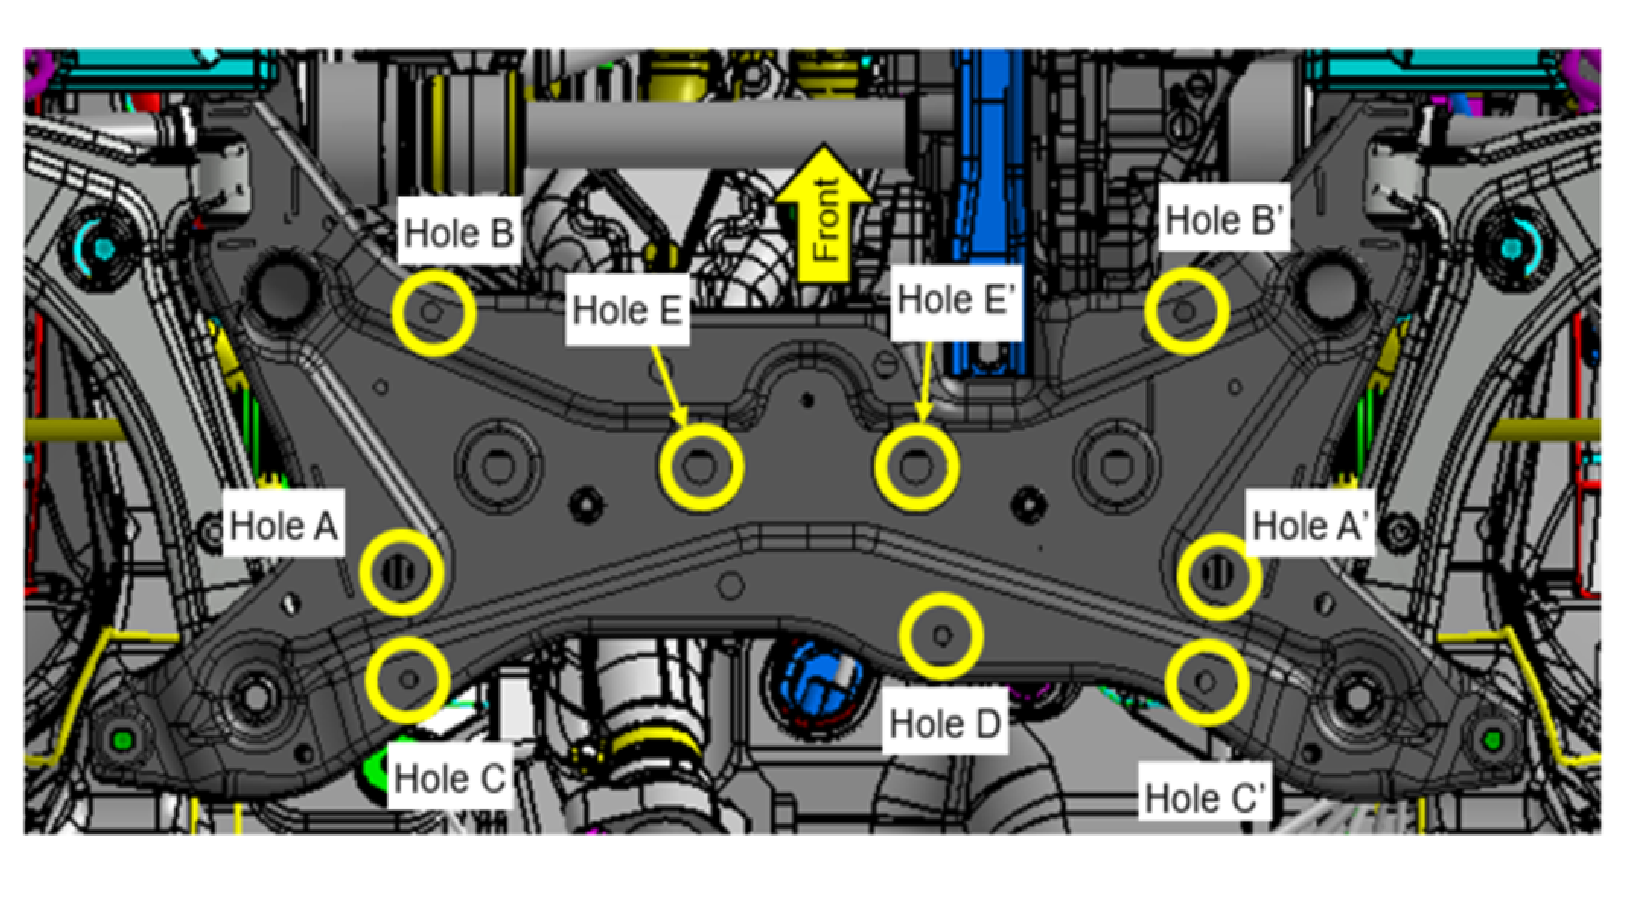
Hole A, A' |
Insert length of hose (mm) |
240 |
180 |
||
|
Spraying time (s) |
Until Anti-Corrosion agent leaks from the opening of the lower arm bracket |
||||
|
Spraying time during removal |
10 seconds |
||||
|
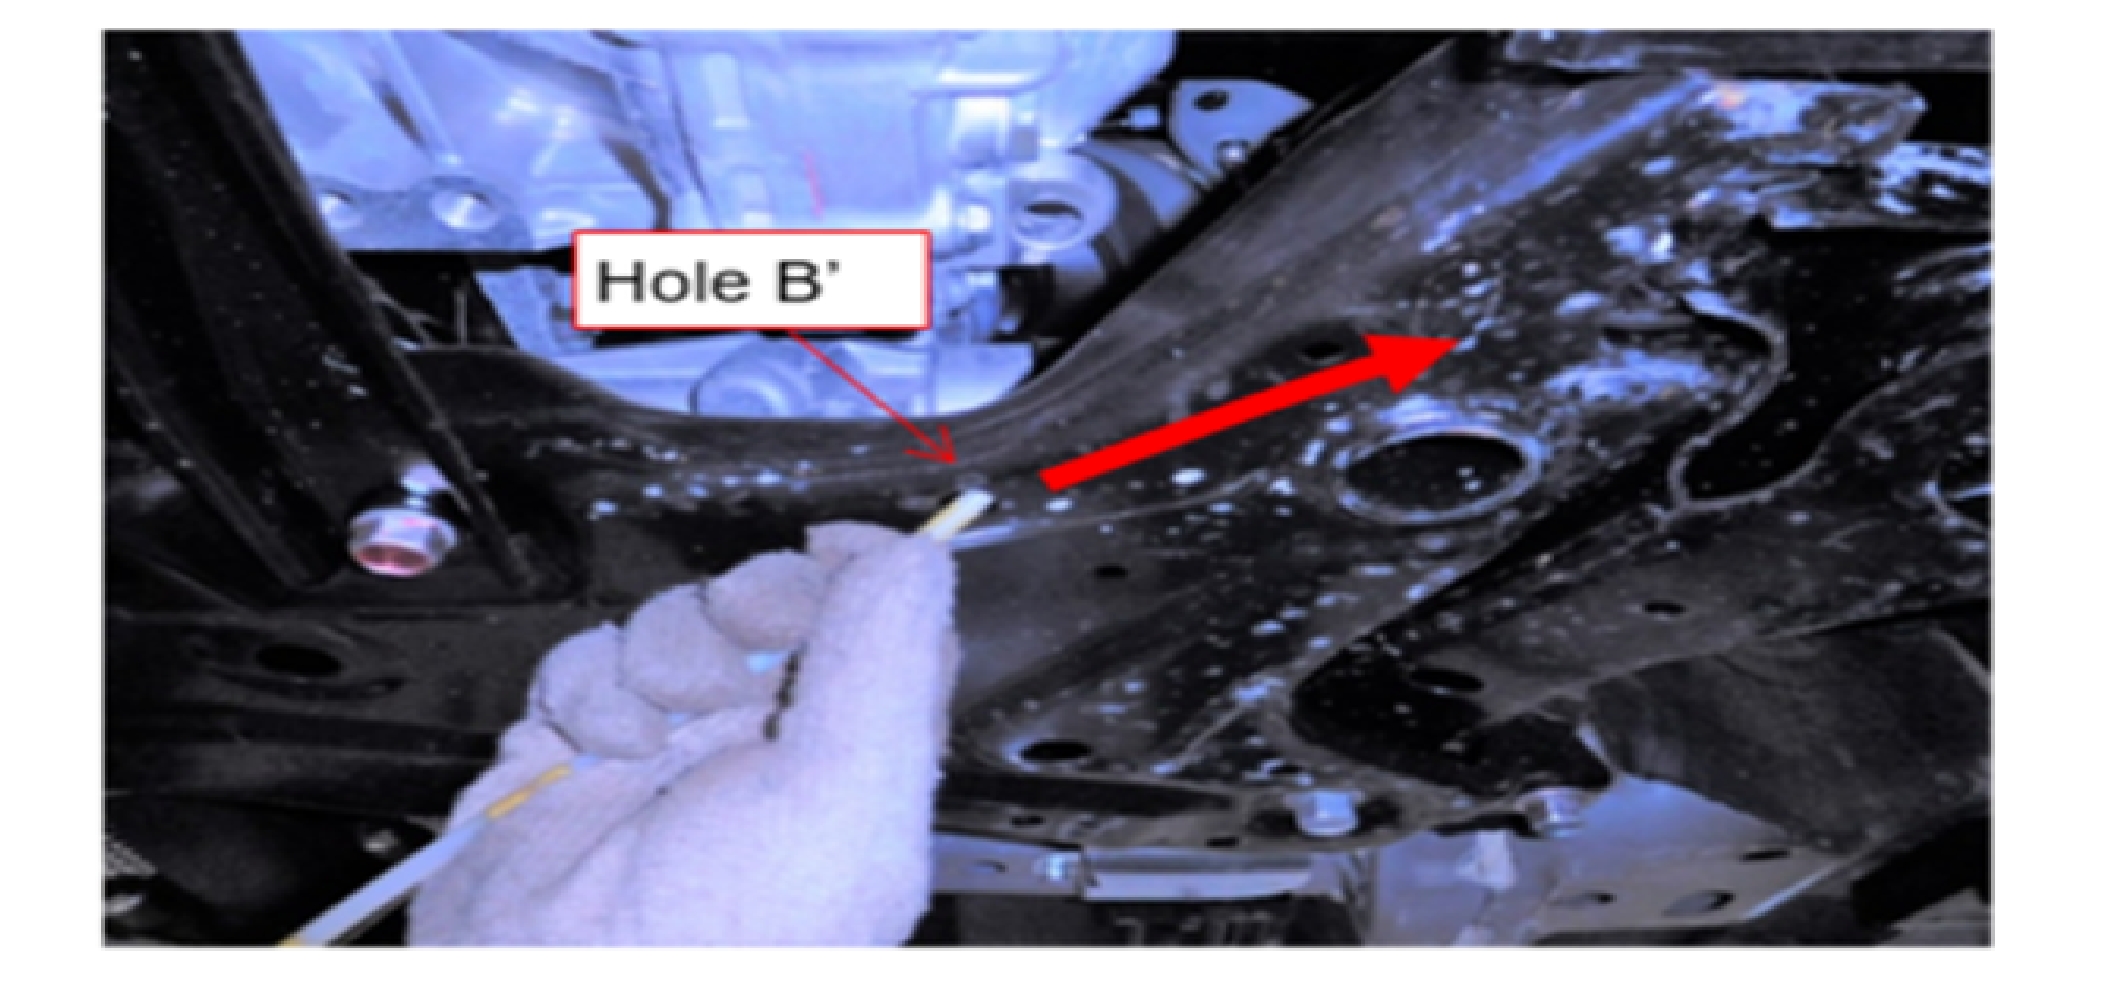
Hole B, B' |
Insert length of hose (mm) |
100 mm |
70 mm |
||
|
Spraying time (s) |
10 seconds |
||||
|
Spraying time during removal |
10 seconds |
||||
|
Hole C, C' |
Insert length of hose (mm) |
25 mm |
|||
|
Spraying time (s) |
10 seconds |
||||
|
Hole D |
Insert length of hose (mm) |
25 mm |
|||
|
Spraying time (s) |
10 seconds |
||||
|
Hole E, E' |
Insert length of hose (mm) |
- |
180 mm |
||
|
Spraying time (s) |
10 seconds |
||||
|
Spraying time during removal |
10 seconds |
||||
When using the combination below:
|
Anti-Corrosion Agent |
Spray Gun |
||
|
MZ341024EX |
MZ321015 (used in Canada) |
MZ341023EX |
T99XXKXX01 |
|
X |
- |
X |
- |
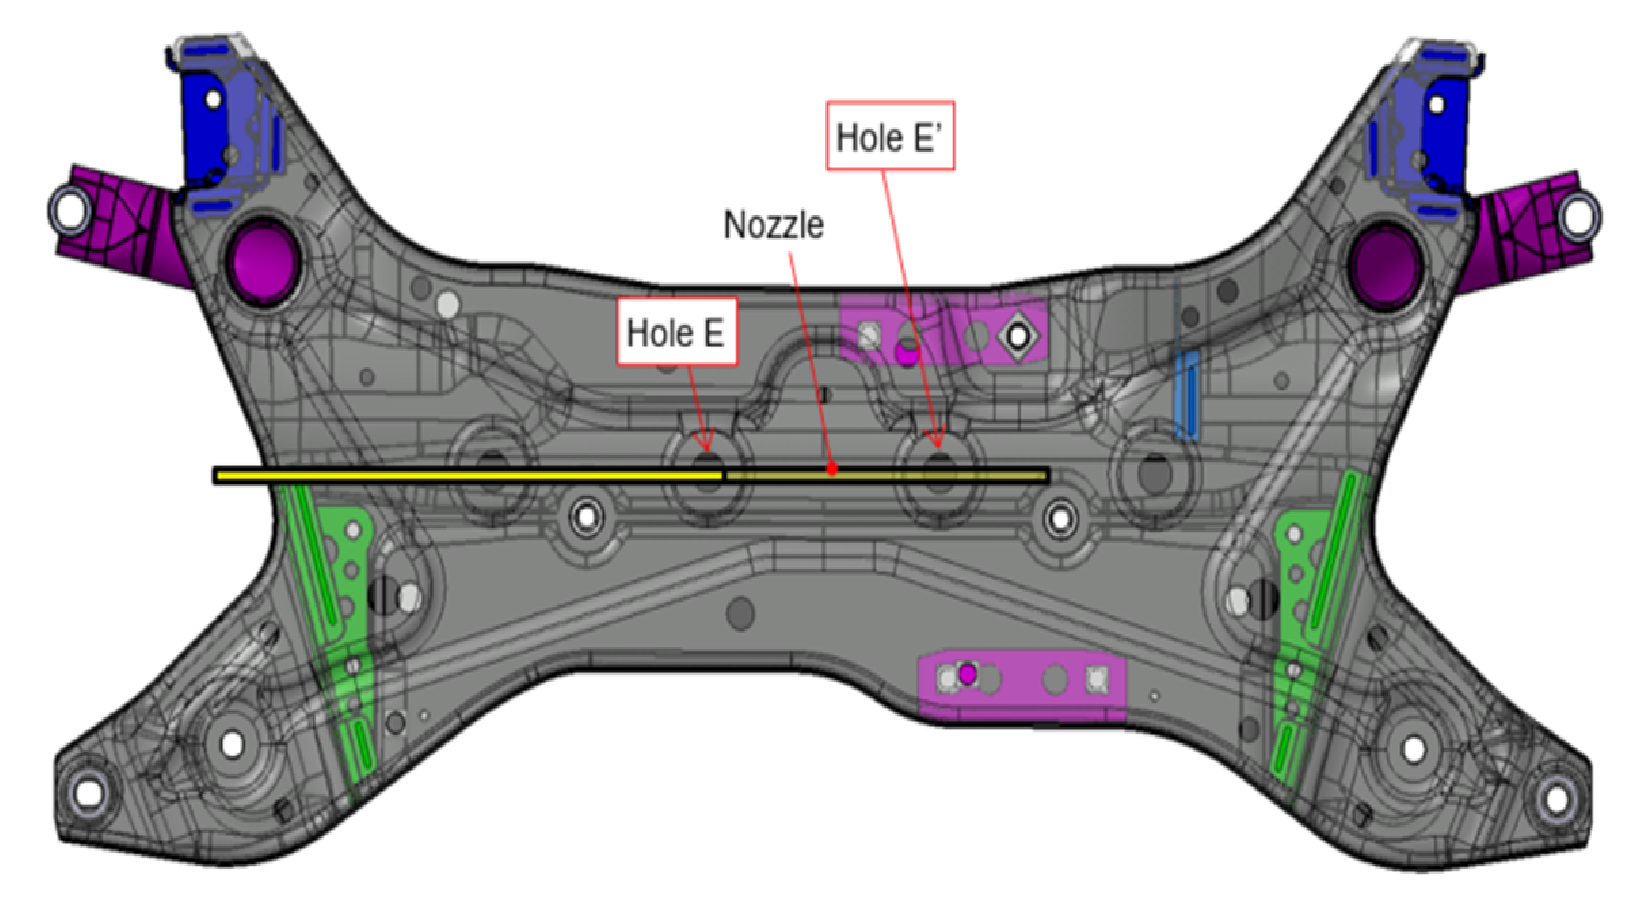
Nozzle should be inserted into the 7 holes identified:
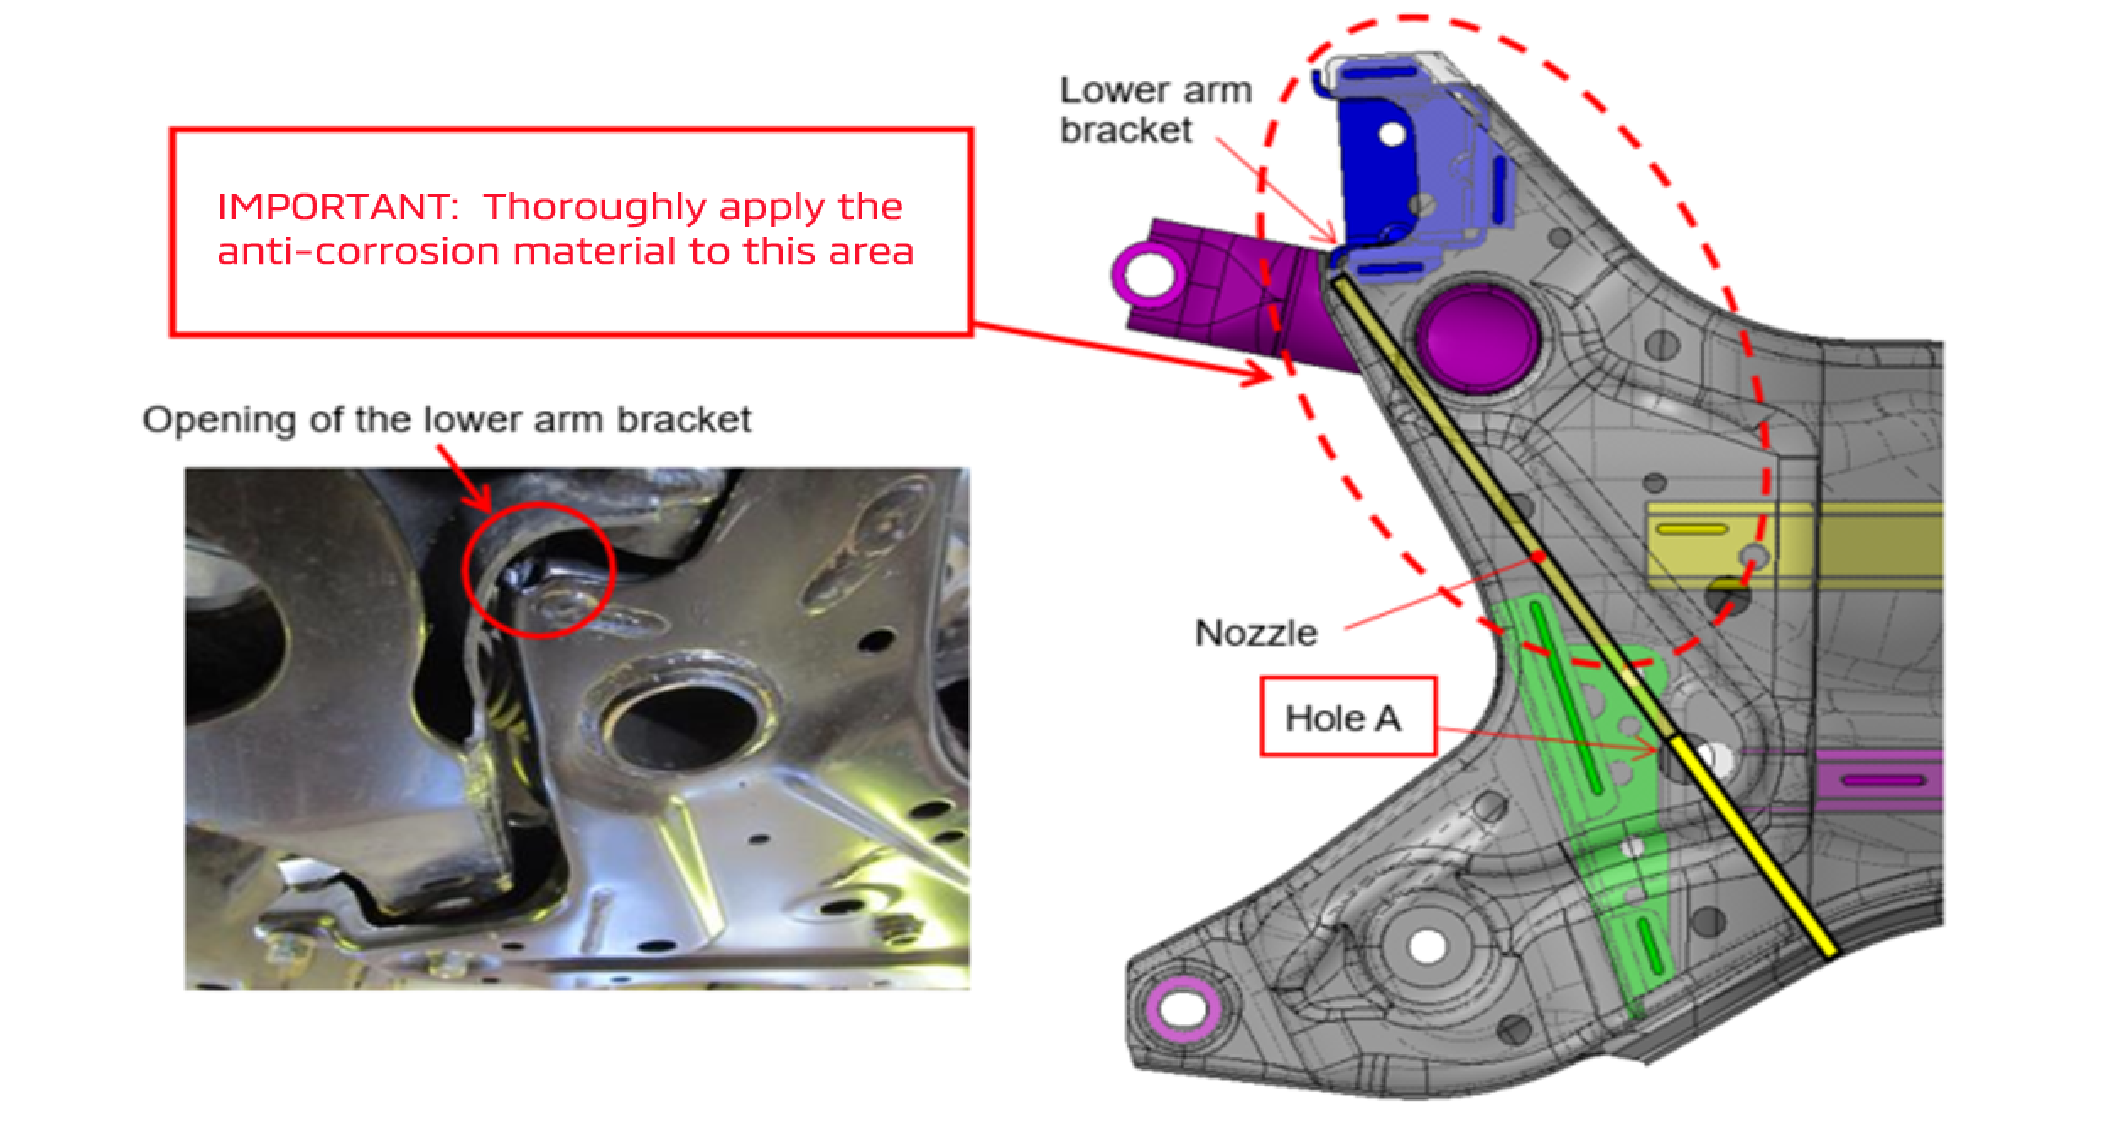
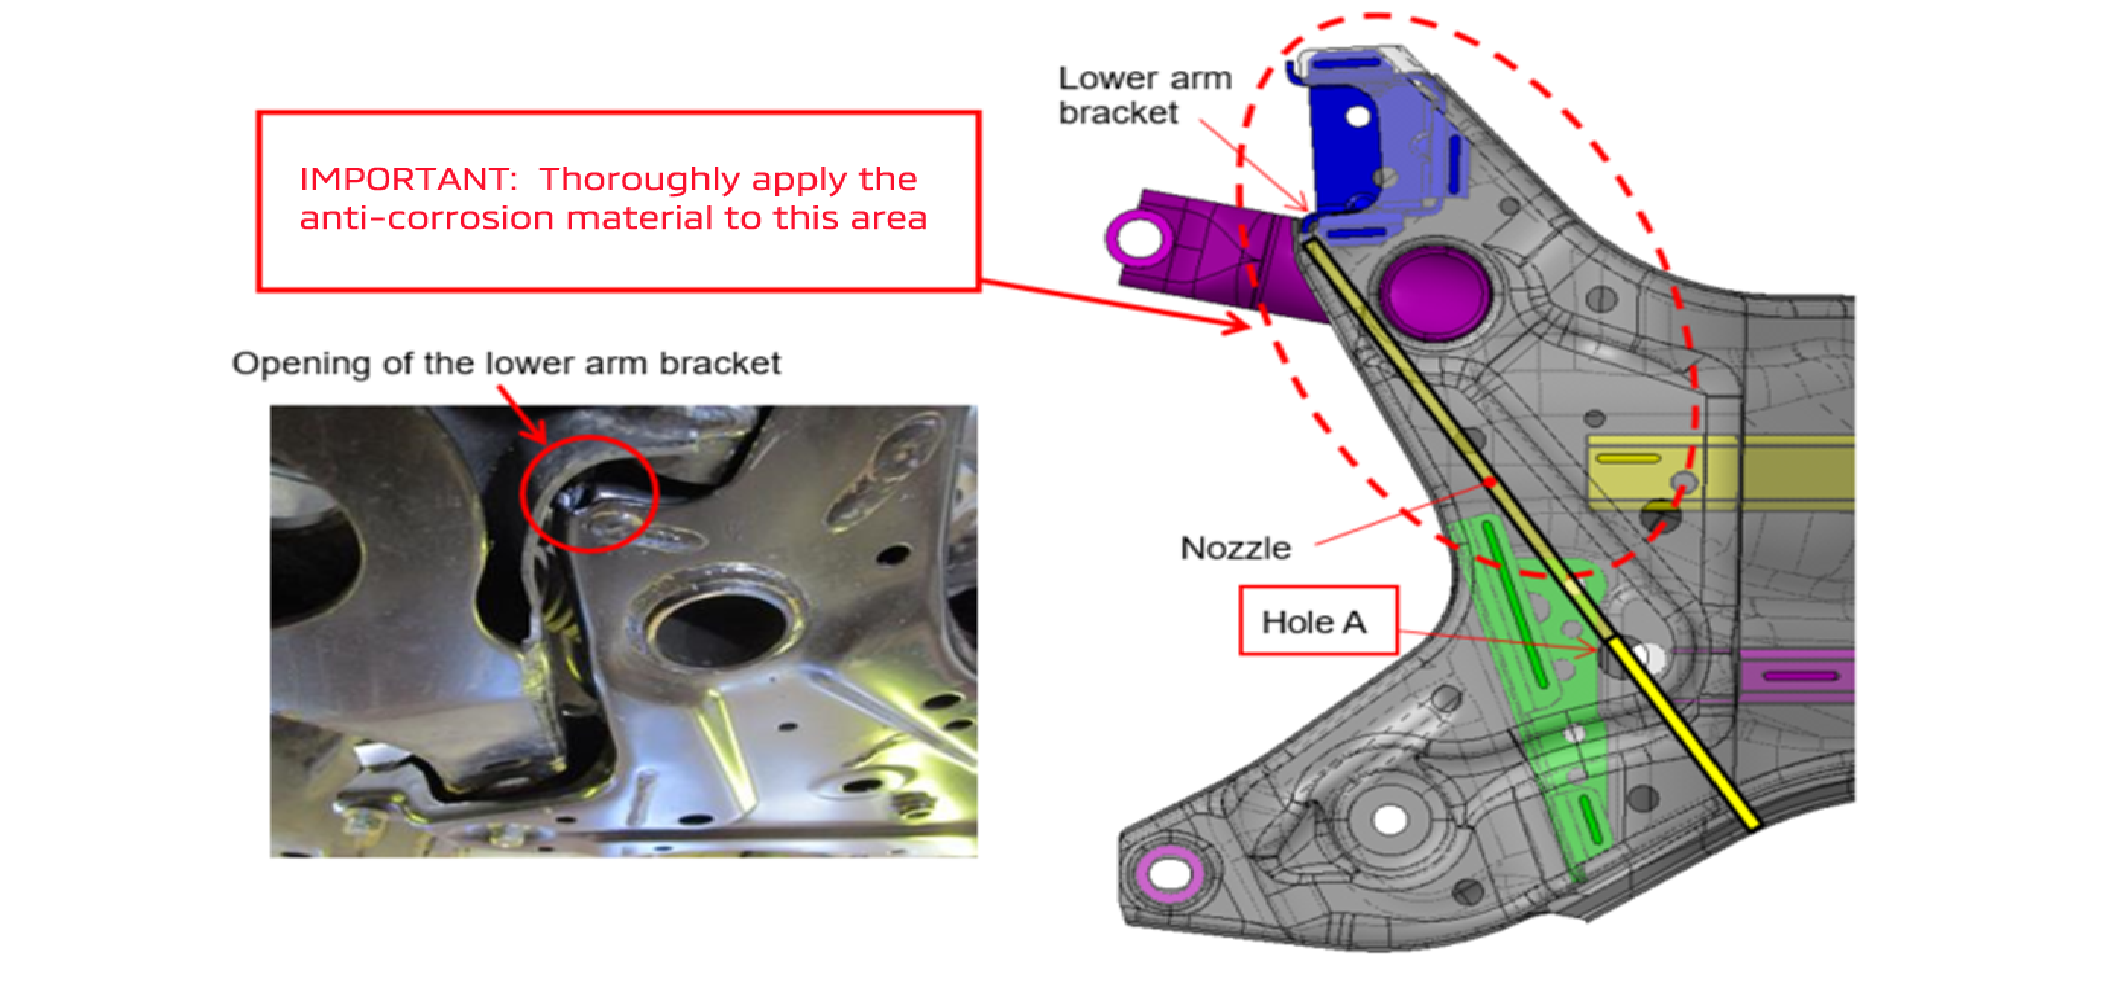
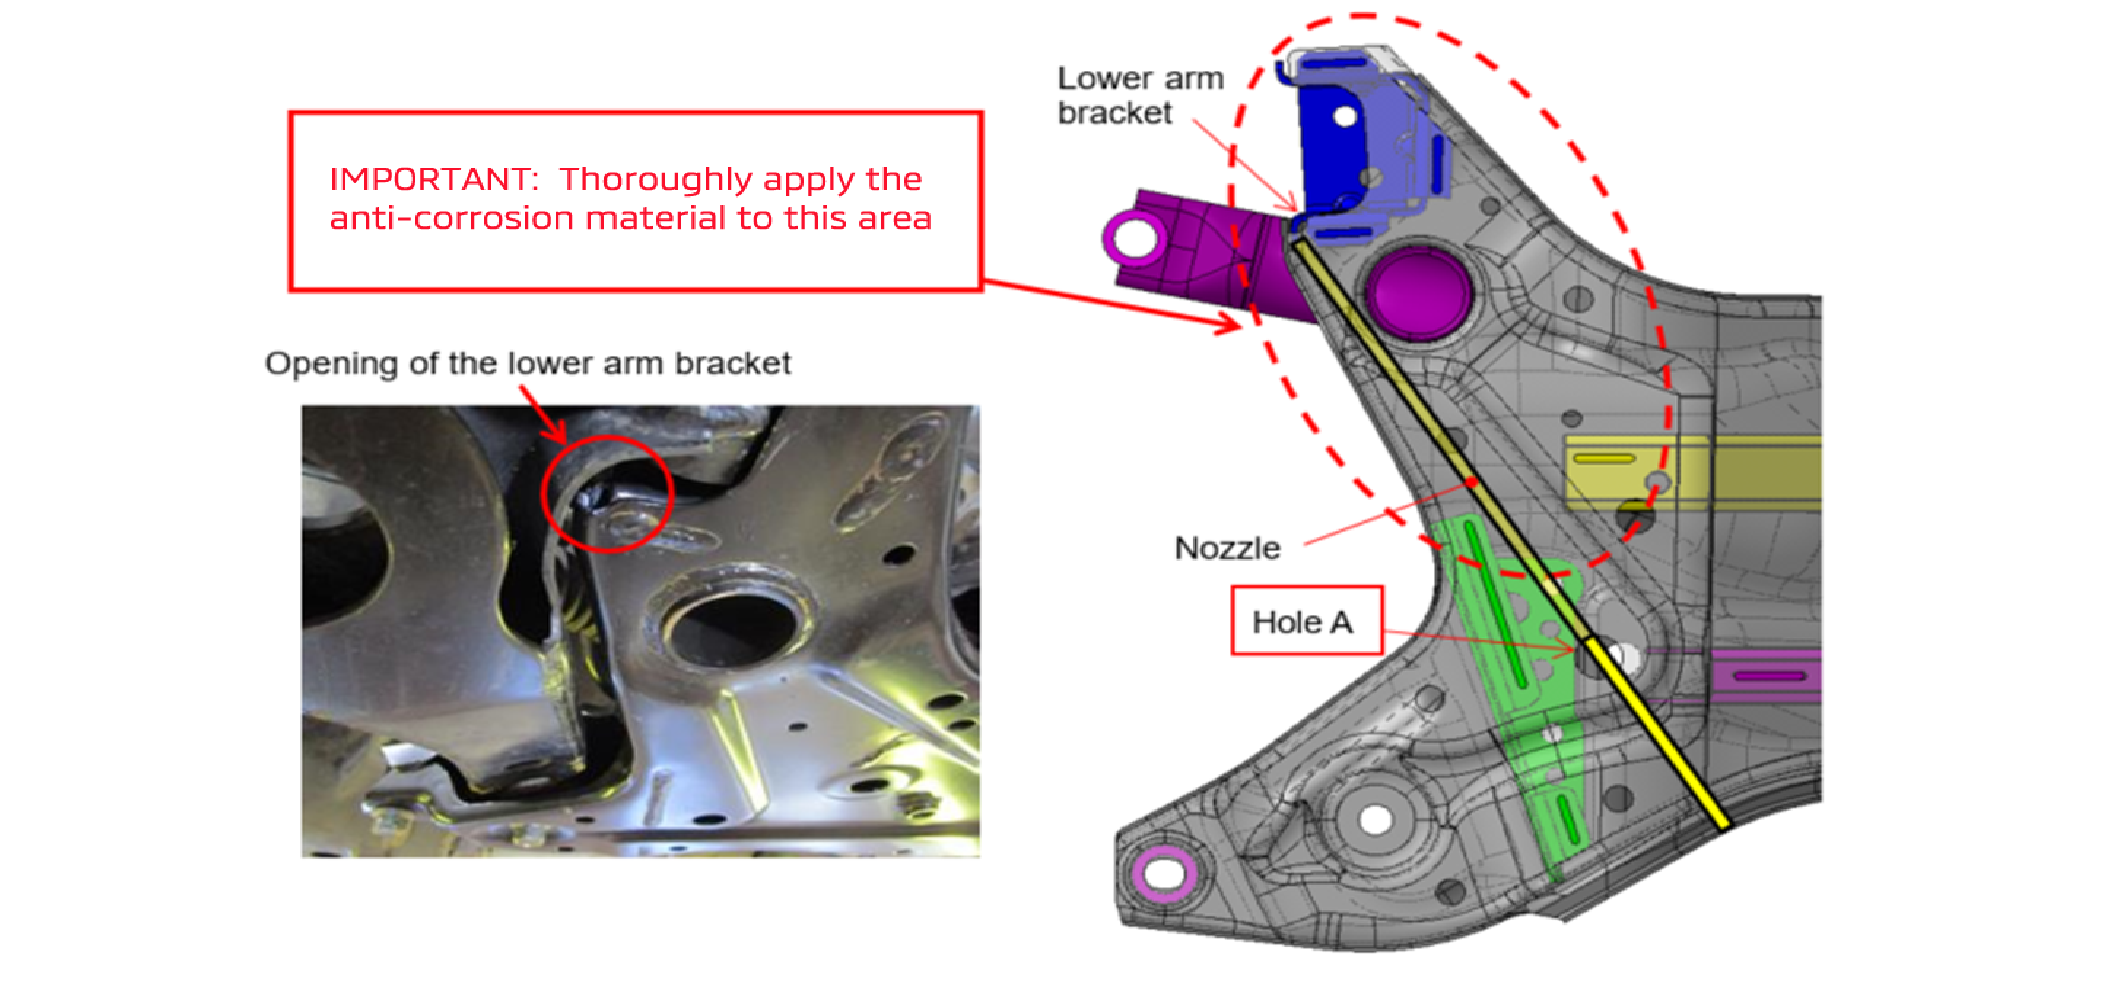
● Insert the nozzle through Hole A(A') in the direction shown below until it contacts the lower arm bracket (Insertion length: 240mm or 9.5 inches). Confirm that the nozzle has been fully inserted in the correct direction by looking in the opening of the lower arm bracket.
● Apply MZ341024EX by engaging the trigger fully at the position demonstrated below and confirm the MZ341024EX leaks out of the opening of the lower arm bracket. Continue spraying while removing the nozzle, which should take 10 seconds.
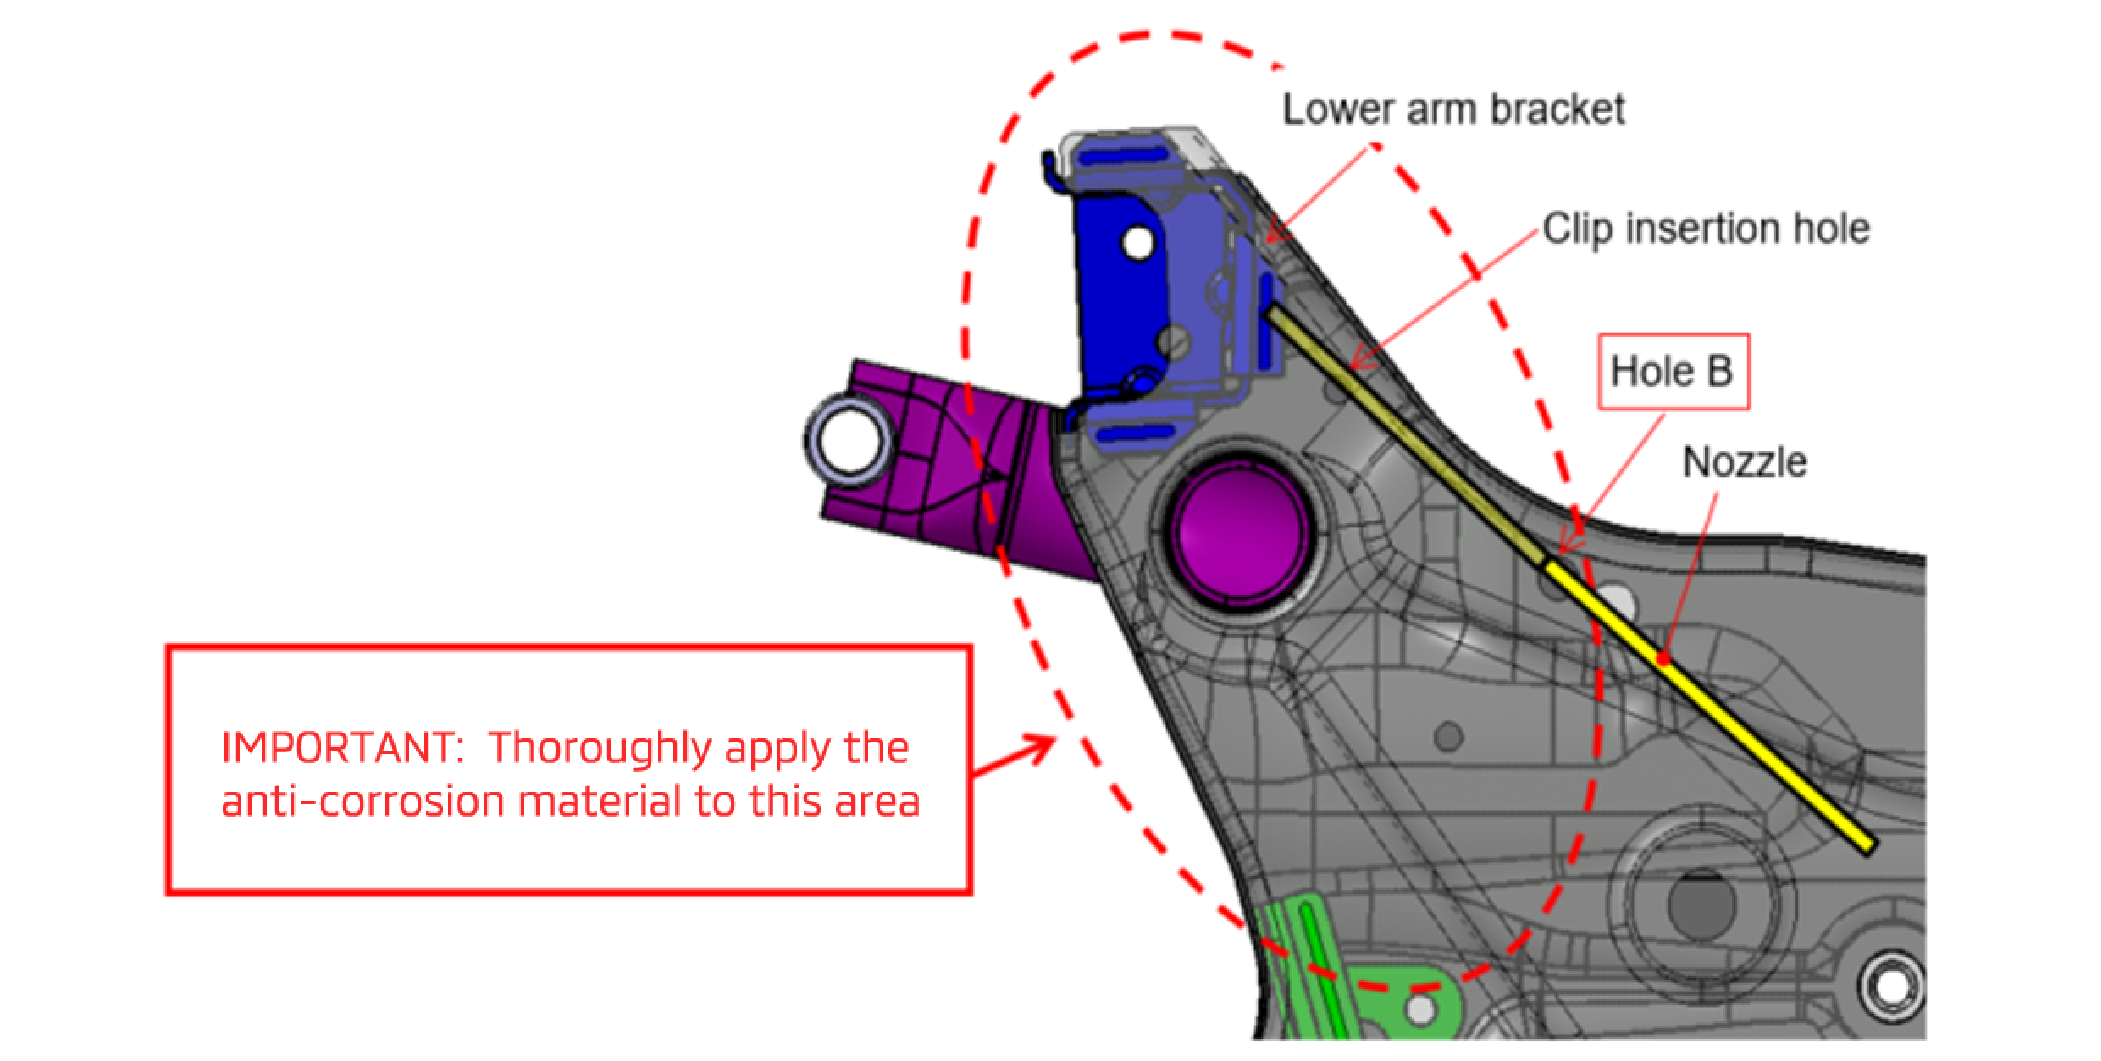
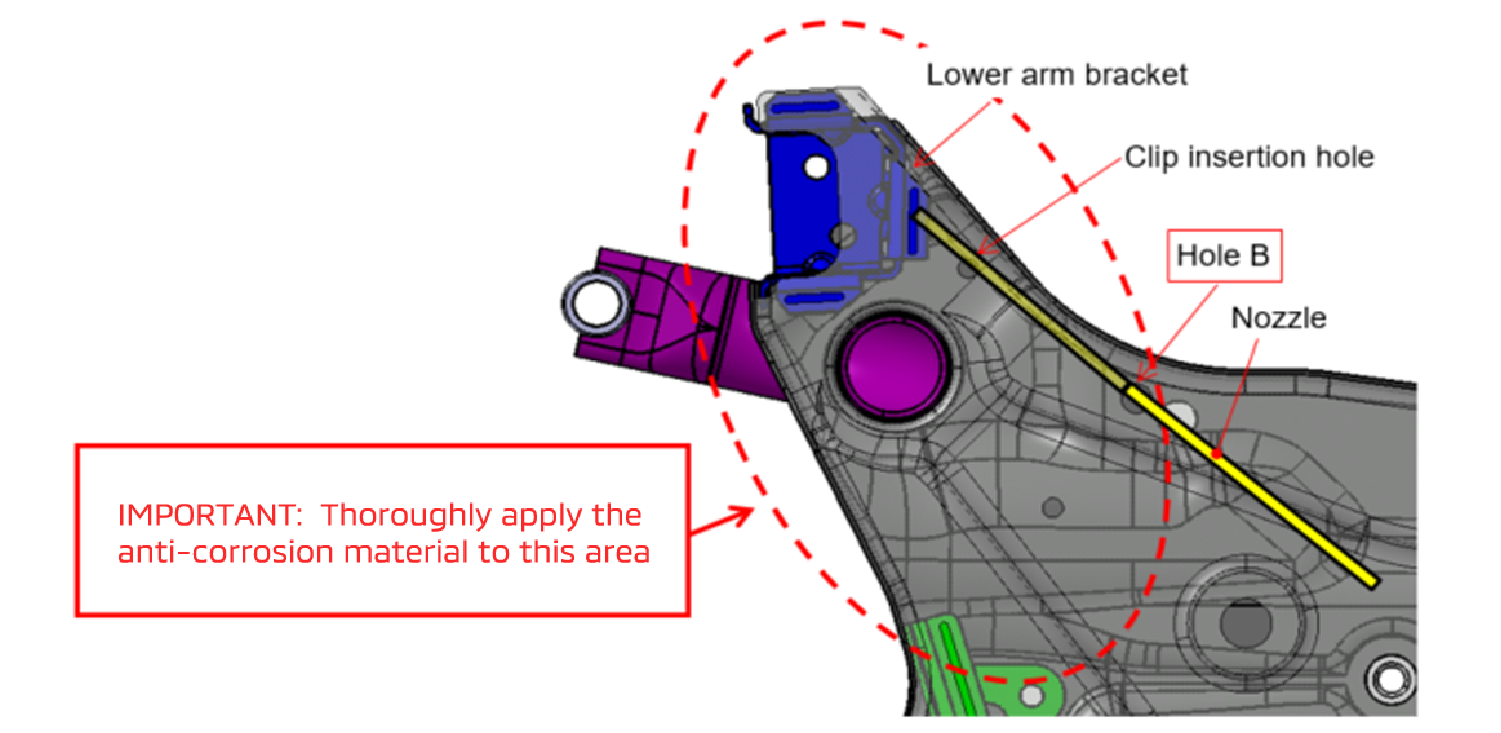
● Insert the nozzle through Hole B (B') in the direction shown below until it contacts the lower arm bracket (Insertion length: 100mm or 4 inches). Confirm that the nozzle has been fully inserted in the correction direction by looking in the clip insertion hole.
● Apply MZ341024EX fully by engaging the trigger fully at this position for 10 seconds and continue spraying while removing the nozzle, which should take another 10 seconds.
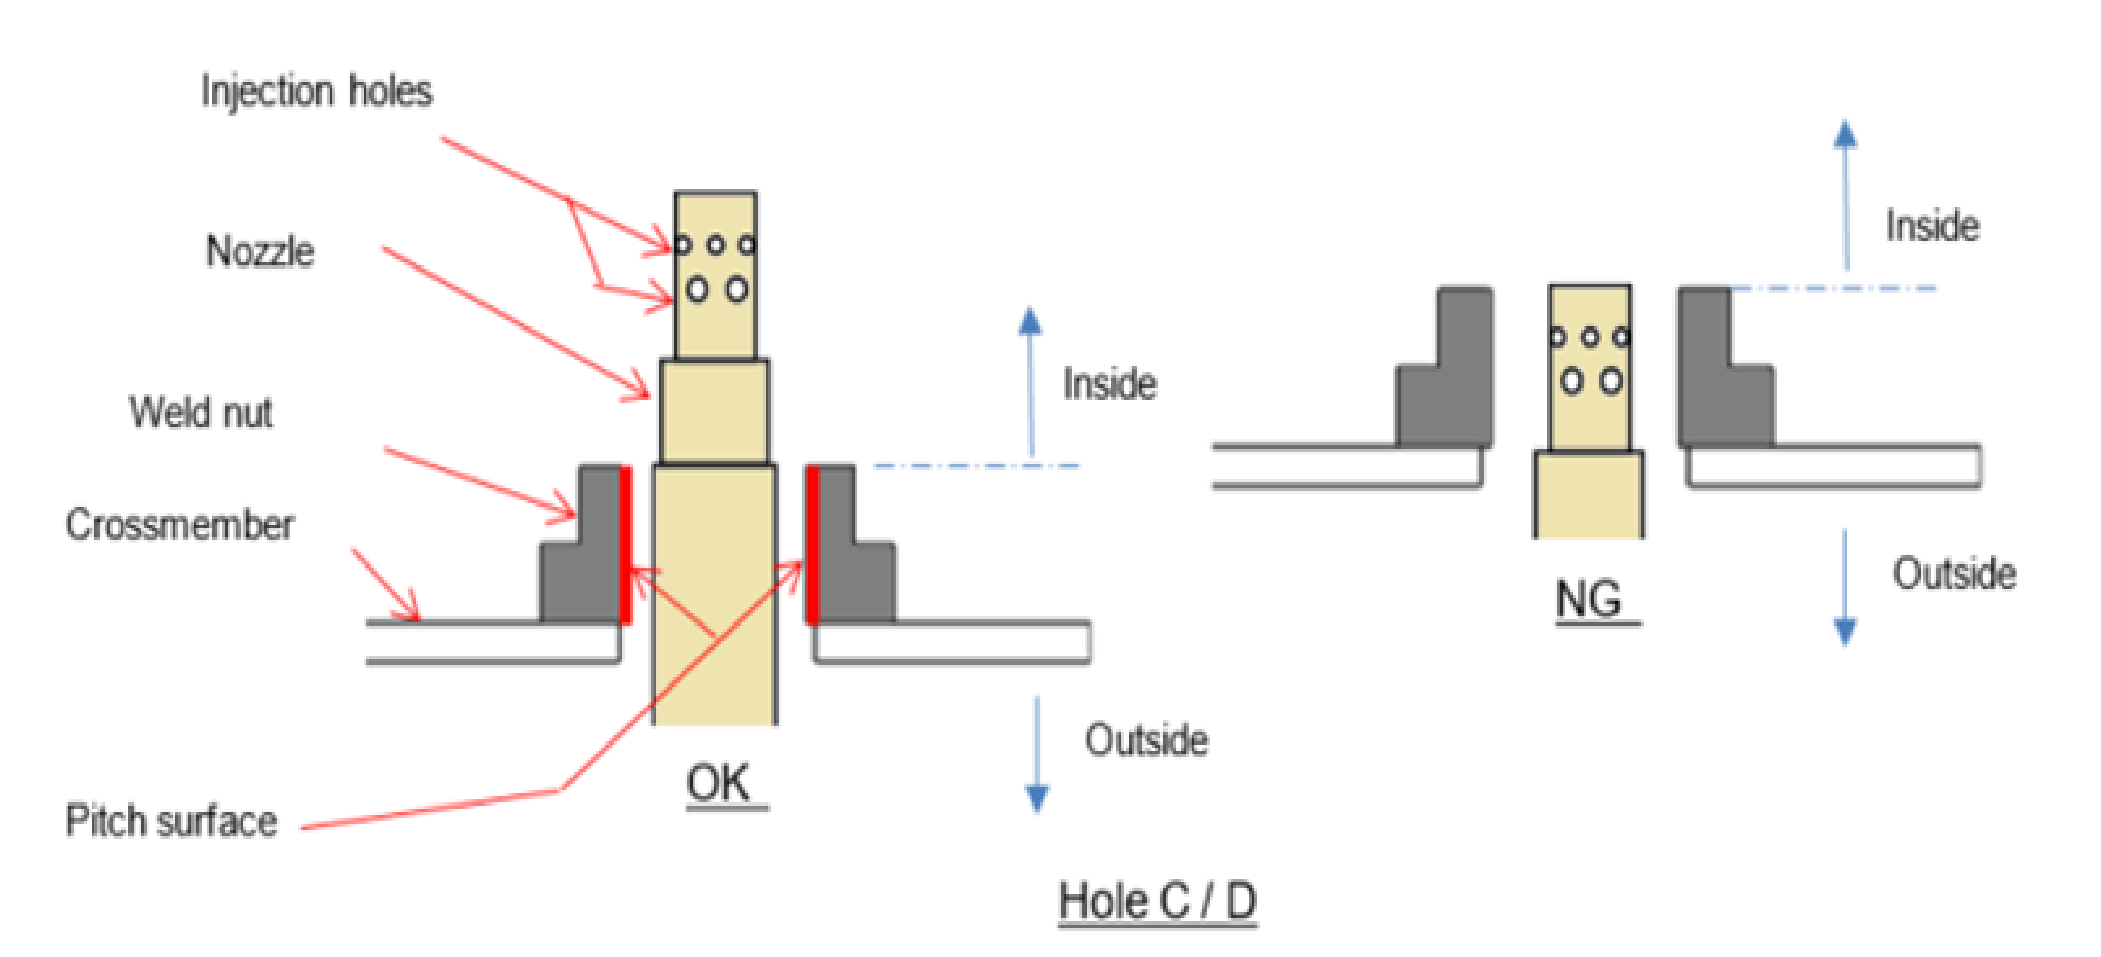
● Insert the nozzle through the Hole C (C') or D upwards (Insertion length: 25 mm or 1 inch).
● Apply MZ341024EX fully by engaging the trigger fully and continue spraying while moving the nozzle in a circular motion for 10 seconds at each hole.
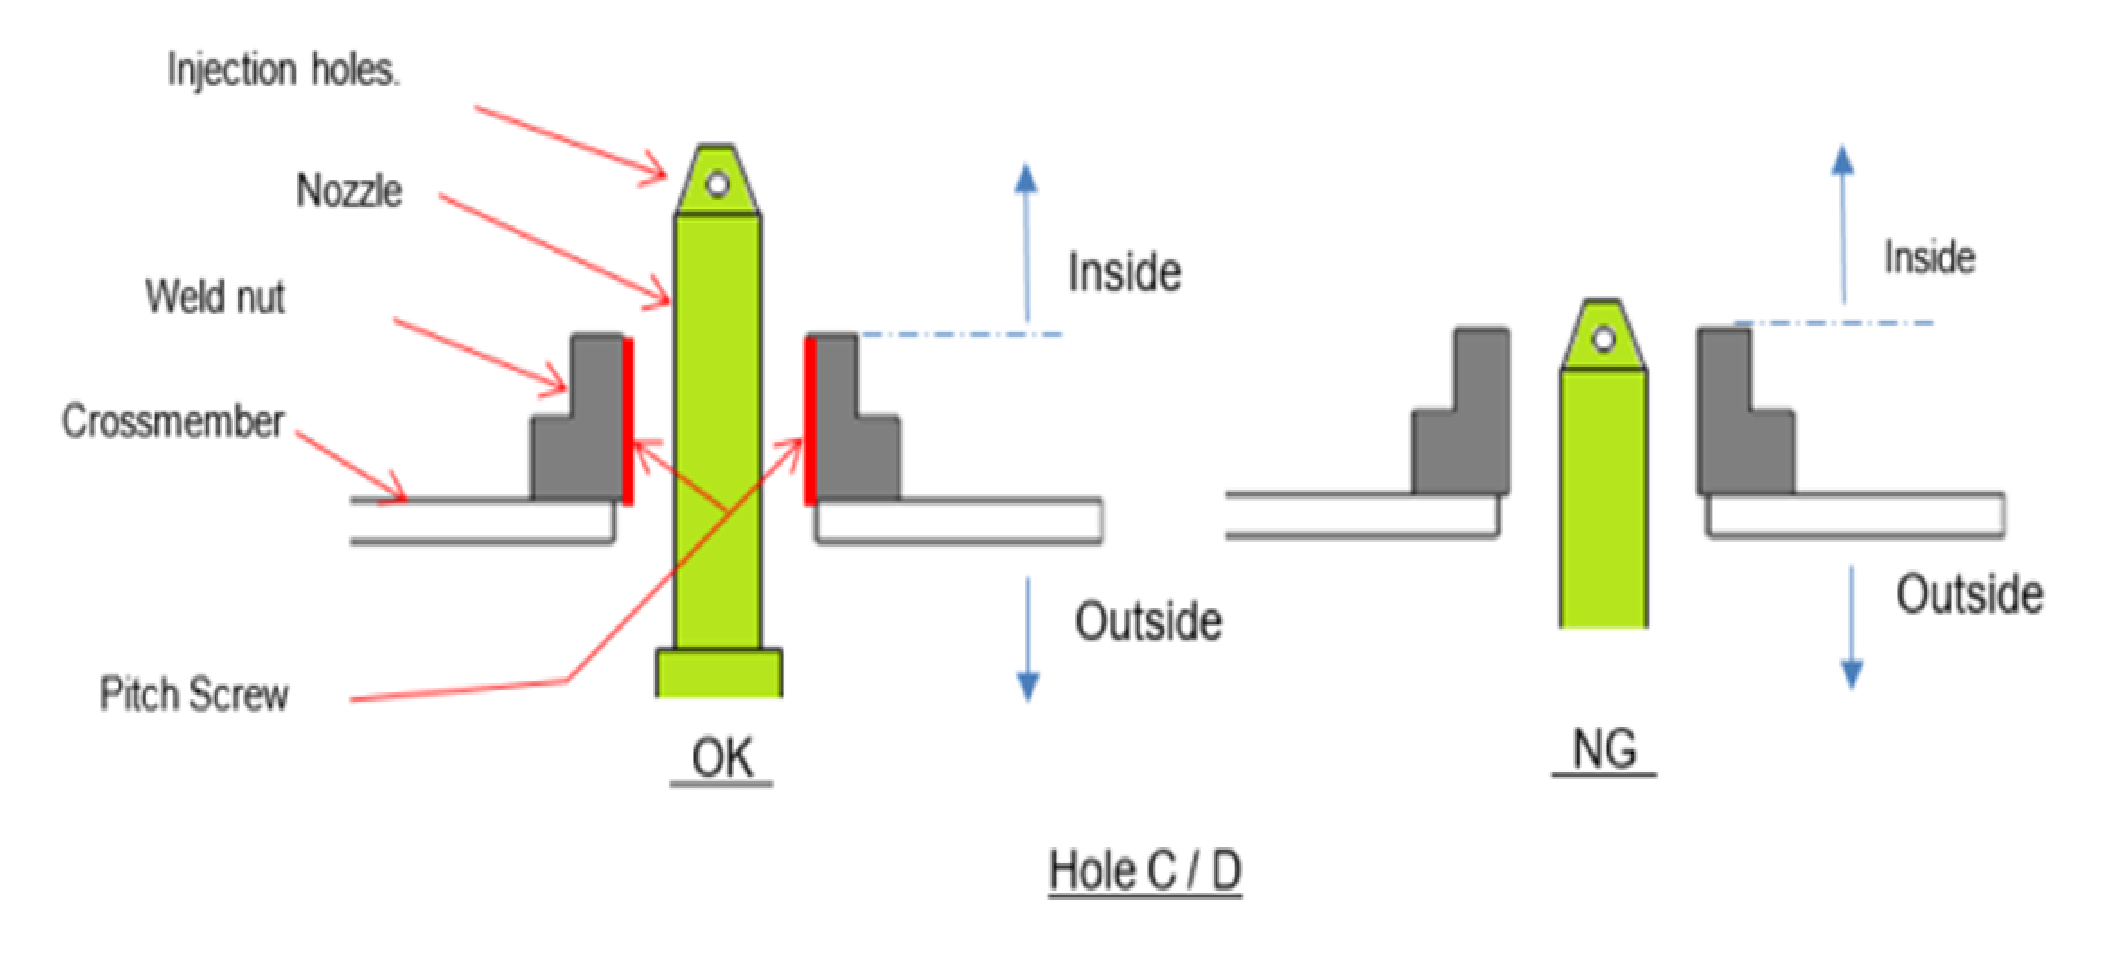
On Hole C and Hole D, insert nozzle until the nozzle is over weld nut. Make sure the anti-corrosion agent is not put on the inner surface of weld nut. Should anti-corrosion agent get on the inner surface of the weld nut; please remove by using a Universal Absorbent Pad.
When using the combination below:
|
Anti-Corrosion Agent |
Spray Gun |
||
|
MZ341024EX |
MZ321015 (used in Canada) |
MZ341023EX |
T99XXKXX01 |
|
- |
X |
X |
- |
Nozzle should be inserted into the 7 holes identified:
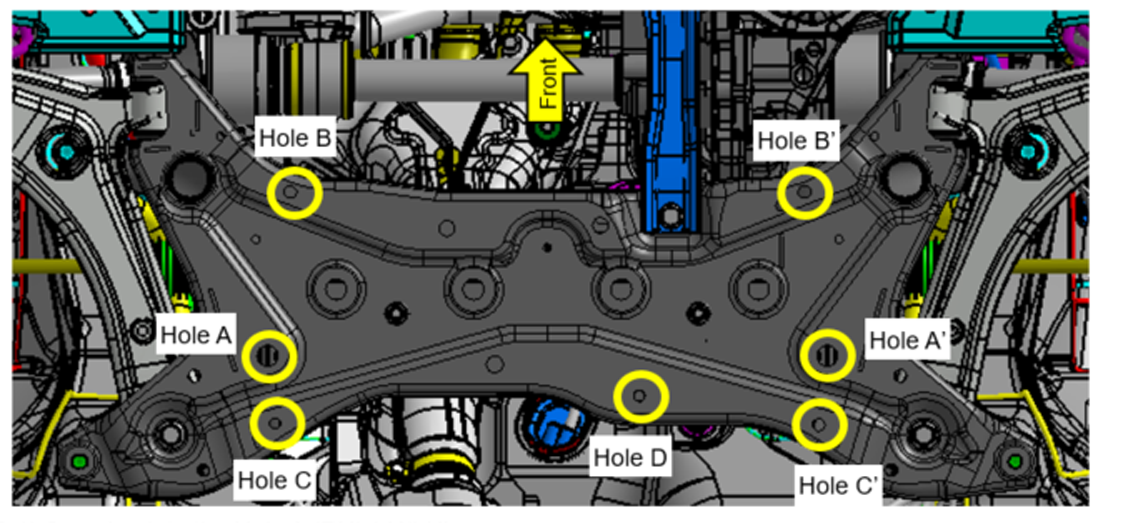
● Insert the nozzle through hole A(A') in the direction shown below until it contacts the lower arm bracket (Insertion length: 240mm or 9.5 inches). Confirm that the nozzle has been fully inserted in the correct direction by looking in the opening of the lower arm bracket.
● Apply MZ321015 (used in Canada) by engaging the trigger fully at the position demonstrated below and confirm the MZ321015 leaks out of the opening of the lower arm bracket. Continue spraying while removing the nozzle, which should take 10 seconds.
● Insert the nozzle through Hole B (B') in the direction shown below until it contacts the lower arm bracket (Insertion length: 100mm or 4 inches). Confirm that the nozzle has been fully inserted in the correct direction by looking in the clip insertion hole.
● Apply MZ321015 (used in Canada) by engaging the trigger fully at this position for 10 seconds and continue spraying while removing the nozzle, which should take another 10 seconds.
● Insert the nozzle through the Hole C (C') or D upwards (Insertion length: 25 mm or 1 inch).
● Apply MZ321015 (used in Canada) by engaging the trigger fully and continue spraying while moving the nozzle in a circular motion for 10 seconds at each hole.
On Hole C and Hole D, insert nozzle until the nozzle is over weld nut. Make sure the anti-corrosion agent is not put on the inner surface of weld nut. Should anti-corrosion agent get on the inner surface of the weld nut; please remove by using Universal Absorbent Pads.
When using the combination below:
|
Anti-Corrosion Agent |
Spray Gun |
||
|
MZ341024EX |
MZ321015 (used in Canada) |
MZ341023EX |
T99XXKXX01 |
|
X |
- |
- |
X |
Nozzle should be inserted into the 9 holes identified:
● Insert the nozzle through Hole A(A') in the direction shown below until it contacts the lower arm bracket (Insertion length: 180mm or 7 inches). Confirm that the nozzle has been fully inserted in the correct direction by looking in the opening of the lower arm bracket.
● Apply MZ341024EX by engaging the trigger fully at the position demonstrated below and confirm the MZ341024EX leaks out of the opening of the lower arm bracket. Continue spraying while removing the nozzle, which should take 10 seconds.
● Insert the nozzle through Hole A(A') in the direction shown below until it contacts the lower arm bracket (Insertion length: 70mm or 2.75 inches). Confirm that the nozzle has been fully inserted in the correct direction by looking in the opening of the lower arm bracket.
● Apply MZ341024EX by engaging the trigger fully at the position demonstrated below for 10 seconds and continue spraying while removing the nozzle, which should take 10 seconds.
● Insert the nozzle through the Hole C (C') or D upwards (Insertion length: 25 mm or 1 inch).
● Apply MZ321015 (used in Canada) by engaging the trigger fully and spray for 10 seconds at this position.
On Hole C and Hole D, insert nozzle until the nozzle is over weld nut. Make sure the anti-corrosion agent is not put on the inner surface of weld nut. Should anti-corrosion agent get on the inner surface of the weld nut; please remove by using Universal Absorbent Pads.
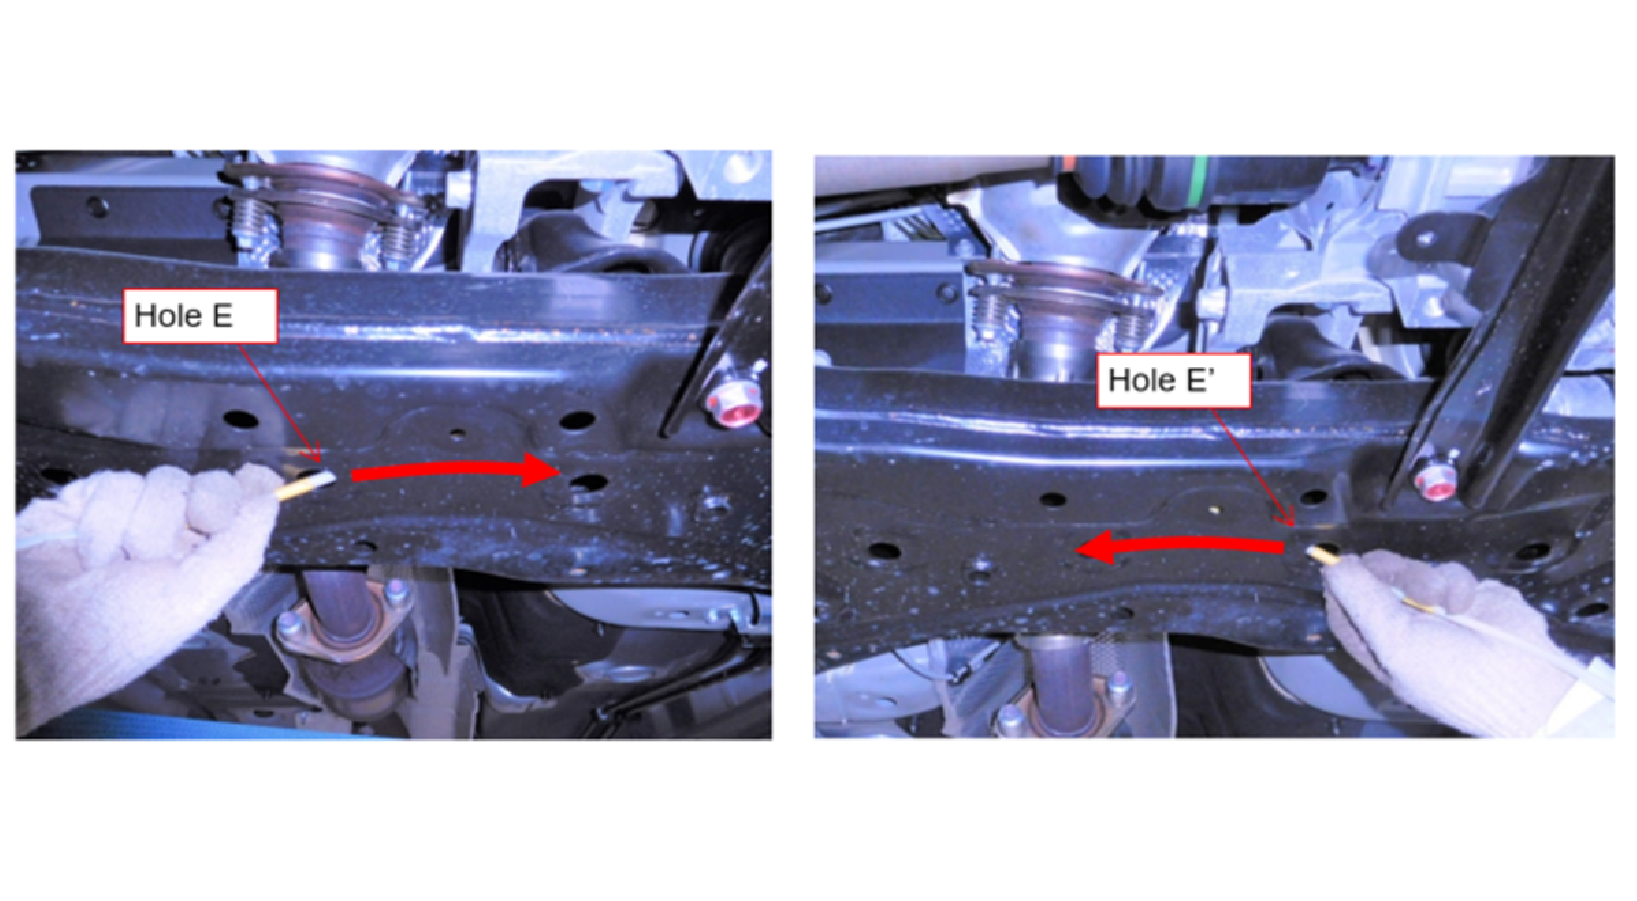
● Insert the nozzle through the Hole E (E') in the direction shown below (Insertion length: 180 mm or 7 inches).
● Apply MZ321015 (used in Canada) by engaging the trigger fully and spray for 10 seconds. Continue spraying while removing the nozzle, which should take 10 seconds.
When using the combination below:
|
Anti-Corrosion Agent |
Spray Gun |
||
|
MZ341024EX |
MZ321015 (used in Canada) |
MZ341023EX |
T99XXKXX01 |
|
- |
X |
- |
X |
Nozzle should be inserted into the 9 holes identified:
● Insert the nozzle through Hole A(A') in the direction shown below until it contacts the lower arm bracket (Insertion length: 180mm or 7 inches). Confirm that the nozzle has been fully inserted in the correct direction by looking in the opening of the lower arm bracket.
● Apply MZ321015 (used in Canada) by engaging the trigger fully at the position demonstrated below and confirm the MZ321015 (used in Canada) leaks out of the opening of the lower arm bracket. Continue spraying while removing the nozzle, which should take 10 seconds.
● Insert the nozzle through Hole B (B') in the direction shown below until it contacts the lower arm bracket (Insertion length: 70mm or 2.75 inches). Confirm that the nozzle has been fully inserted in the correct direction by looking in the clip insertion hole.
● Apply MZ321015 (used in Canada) by engaging the trigger fully at this position for 10 seconds and continue spraying while removing the nozzle, which should take another 10 seconds.
● Insert the nozzle through the Hole C (C') or D upwards (Insertion length: 25 mm or 1 inch).
● Apply MZ321015 (used in Canada) by engaging the trigger fully and spray for 10 seconds at this position.
On Hole C and Hole D, insert nozzle until the nozzle is over weld nut. Make sure the anti-corrosion agent is not put on the inner surface of weld nut. Should anti-corrosion agent get on the inner surface of the weld nut; please remove by using Universal Absorbent Pads.
● Insert the nozzle through the Hole E (E') in the direction shown below (Insertion length: 180 mm or 7 inches).
● Apply MZ321015 (for Canada) by engaging the trigger fully and spray for 10 seconds. Continue spraying while removing the nozzle, which should take 10 seconds.
Wear safety glasses, respirator, and gloves when spraying MZ320800.
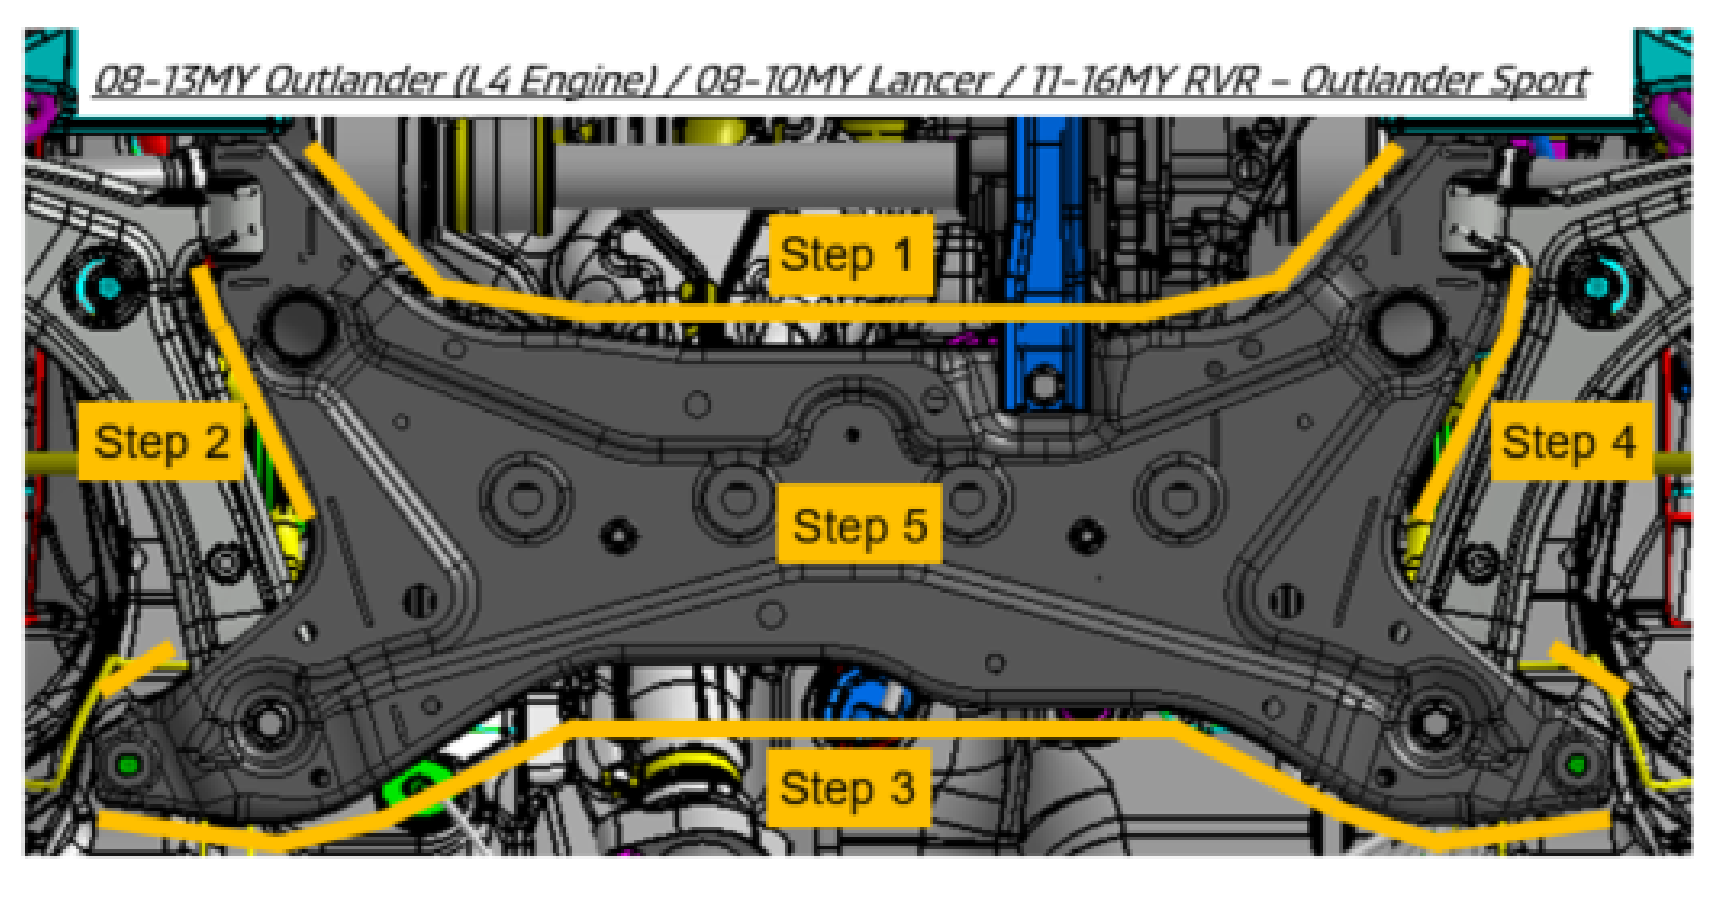
● Step 1 Front surface
● Step 2 Right surface
● Step 3 Rear surface
● Step 4 Left side surface
● Step 5 bottom surface
● Spray MZ320800 by moving the nozzle at a constant speed of 0.2m/second (or 8 inches/second). Spray it 2 to 3 times, repeatedly.
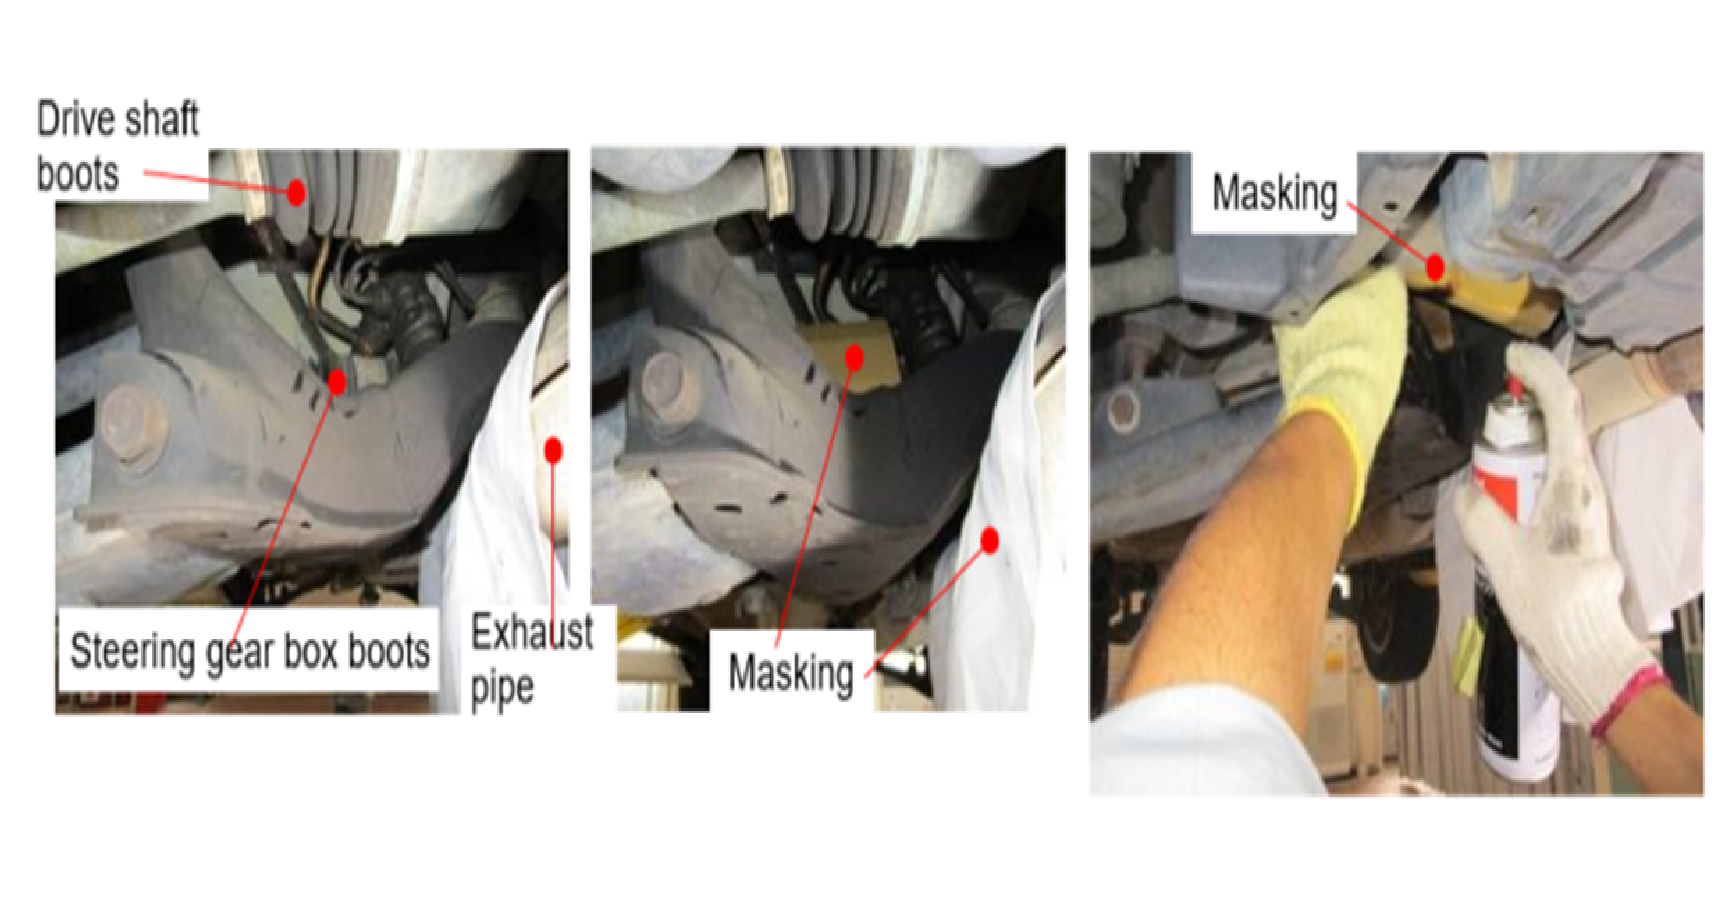
Wear safety glasses, respirator, and gloves when spraying MZ320800.
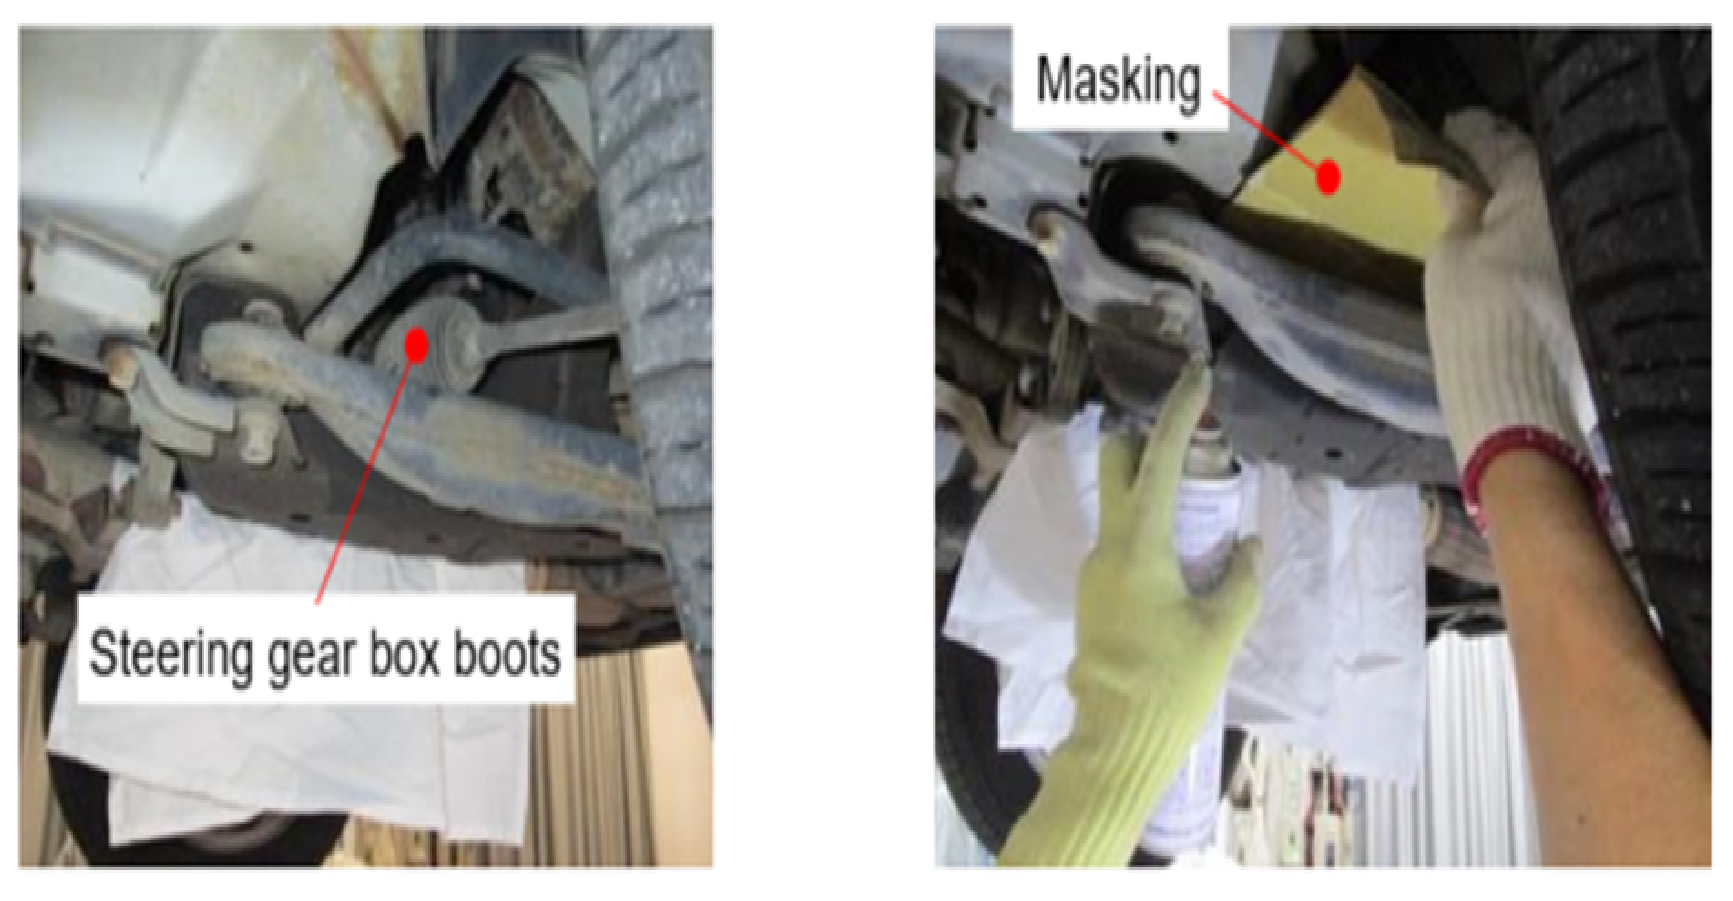
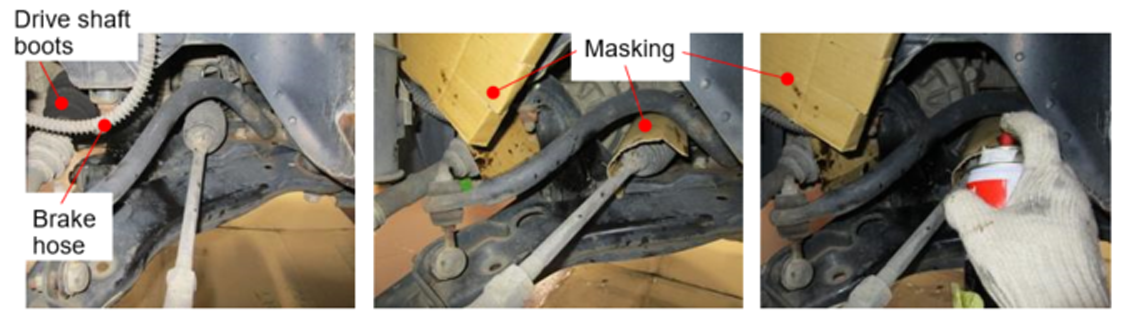
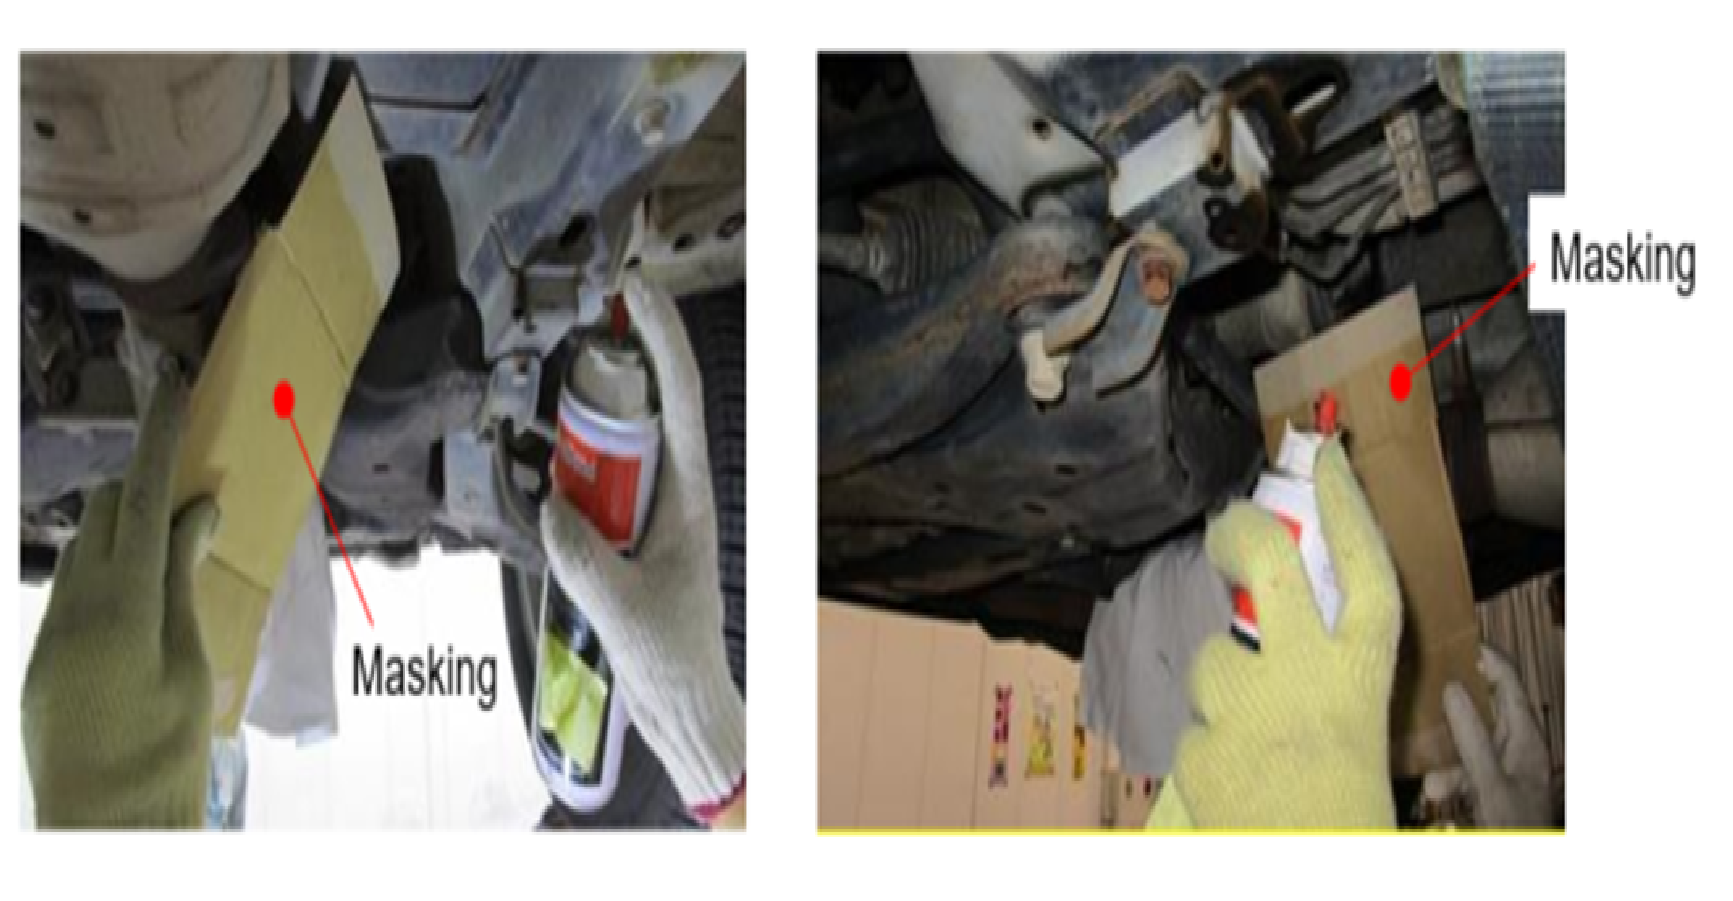
● Mask steering gear box boots, drive shaft boots and exhaust pipe.
● Mask suspension bushings, steering gear box boots, drive shaft boots, and brake hoses.
● Mask exhaust pipe.
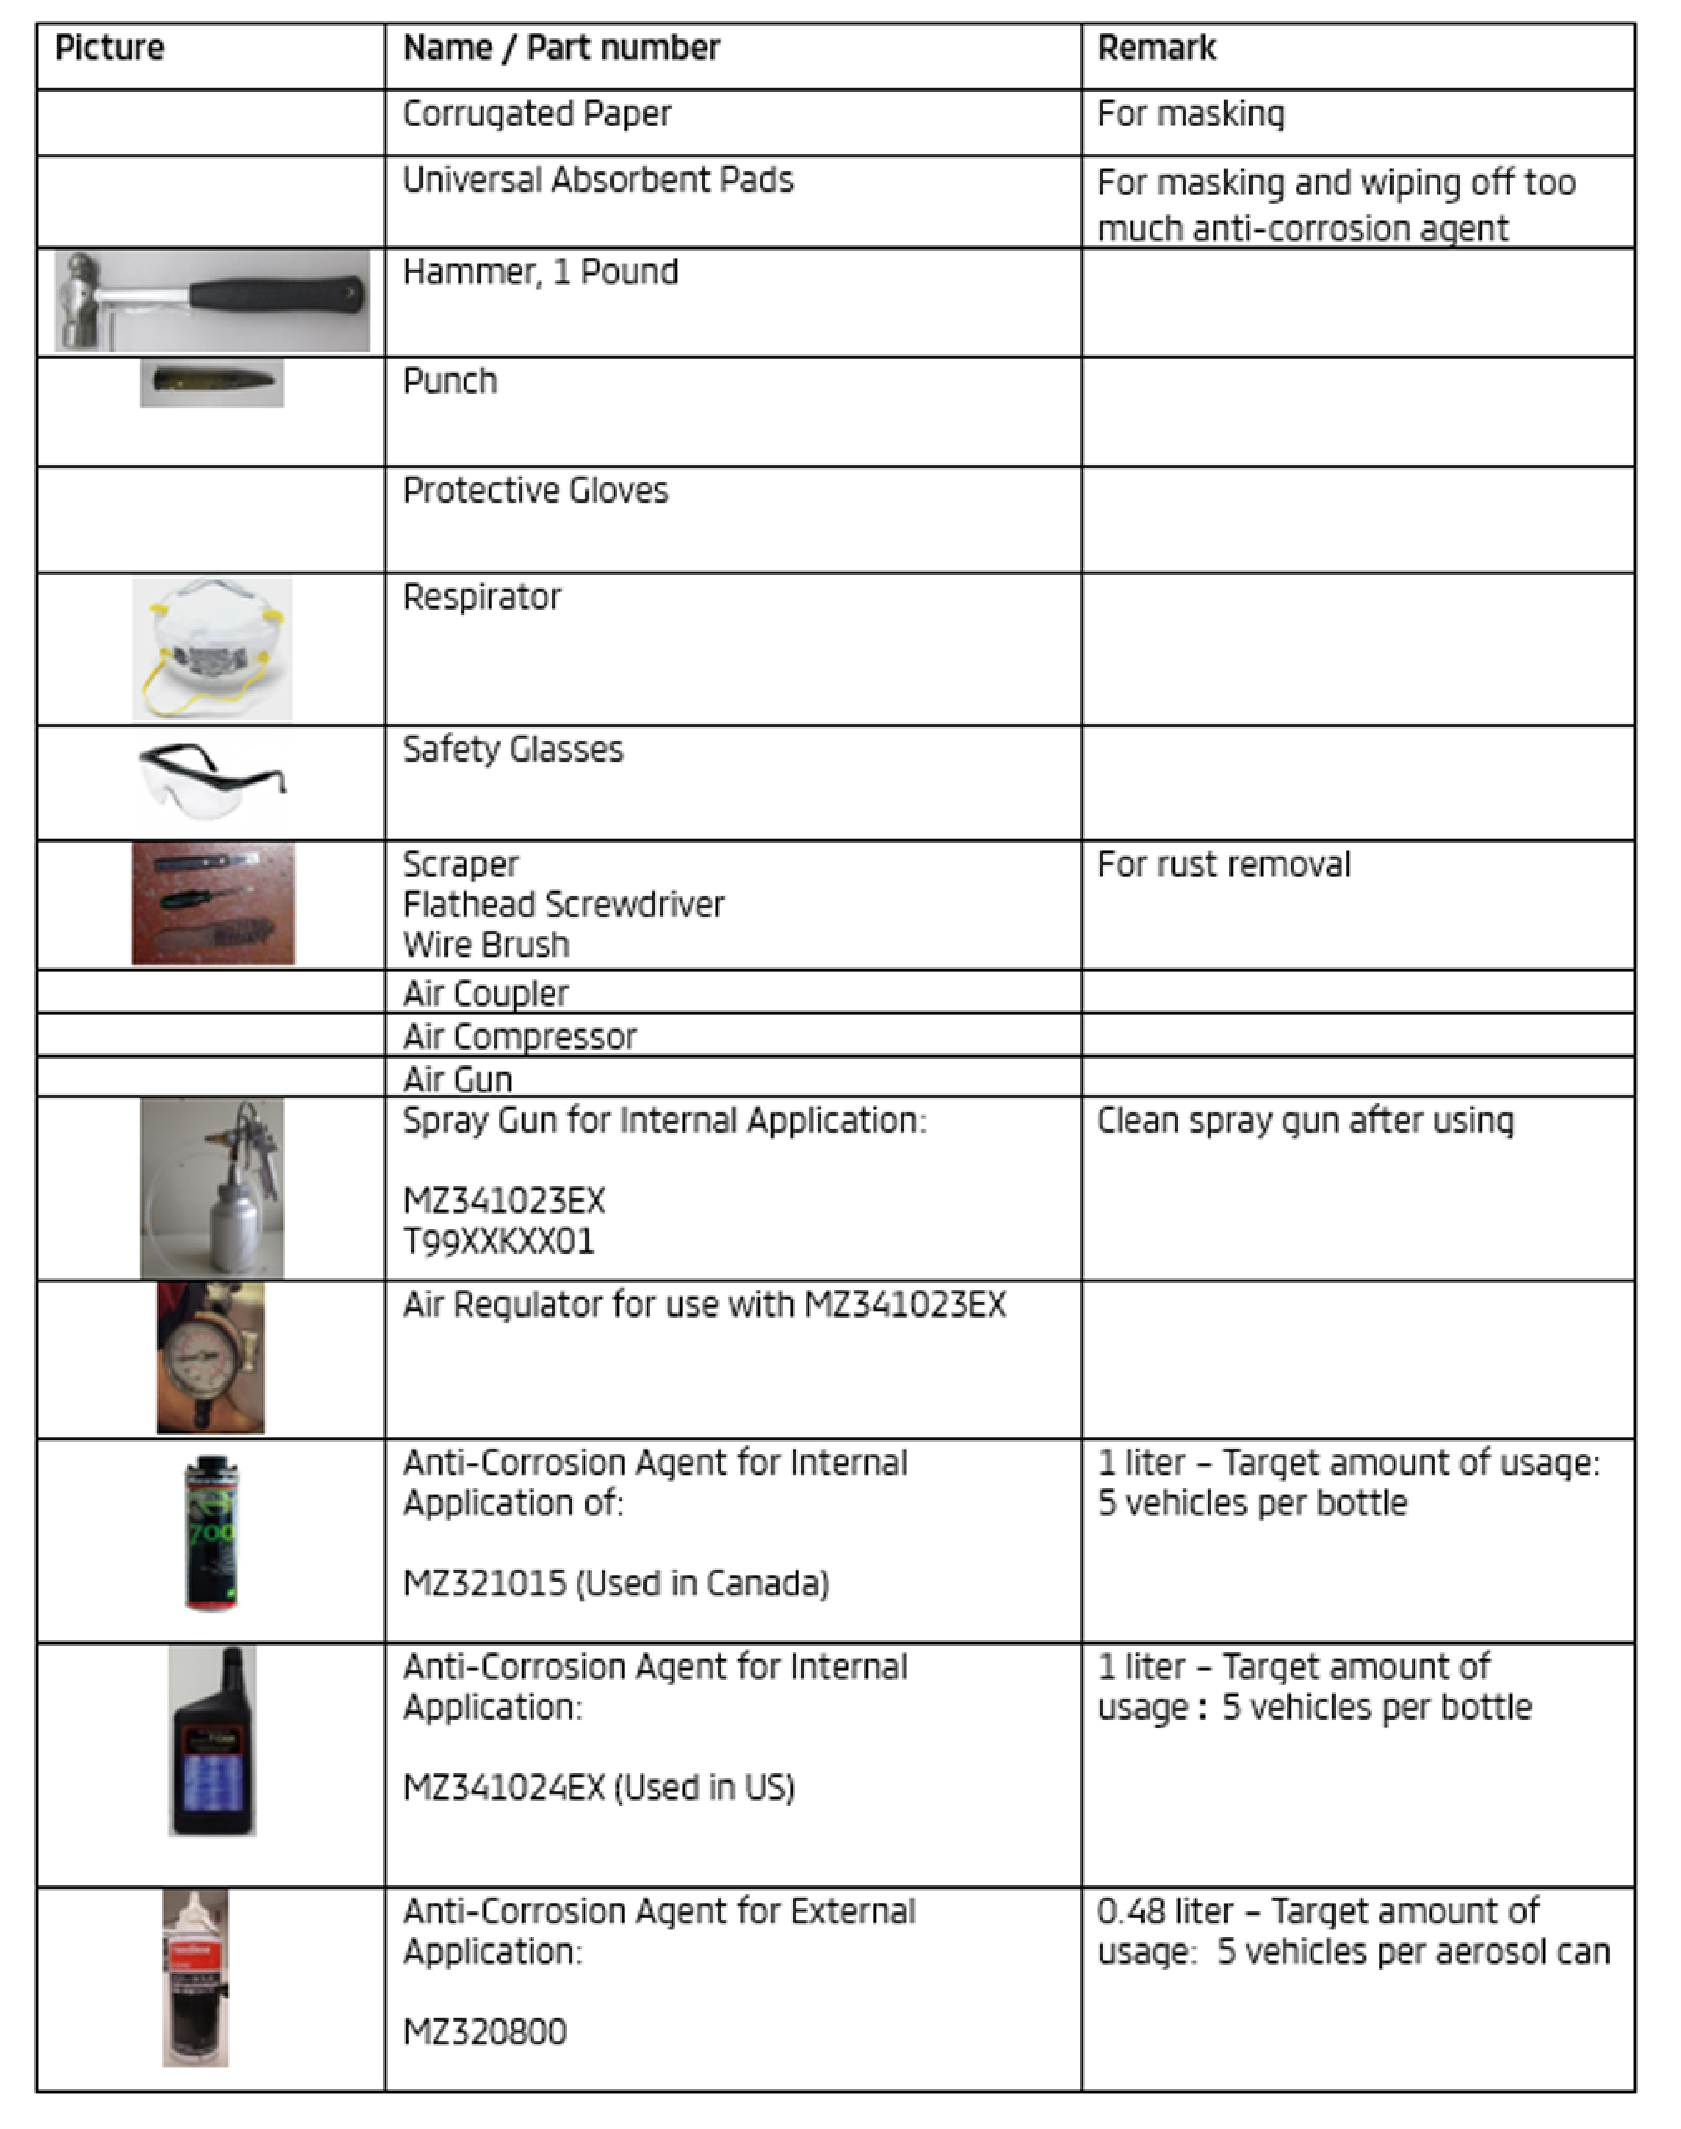
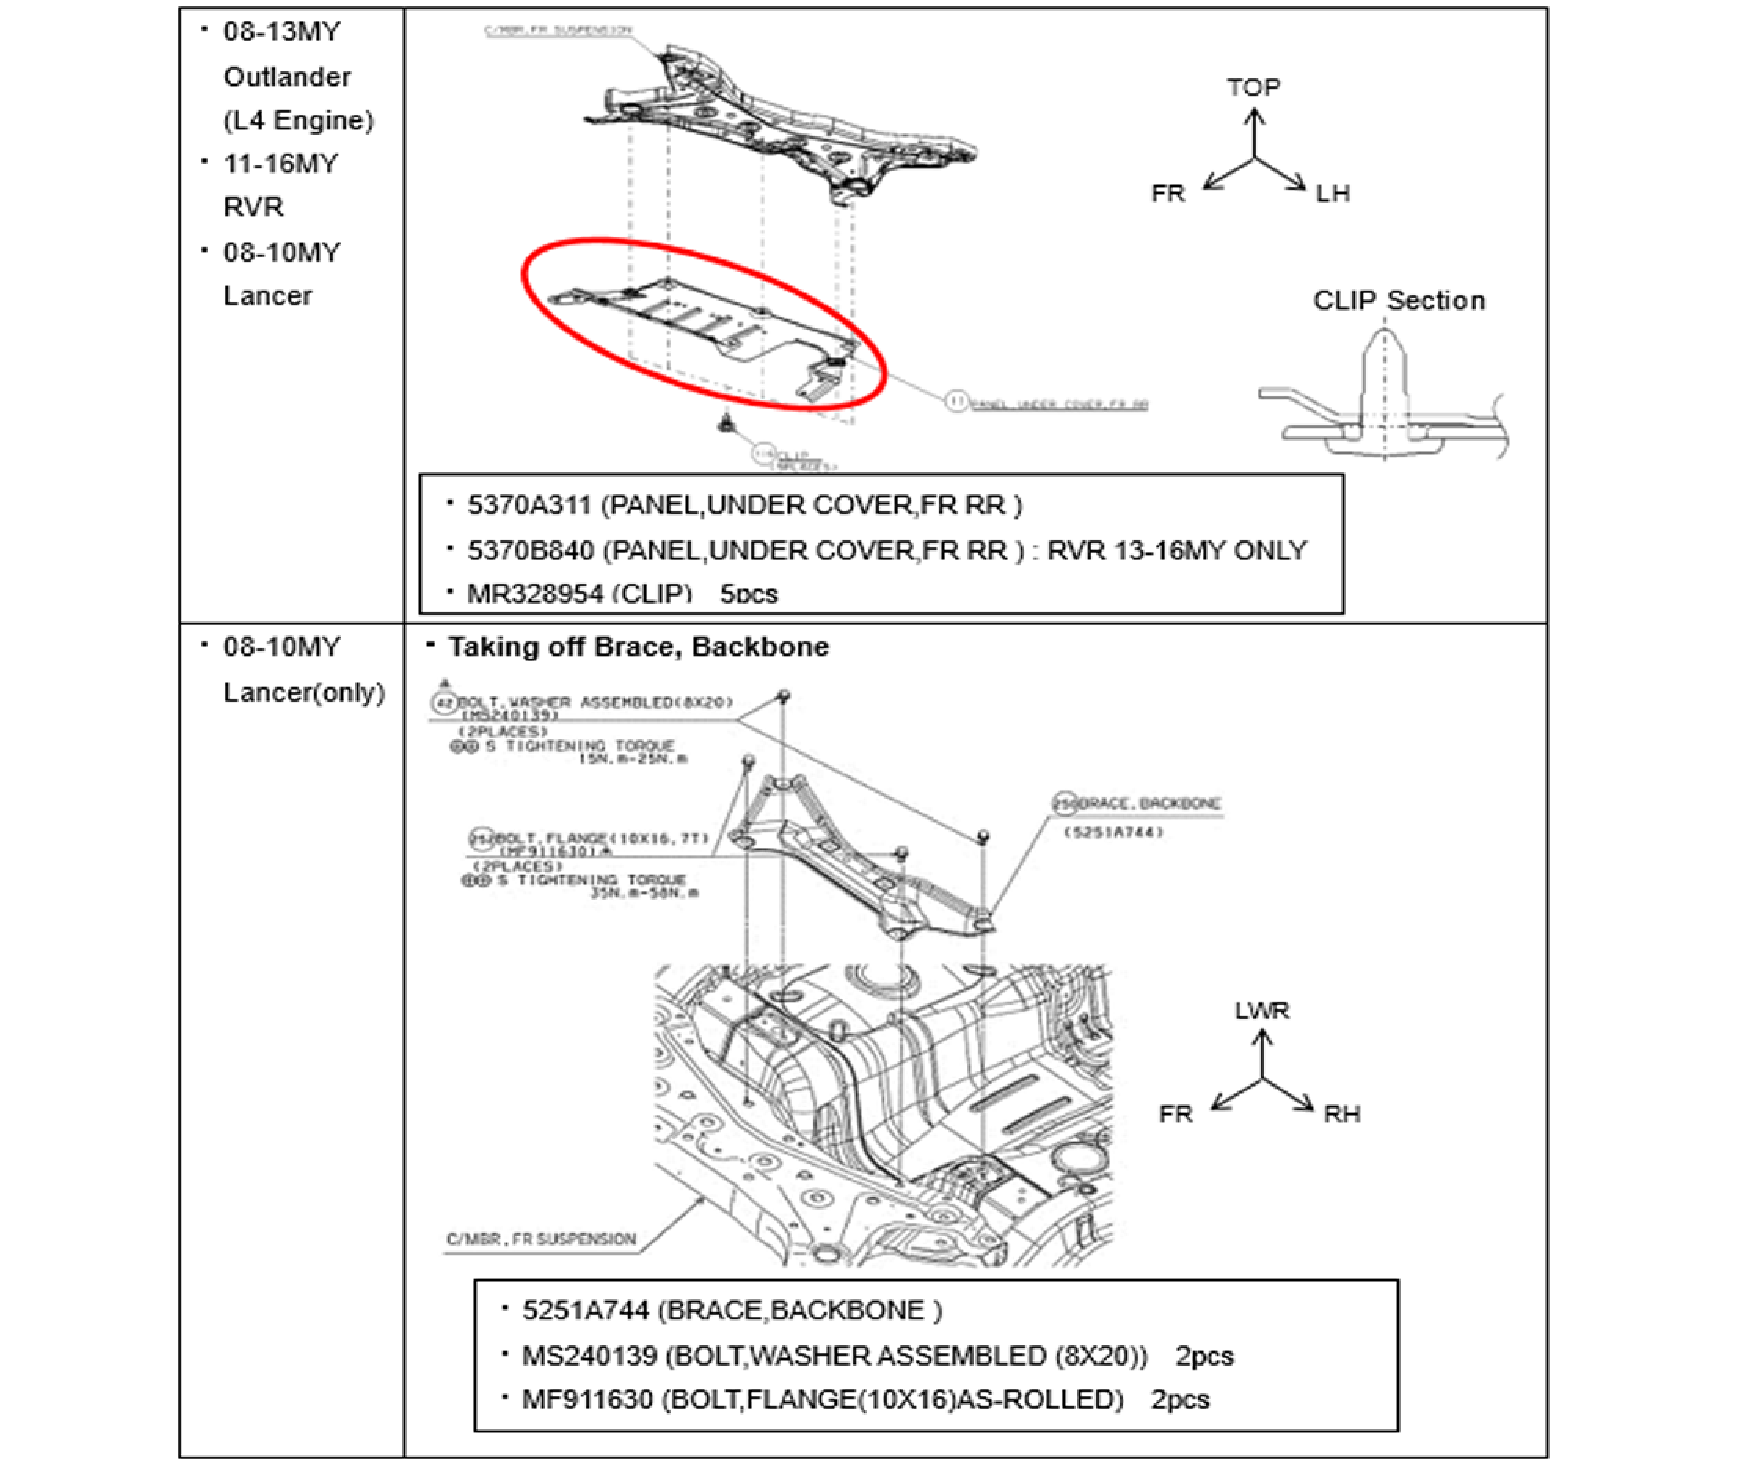
Use only the Genuine Mitsubishi Parts listed below:
|
Part Number |
Part Description |
Quantity/Vehicle |
Comments |
|
MZ341024EX or MZ321015 (in Canada) |
Anti-Corrosion Agent |
5 vehicles per bottle |
For inside of the Crossmember |
|
MZ320800 |
Anti-Corrosion Agent |
5 vehicles per can |
For outside of the Crossmember |
|
MW400273 |
Crossmember |
1 |
For applicable replacement |
NOTE: Additional spray gun or air regulators may be purchased at dealer's expense.
WARRANTY INFORMATION
|
Vehicles |
Campaign |
Labor Time (hrs) |
Repair Description |
|
|
2008-2010 Lancer, 2009-2010 Lancer Sportback, 2008-2013 Outlander, 2011-2012 Outlander Sport / RVR & 2016 Outlander Sport / RVR< |
C2003R01 |
1.0 |
Inspection & Application of Anti-Rust Agents (Lancer, Lancer Sportback) |
|
|
C2003R02 |
0.9 |
Inspection & Application of Anti-Rust Agents (Outlander, Outlander Sport/RVR) |
||
|
C2003R03 |
3.3 |
Inspection & Replacement of Crossmember (Lancer, Lancer Sportback, Outlander) |
||
|
C2003R04 |
2.5 |
Inspection & Replacement of Crossmember (Outlander Sport/RVR) |
||
|
2013 Outlander Sport / RVR |
C2003X01 |
0.9 |
Inspection & Application of Anti-Rust Agents (2013 Outlander Sport/RVR) |
|
|
C2003X02 |
2.5 |
Inspection & Replacement of Crossmember (2013 Outlander Sport/RVR) |
||
|
2014-2015 Outlander Sport / RVR |
C2003Z01 |
0.9 |
Inspection & Application of Anti-Rust Agents |
|
|
C2003Z02 |
2.5 |
Inspection & Replacement of Crossmember |
||
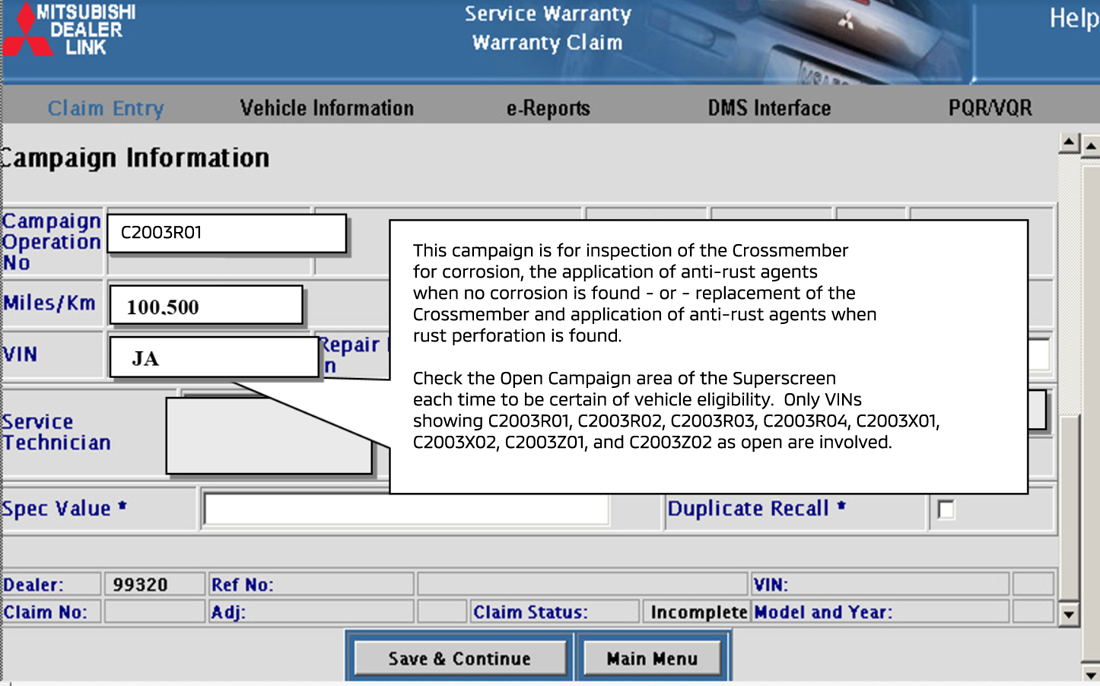
Warranty / Recall Campaign Claim Information
Enter all claims as claim type ‘C’ – Recall/Campaign Claims
Please follow the campaign instructions below.
Certain affected vehicles:
2008 – 2010 Lancer*
2009 - 2010 Lancer Sportback*
2008 - 2013 Outlander*
2011 – 2016 Outlander Sport / RVR*
NOTE: Always check the Superscreen to verify vehicle involvement.
A claim example for reference:
LABOR AND PARTS
There are only 2 possible repair scenarios for this campaign.
Scenario 1
Inspect = OK - then, still must apply the 2 anti-rust agents only.
Scenario 2
Inspect = applicable corrosion - replace Crossmember. Do not apply anti-rust agent.<
Each can of the anti-rust agents is enough to complete 5 vehicles. Thus, the dealer net price for each of the materials is priced at dealer net divided by 5 and will be reflected automatically when entering the parts costs on the related recall campaign claim. Dealers will receive markup based on the per vehicle material prices.<
REPLACED PARTS
Replaced parts must be held for at least 10 days beyond the recall claim payment date unless requested to be returned to MMNA. Return requested parts as you would any return requested warranty replaced part.
RENTAL CARS
If there is a need to provide the owner with a rental car or to claim return freight charges, claim the applicable charges in this section of the claim on the lower portion of the labor entry screen.
Copyright 2020, Mitsubishi Motors North America, Inc.


