Technical Service Bulletin

SUBJECT:

4WD WARNING INDICATOR ILLUMINATES WITH DTC U0431

No: TSB-18-23-001

DATE: June 2018

MODEL: 2014-18 Outlander

CIRCULATE TO:

[ ] GENERAL MANAGER

[ X ] PARTS MANAGER

[ X ] TECHNICIAN

[ X ] SERVICE ADVISOR

[ X ] SERVICE MANAGER

[ X ] WARRANTY PROCESSOR

[ ] SALES MANAGER

PURPOSE

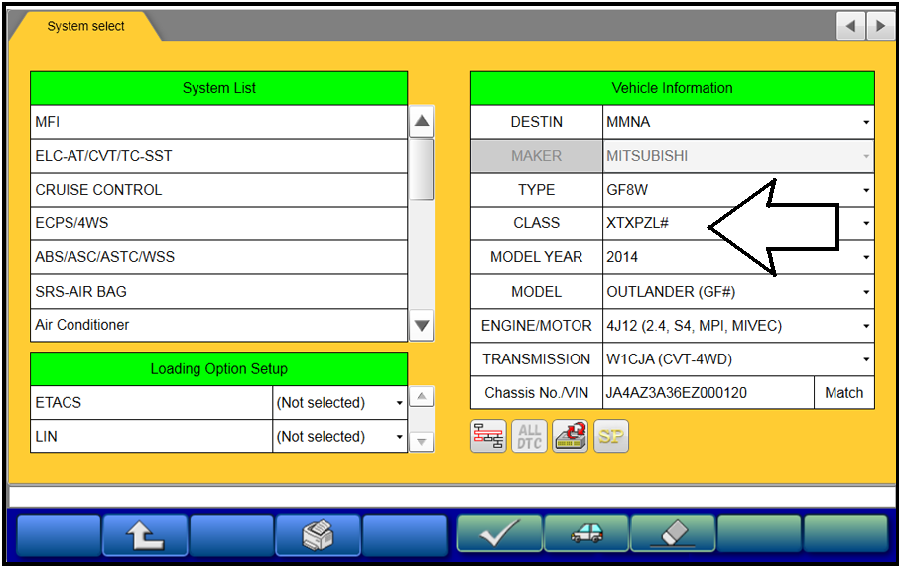
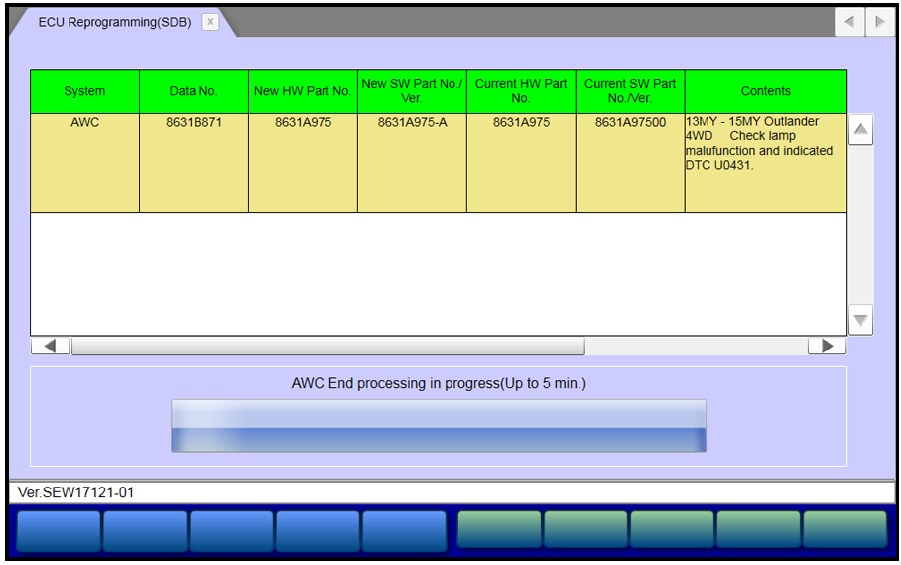
Due to improper programming of the All Wheel Control (AWC) Electronic Control Unit (ECU), the ETACS may transmit an incorrect signal, resulting in the 4WD warning indicator illuminating. As a result, DTC U0431 may be stored.

This TSB instructs dealers to reprogram the AWC ECU with updated software to correct the issue.

AFFECTED VEHICLES

Certain 2014-2018 Outlander vehicles equipped with AWC, built before March 1, 2018.

REQUIRED OPERATIONS

  1. Confirm your MUT-III is updated with the latest reprogramming database.
  2. Reprogram the AWC ECU with the new software. Refer to the “AWC ECU Reprogramming Chart” for new software information.

IMPORTANT: If an affected vehicle has a Malfunction Indicator Lamp (MIL) illuminated before reprogramming, and DTCs are listed in the AWC ECU memory, diagnose and repair those DTCs per the service manual before reprogramming. DO NOT reprogram the AWC ECU until the reason(s) for other DTCs being set is corrected.


EQUIPMENT

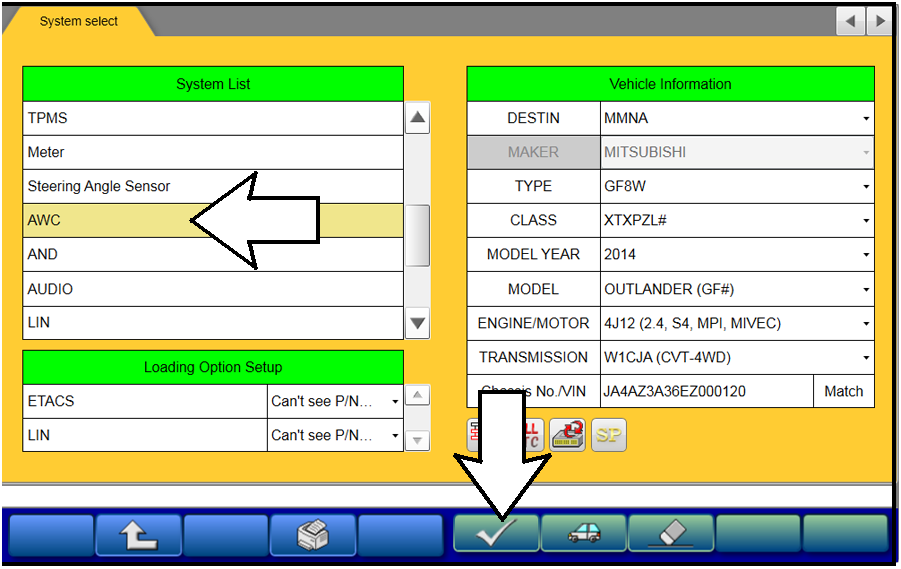
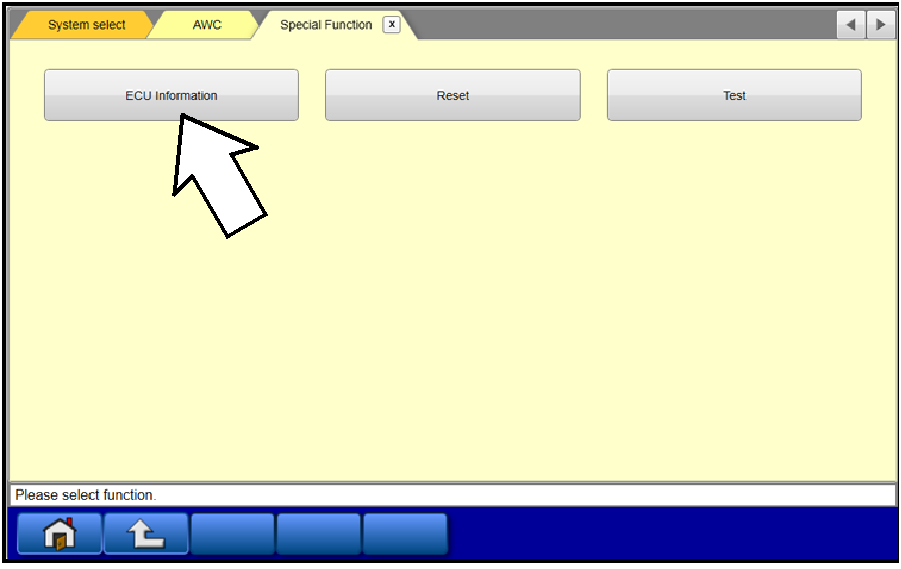
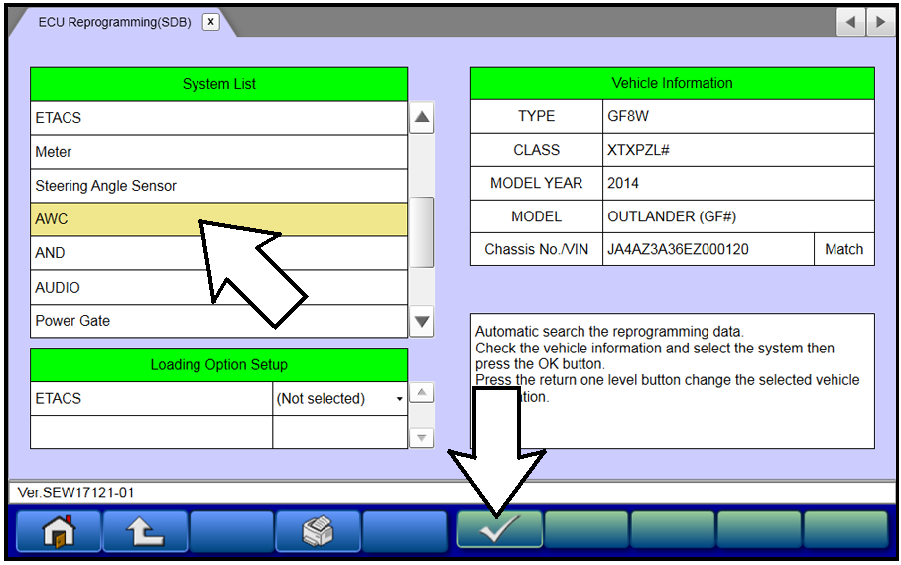
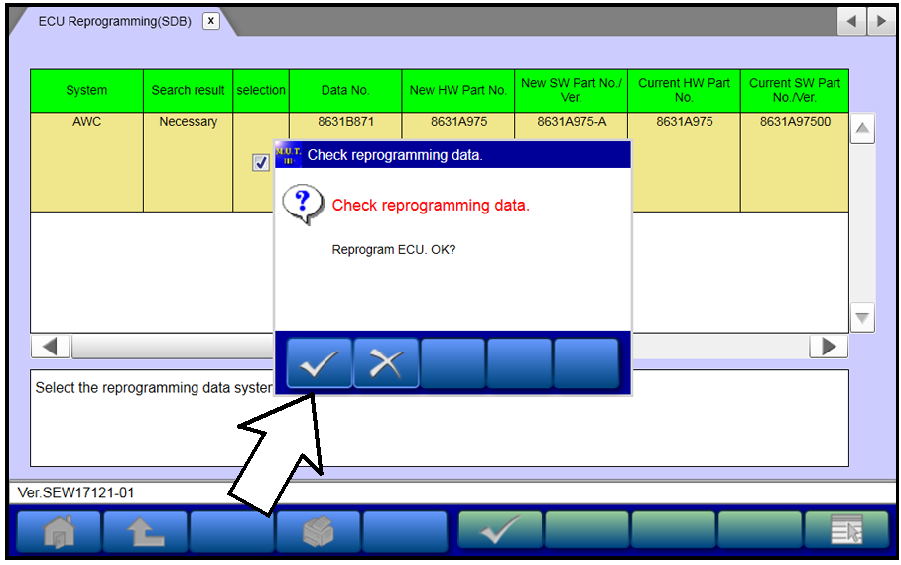
The following equipment is needed to reprogram the AWC ECU.

AWC ECU REPROGRAMMING CHART

Model

AWC ECU Part Number

Data No.

Software Part Number

ECU Model Number

Previous

New

Previous

New

2014-15 Outlander

8631A975

8631B871

8631A975 00

8631A975-A

X4T72372 H

X4T72372 H1

2016-18 Outlander

8631B341

8631B872

8631B341 00

8631B641-A

X4T72372 H

X4T72372 H1

2014-18 Outlander

8631A955

8631B873

8631A955-B

8631A955-C

X4T72372 H

X4T72372 H1

REPAIR PROCEDURE

SOFTWARE/MEDIC VERSION VERIFICATION

  1. Verify that the AWC ECU has not already been updated to the latest S/W number in the table above.
    If the AWC ECU is at the latest level, reprogramming is not necessary.

NOTE: Reprogramming the AWC ECU with the latest database (e.g., N180601) includes all past and current reprogramming for TSBs of affected vehicles. It is not necessary to reprogram the AWC ECU for each previous TSB.

520069981_graphic-textA0

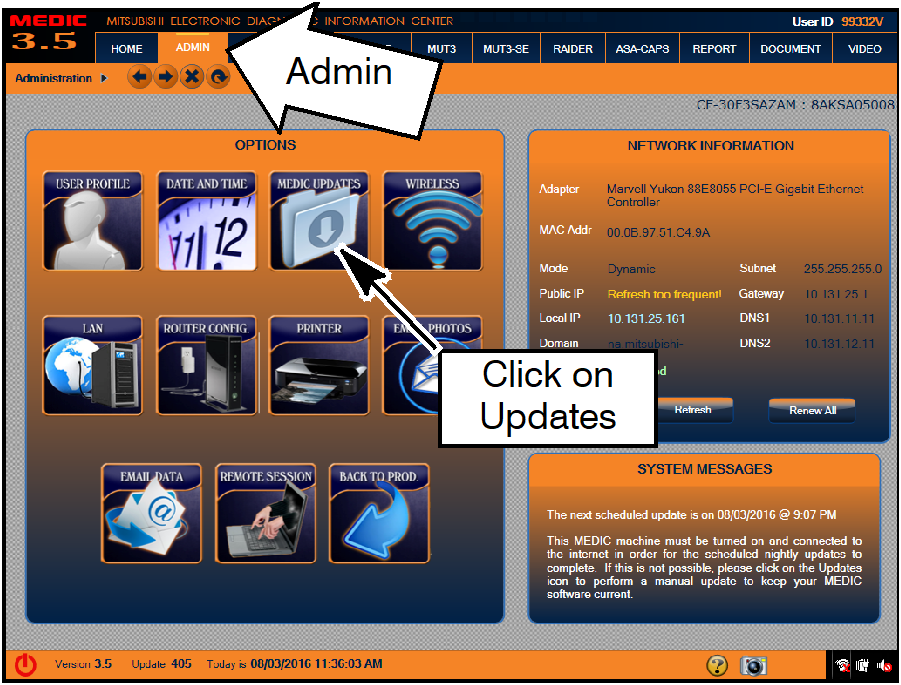
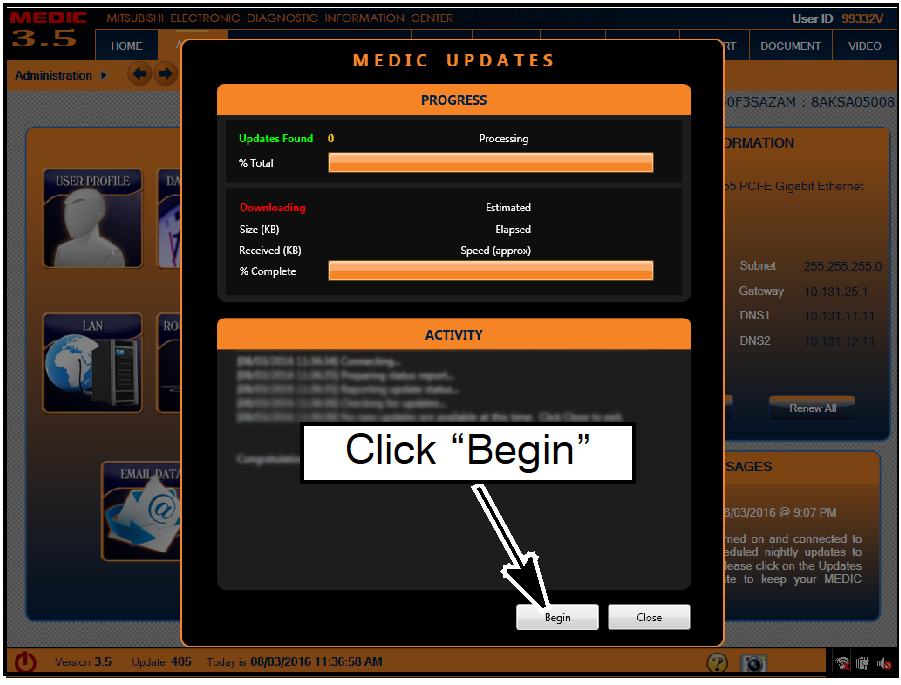
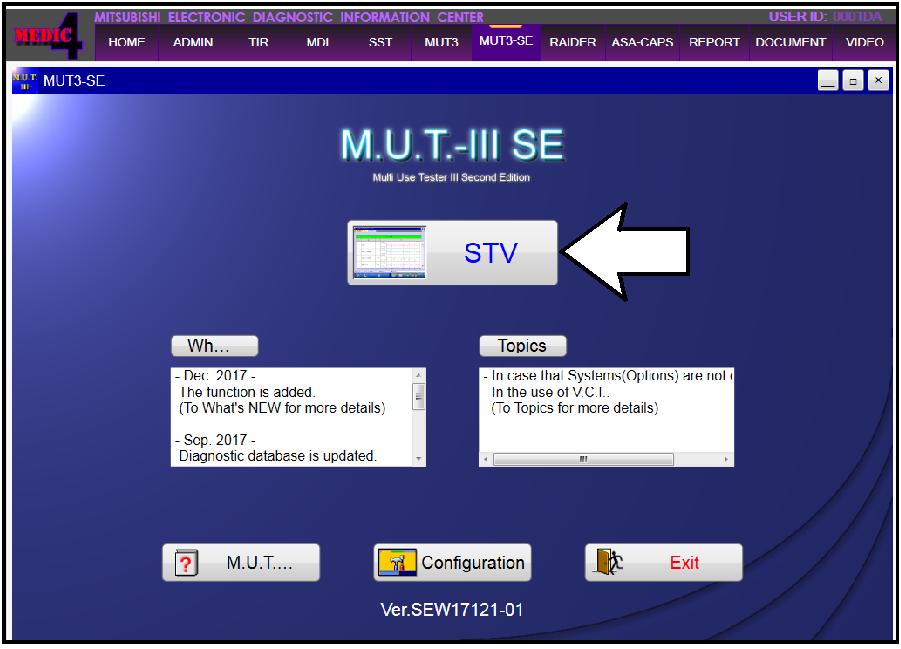
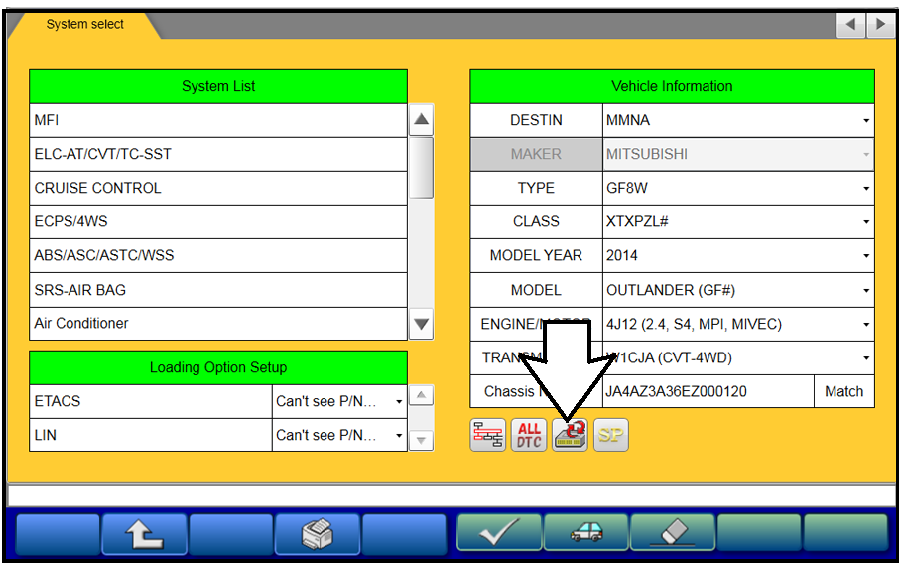
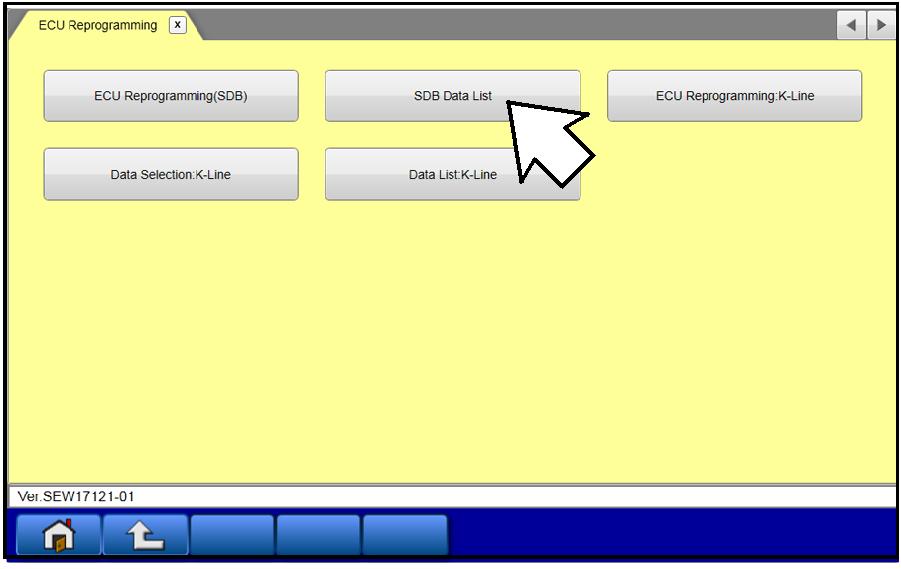
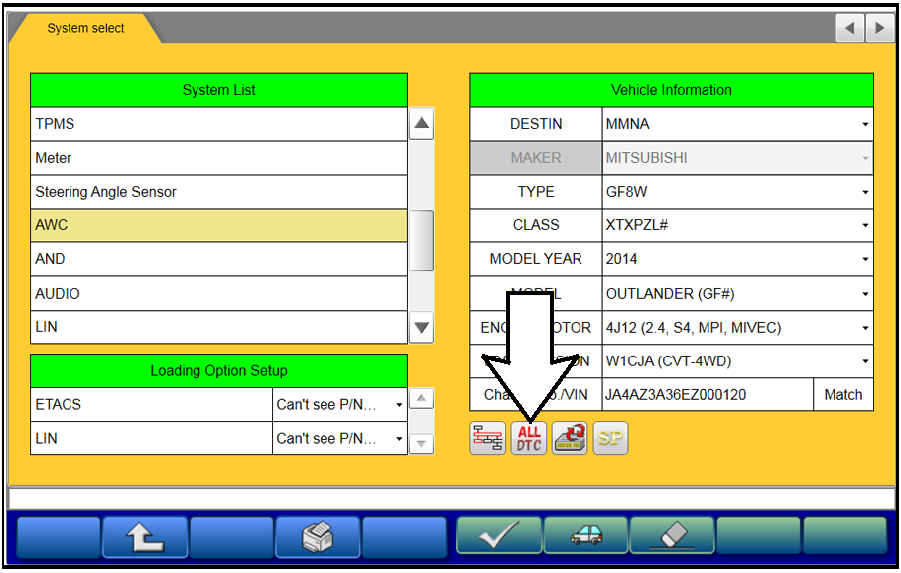
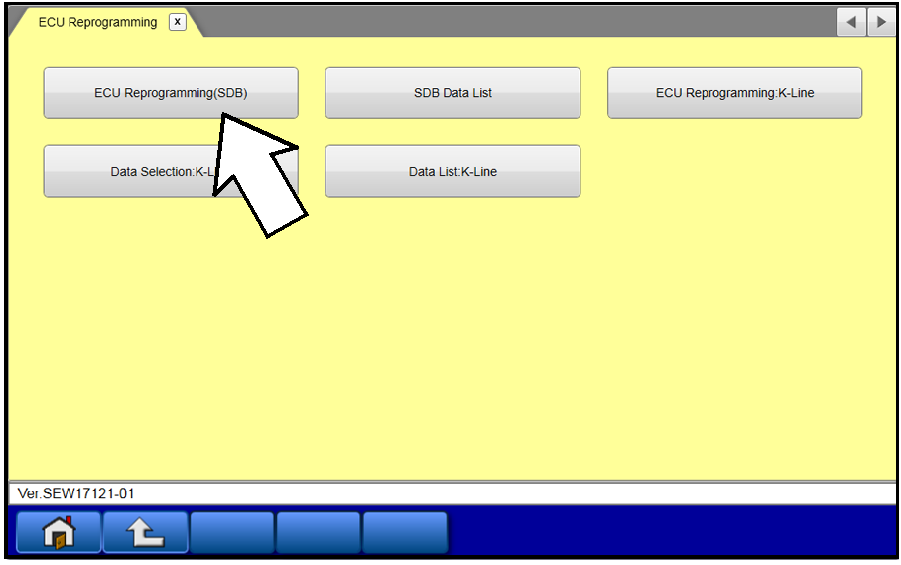
For MEDIC 3.5/4 users only: (MUT-III STV users go to step 5)

  1. Verify the MEDIC 3.5/4 is at version 3.5 and at update 532 or higher.

    If your MEDIC 3.5/4 update is at least 532, continue with the Reprogramming Procedure.

    If your MEDIC 3.5/4 update is below 532, update your MEDIC as follows.
520069981_graphic-text90
  1. Select the MEDIC 3.5/4 Admin tab and click on “Updates.”
520069981_graphic-text80
  1. IF the MEDIC update screen advises updates are available, click the “Begin” button. After all updates are complete, GO TO THE REPROGRAMMING PROCEDURE.
520069981_graphic-text81
  1. STANDALONE MUT-III SCAN TOOL VIEWER (STV) ONLY: (MEDIC 3.5 USERS - GO TO THE REPROGRAMMING PROCEDURE). Verify that your MUT3-SE has the most current version of the reprogramming database:
    From the MUT3-SE Main Page:
    1. Click “STV.”
520069981_graphic-text82
  1. Click the “ECU Reprogramming” button.
520069981_graphic-text83
  1. Click “SDB Data List.”
520069981_graphic-text84
  1. Confirm that the database number displayed in the upper right above the chart is N180601 or higher

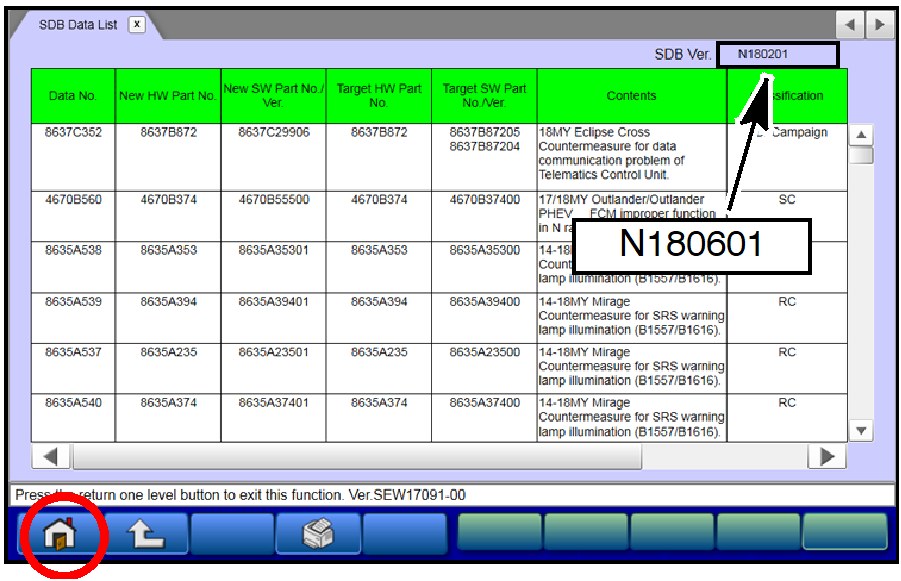
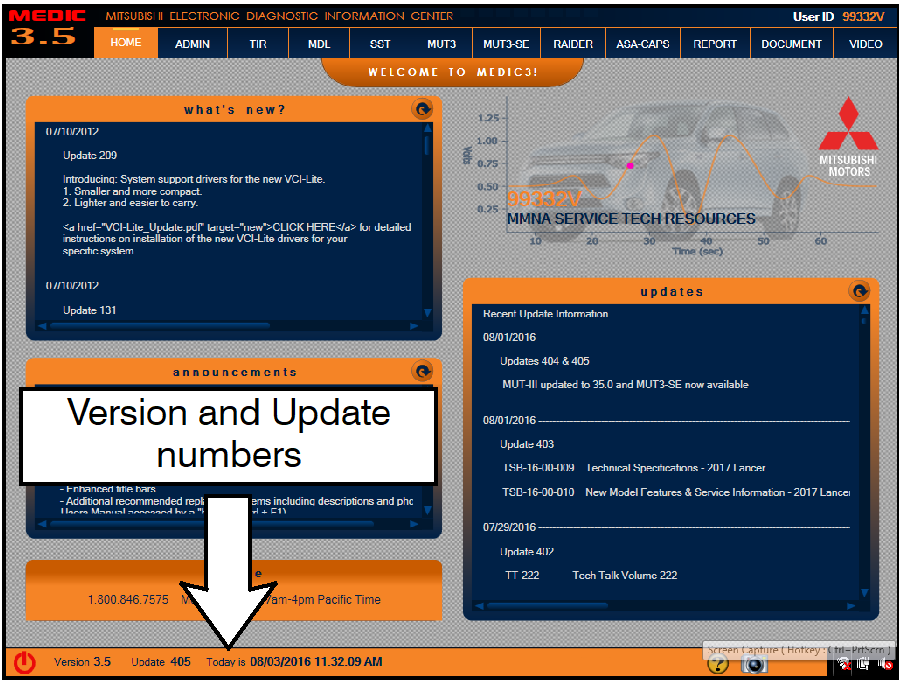
● If the database number displayed on your MUT3-SE is N180601 or greater, continue to the next section.

● If the reprogramming database number displayed on your MUT3-SE is lower than N180601, then the MUT3-SE database needs to be updated.

  1. Once database number is confirmed, hit the Home button to go back to the System Select screen.

REPROGRAMMING PROCEDURE

Caution! 
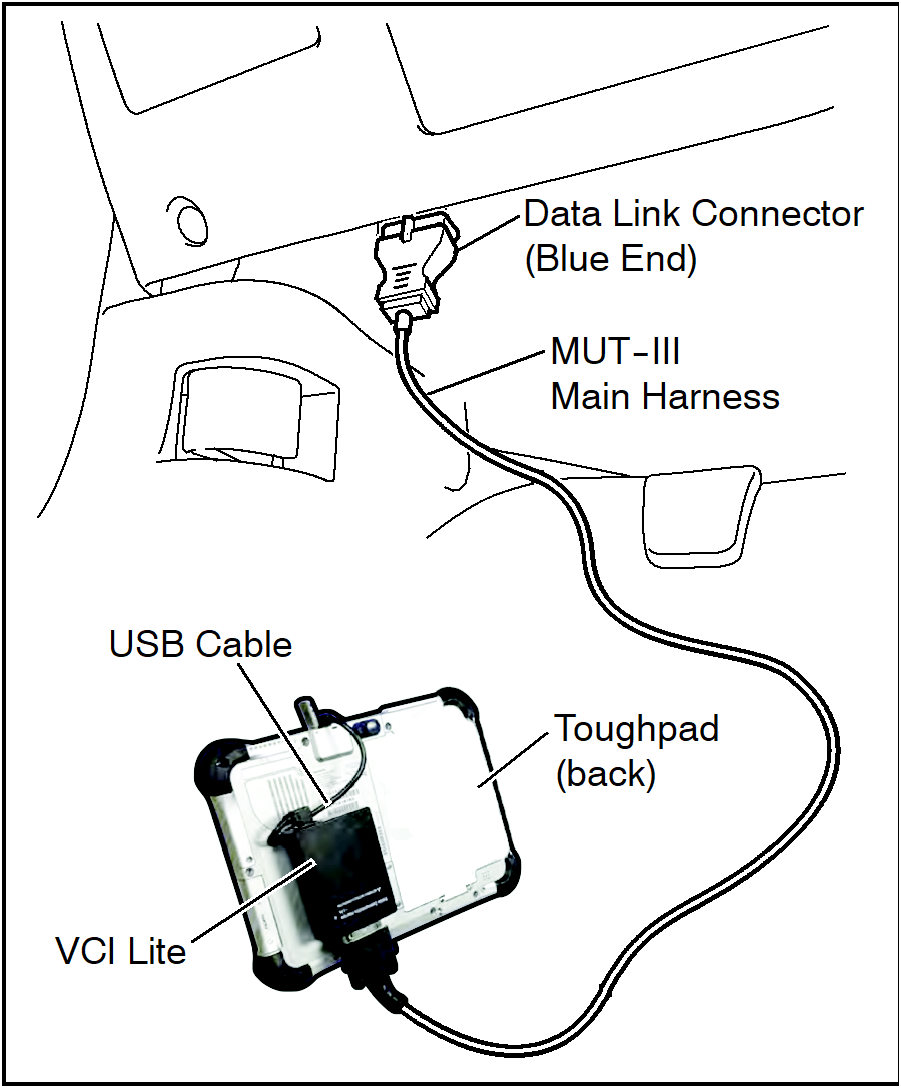
To ensure that the vehicle battery maintains 12V during the procedure, hook-up a battery charger to the vehicle during the procedure.

NOTE: VCI Stand-alone reprogramming is not available for this procedure.
The laptop/tablet and the VCI must remain connected for the entire procedure.

  1. Connect the equipment as follows:

NOTE: VCI Lite and MEDIC 4.0 Toughpad shown for illustration purposes only.

520069981_graphic-text70
  • Turn the MEDIC PC/tablet on. If the battery indicator in the lower right hand corner of the screen does not show a full charge, it is recommended that either the battery be charged prior to beginning, or be used with the A/C power adaptor connected.
  • Connect the USB cable to the VCI/VCI Lite.
  • When the laptop/tablet displays the MUT-III main screen, connect the USB cable to the device.
  • Connect the MUT-III main harness with the blue DLC connection to the VCI/VCI Lite.
  • Connect the blue connection of the MUT-III main harness to the vehicle's data link connector.
  • Turn the VCI power switch ON. Verify that the indicator lamp in the upper right corner of the screen is green.

Caution!

DO NOT DISTURB THE HARNESS CABLES OR CONNECTIONS DURING THE REPROGRAMMING PROCESS AS IT COULD CAUSE THE CONTROL UNIT TO LOSE DATA. IF THE USB CABLE IS DISCONNECTED DURING THIS PROCEDURE, A WARNING MESSAGE WILL DISPLAY.

  1. Turn the ignition switch to the “ON” position.
520069981_graphic-text60
  1. Using MEDIC, from the main page, click the “MUT3-SE” icon at the top center of the screen to open MUT-III SE.

    Click the STV button.
520069981_graphic-text61
  1. The System Select screen opens and populates with some basic information from the vehicle.

    Look at the label on the passenger side B pillar to identify the appropriate class.

    If necessary, select the correct class from the drop-down list.
520069981_graphic-text62
  1. The System List should now populate with vehicle information.

    If required, select the correct Loading Option Setup from the drop-down lists.
  • ETACS: (e.g., Can't see P/N / Can see P/N)
  • LIN: (e.g., Can't see P/N / Can see P/N)
  1. Verify that the AWC ECU has not already been updated to the latest S/W number shown in the “AWC ECU Reprogramming Chart” in this TSB.
    If the AWC ECU is at the latest level, reprogramming is not necessary.
520069981_graphic-text50
  1. Select “AWC” from the System List, then click on the check mark at the bottom of the screen.
520069981_graphic-text51
  1. Select “Special Function.”
520069981_graphic-text52
  1. Select “ECU Information.”
520069981_graphic-text53
  1. If the Software Part Number listed is not at the latest level (shown in the “AWC ECU Reprogramming Chart” in this TSB), proceed with the next step. Click the Home button to return to the System Select screen.

    If the Software Part Number is at the latest level, then reprogramming is not necessary.
  1. Before reprogramming, perform an “Erase and Read All DTCs” to clear any DTCs that may have set.
520069981_graphic-text40
  1. On the System Select screen click the “ALL DTC” button.
520069981_graphic-text41
  1. Select “Erase and Read All DTCs.”
520069981_graphic-text42
  1. A window will pop up asking you to confirm DTC erasing. Click the check mark in the dialog box for DTC erasing and reading to begin.
520069981_graphic-text43
  1. The “System List” on the left side of the screen will have all selections checked. Do not change these selections.
  2. Click the check mark to continue.
520069981_graphic-text44
  1. When DTC erasing is completed, click the check mark in the pop-up message that reads “All erasing and checks are completed.”

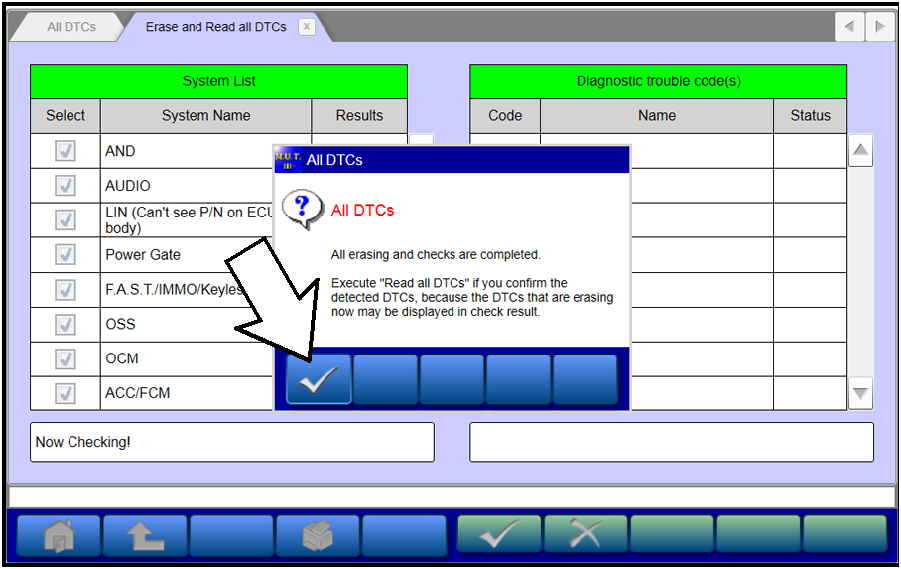
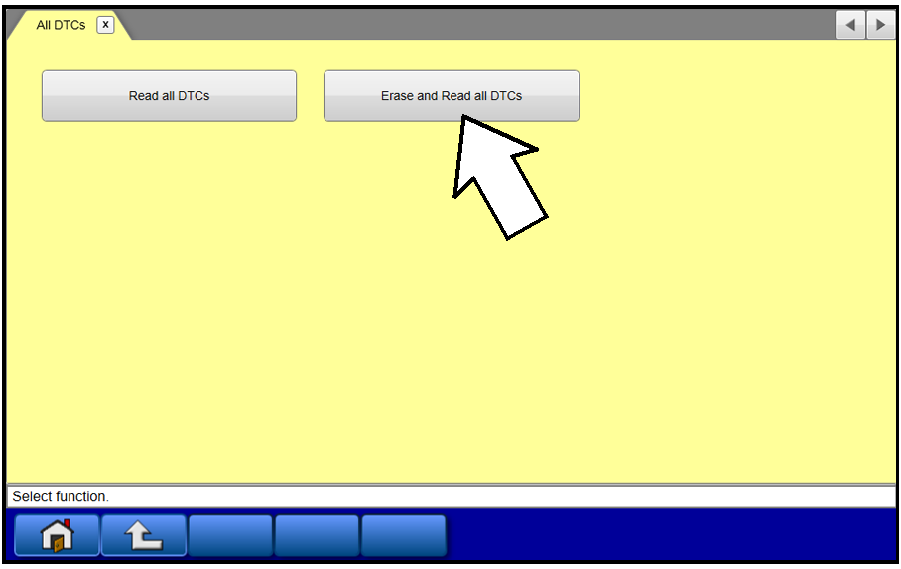
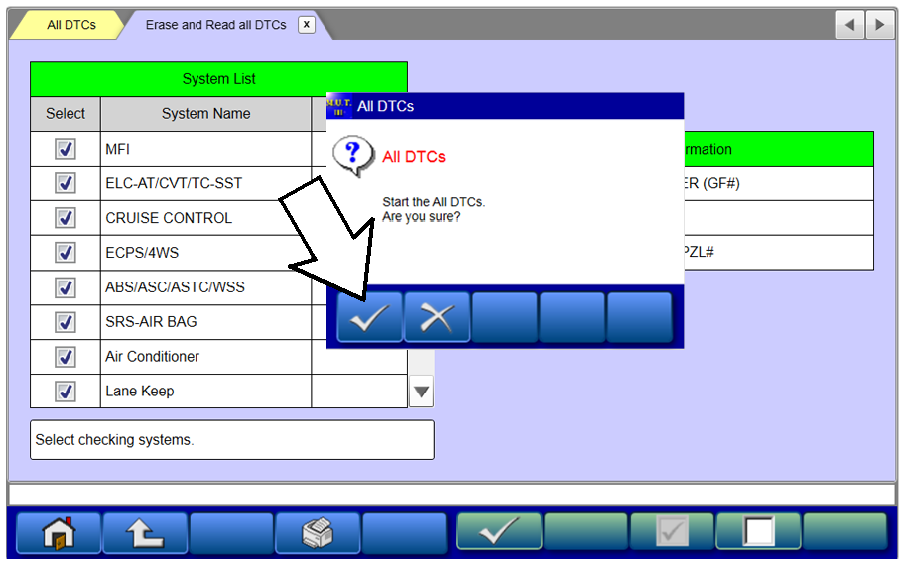
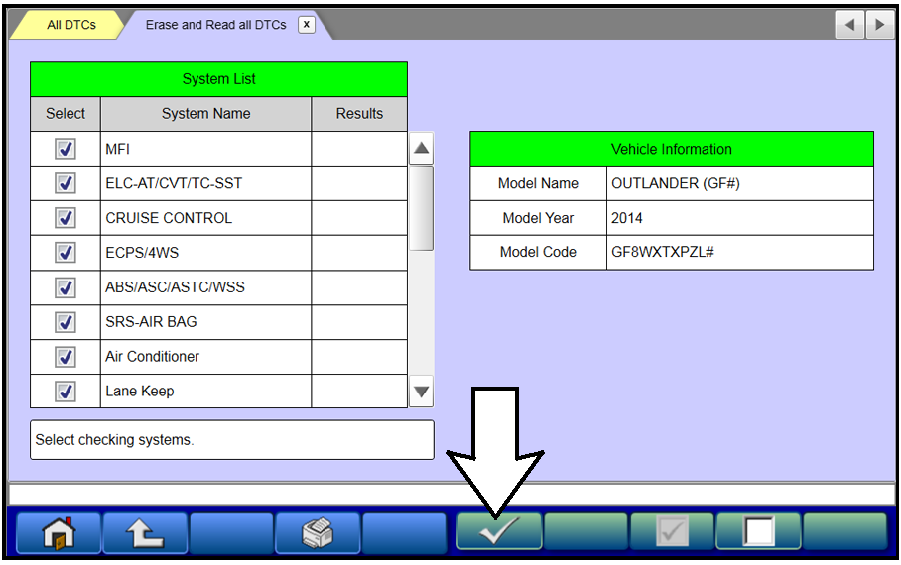
a. If any DTCs return after erasing is completed, click the check mark to clear the window. Diagnose and repair per the Service Manual.

520069981_graphic-text45

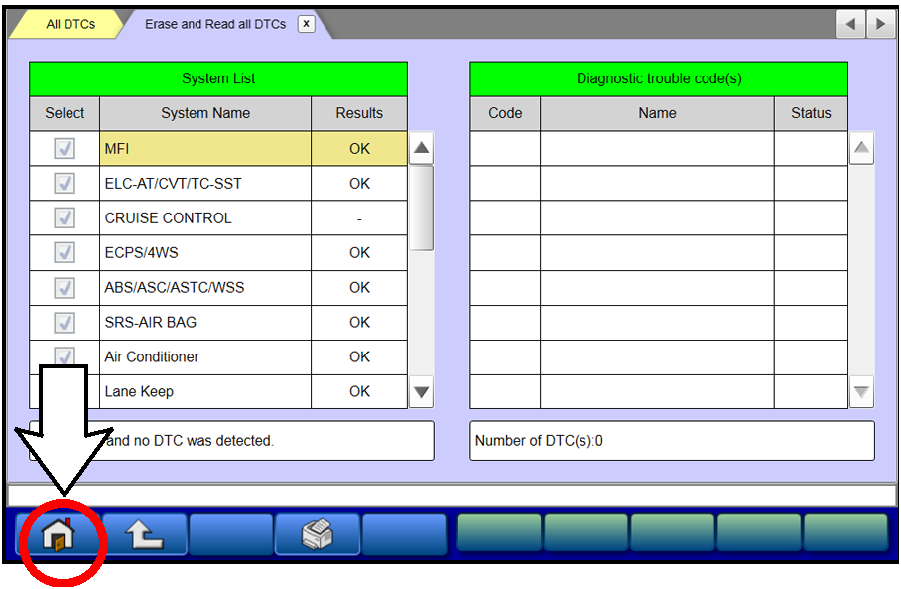
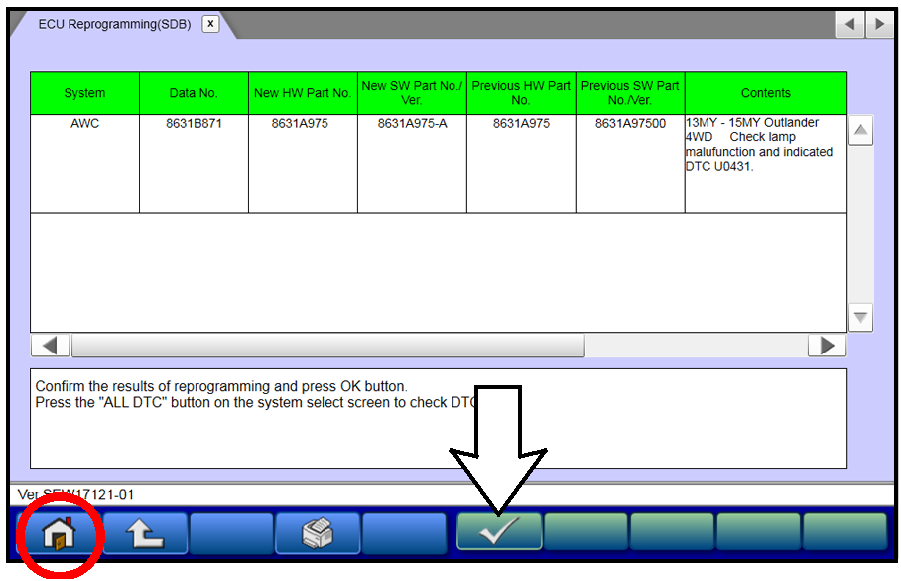
b. If DTCs do not return, click the check mark to clear the window, then click the Home icon in the lower left to return to the System Select menu.

  1. Reprogram the AWC ECU following the steps below.
520069981_graphic-text30
  1. On the System Select page, click on the Reprogram button.
520069981_graphic-text31
  1. Select “ECU Reprogramming (SDB).”
520069981_graphic-text32
  1. Select “AWC” in the System List, then click the check mark.
520069981_graphic-text33
  1. Verify that the correct data file listed in the table matches the one in the “AWC ECU Reprogramming Chart.”
  2. Click the check mark at the bottom of the page to initiate reprogramming.
520069981_graphic-text34
  1. Click the check mark in the “Check reprogramming data” dialog box.
520069981_graphic-text35
  1. Once the reprogramming is initiated, the screen shown will indicate the reprogramming progress.

NOTE: Do NOT disturb the cables or turn off the ignition during reprogramming.

520069981_graphic-text20
  1. Click the check mark in the “Completed” dialog box.
520069981_graphic-text21
  1. Verify the correct information is listed in the table. Click the check mark at the bottom of the page, then click the Home button to return to the System Select screen.
  1. Perform an “Erase and Read All DTCs” again to clear any DTCs that may have set.
    For instructions, refer to steps 7 and 8 in this TSB.
  2. Confirm the software version has been updated.
    For instructions, refer to step 6 in this TSB.
520069981_graphic-text10

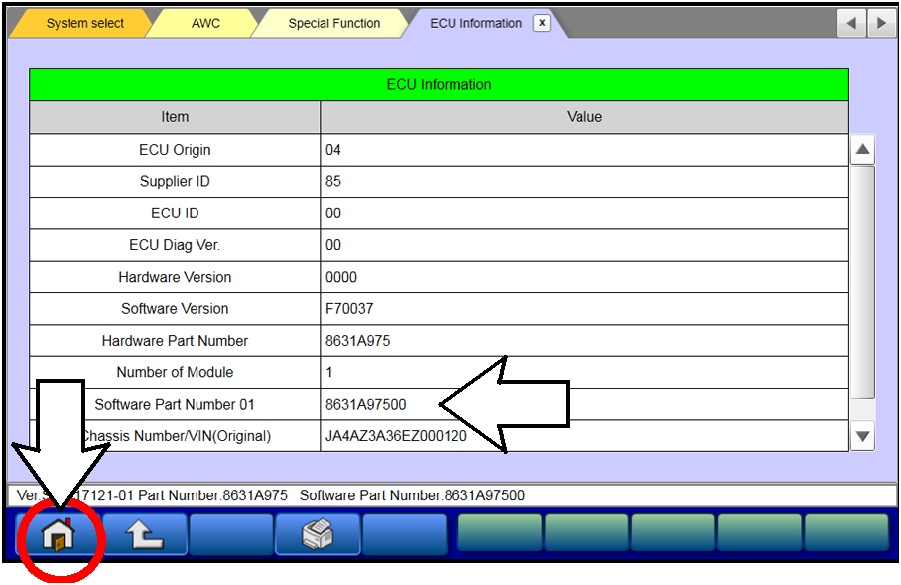
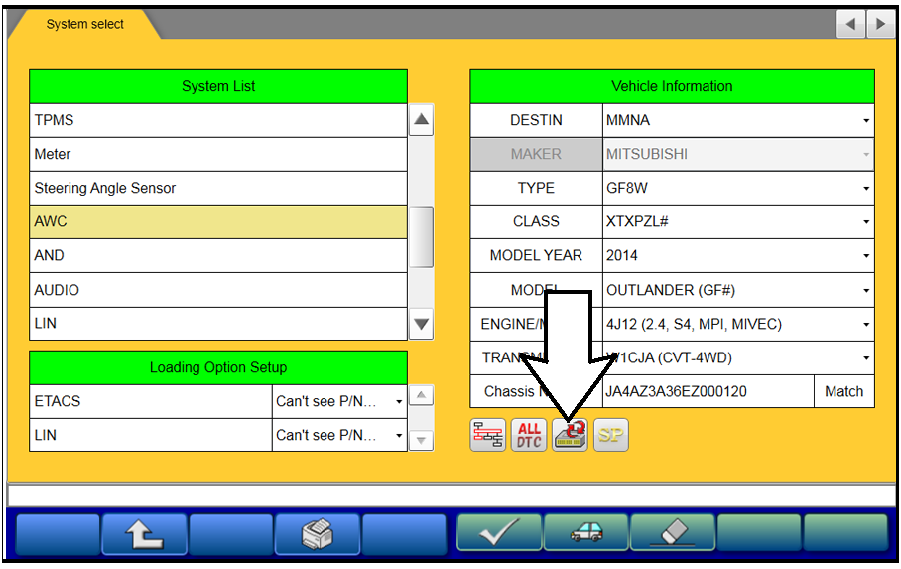
Confirm “Software Part Number” now matches the one shown for the applicable model in the “AWC ECU Reprogramming Chart” in this TSB.

  1. Turn off the ignition switch and disconnect the MUT-III. Turn off and disconnect the battery charger.
  2. Test drive the vehicle to confirm proper operation.

WARRANTY INFORMATION

This bulletin is supplied as technical information only and is not an authorization to repair. If an affected vehicle is reported with the described condition, diagnose the condition, repair as described in this bulletin and submit a normal warranty claim using the following information.

Operation

Labor Operation Code

Nature Code

Cause Code

Time Allowance

Reprogram AWC ECU

238503UC

16D

8B0

0.3 hrs.

Warranty Coverage: 8 years / 80,000 miles; (Canada: 8 years / 130,000 kms)

Copyright 2018, Mitsubishi Motors North America, Inc.

The information contained in this bulletin is subject to change. For the latest version of this document, go to the Mitsubishi Dealer Link, MEDIC, or the Mitsubishi Service Information website (www.mitsubishitechinfo.com).