Technical Service Bulletin

SUBJECT:

ILLUMINATED TPMS WARNING LIGHT

No: TSB-17-31-001

DATE: February, 2017

MODEL: 2016-17 Outlander

CIRCULATE TO:

[ ] GENERAL MANAGER

[ X ] PARTS MANAGER

[ X ] TECHNICIAN

[ X ] SERVICE ADVISOR

[ X ] SERVICE MANAGER

[ X ] WARRANTY PROCESSOR

[ ] SALES MANAGER

PURPOSE

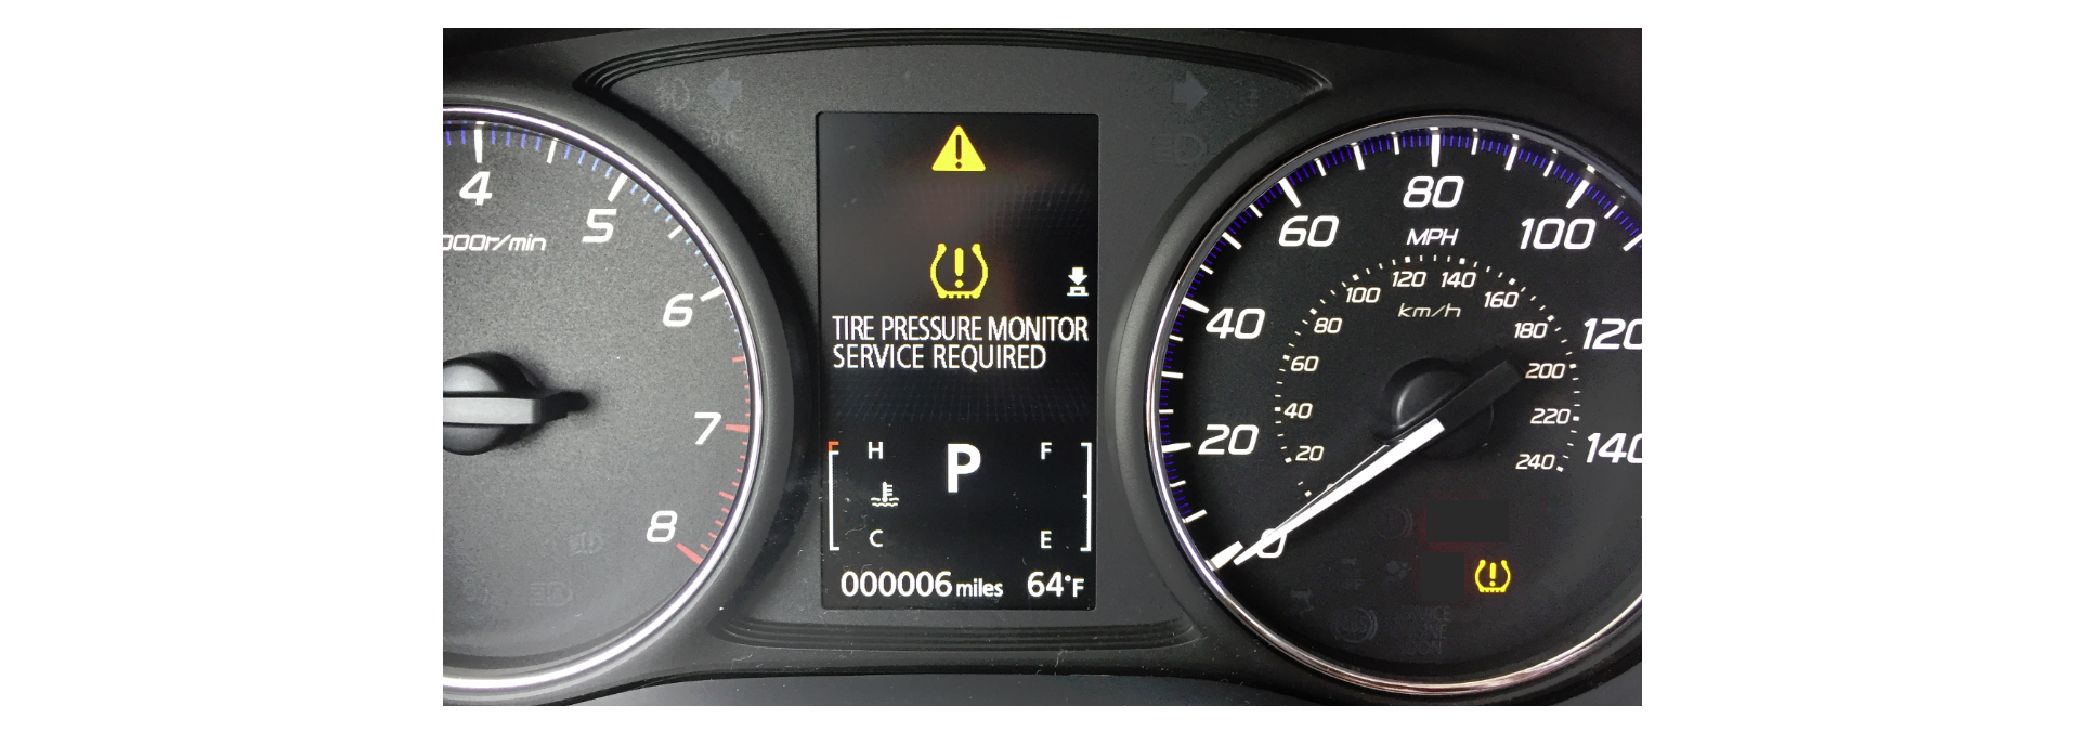
When the 12V auxiliary battery voltage becomes abnormally low, or completely goes dead, and subsequently the 12V auxiliary battery is recharged or the vehicle is jump‐started, the TPMS warning light will start flashing for about 1 minute and 20 seconds, and then remains ON after engine start‐up. The MID display will also read “TIRE PRESSURE MONITOR SERVICE REQUIRED.” An initial check of DTCs (Diagnostic Trouble Codes) may indicate low voltage DTCs, but even after all DTCs are erased, the TPMS warning light remains ON.

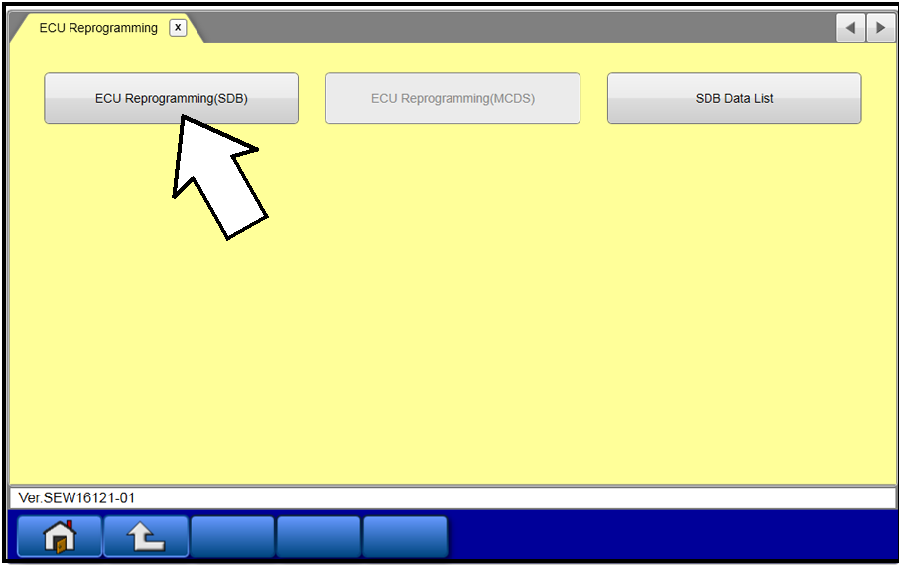
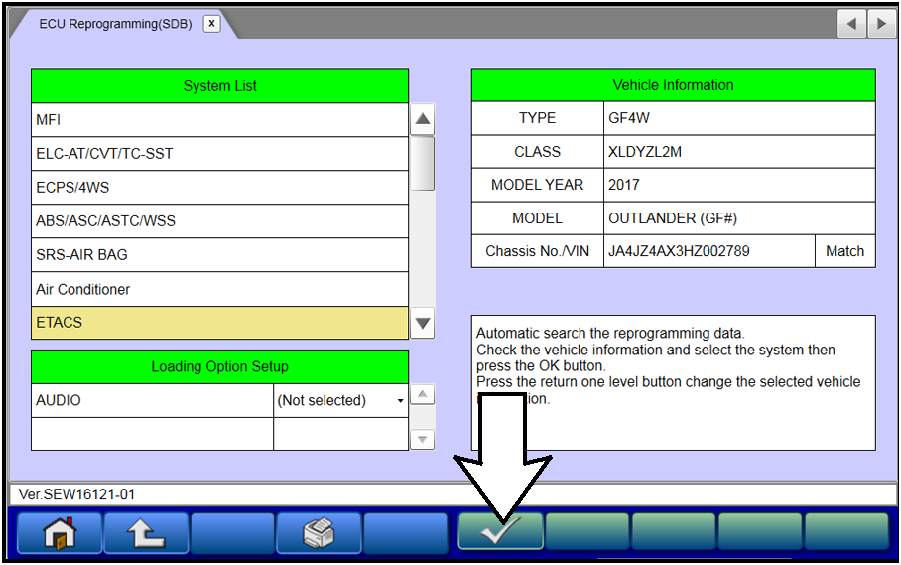
This TSB instructs dealers to reprogram the ETACS ECU (with MUT3-SE) to resolve the issue.

520068082_half-page0


AFFECTED VEHICLES

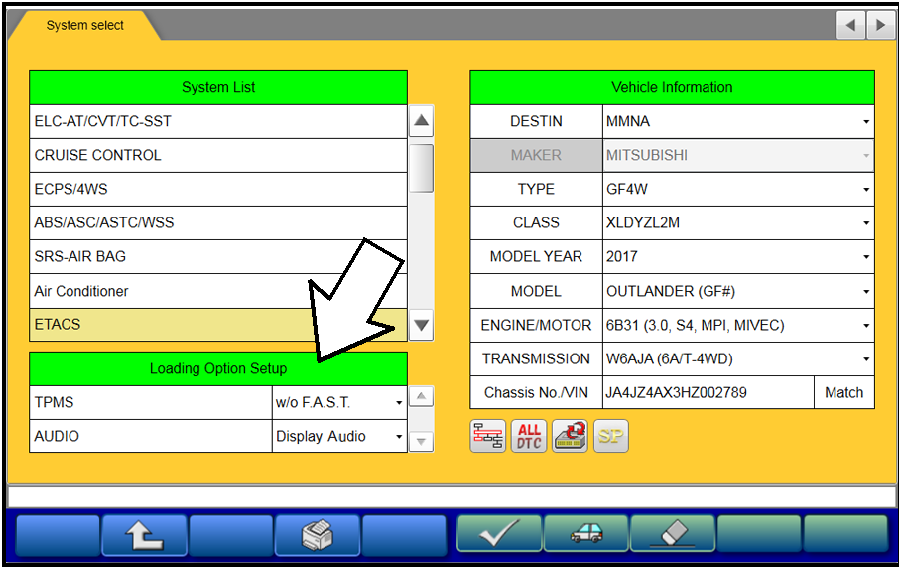
2016-2017 Outlander vehicles equipped with Tire Pressure Monitoring System (TPMS) and Remote Keyless Entry (RKE).

NOTE: This issue DOES NOT apply to vehicles with F.A.S.T. Key (KOS). TPMS is controlled by the ETACS ECU for vehicles with RKE only.

REPAIR PROCEDURE

If an affected vehicle has a Malfunction Indicator Lamp (MIL) illuminated before reprogramming, and DTCs are listed in the ECM memory, diagnose and repair those DTCs per the service manual before reprogramming. DO NOT reprogram the ECM until the reason(s) for other DTCs being set is corrected.


EQUIPMENT

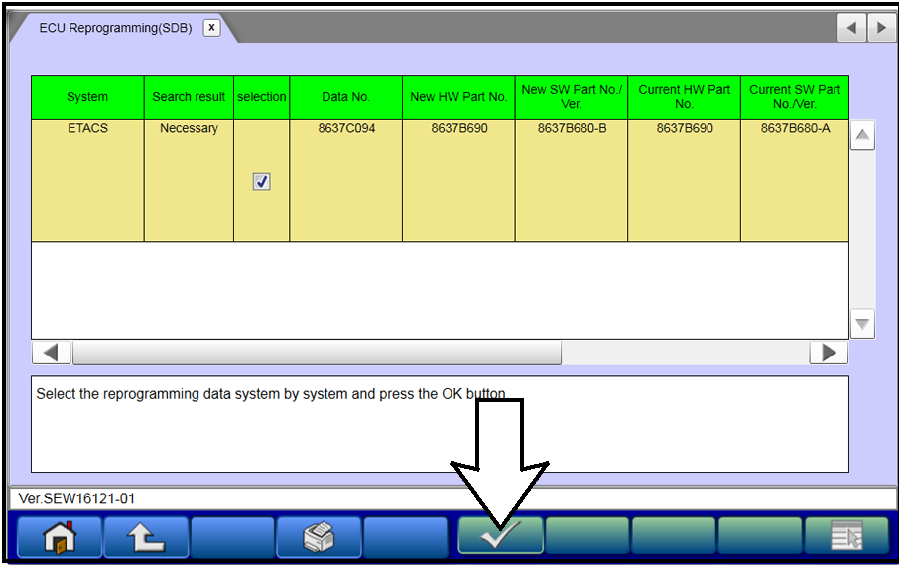
The following equipment is needed to reprogram the ETACS ECU.


ECM REPROGRAMMING CHART

Database No. 170101

Model

ETACS ECU
Part Number

Data No.

Software Part Number

MUT3-SE Software

Previous

New

2016 - 2017 Outlander

8637B690

8637C094

8637B680-A

8637B680-B

SEW16121-01

NOTE: Reprogramming the ETACS ECU with the latest database (e.g., N170101) includes all past and current reprogramming for TSBs of affected vehicles. It is not necessary to reprogram the ETACS ECU for each previous TSB.

520068082_graphic-text70

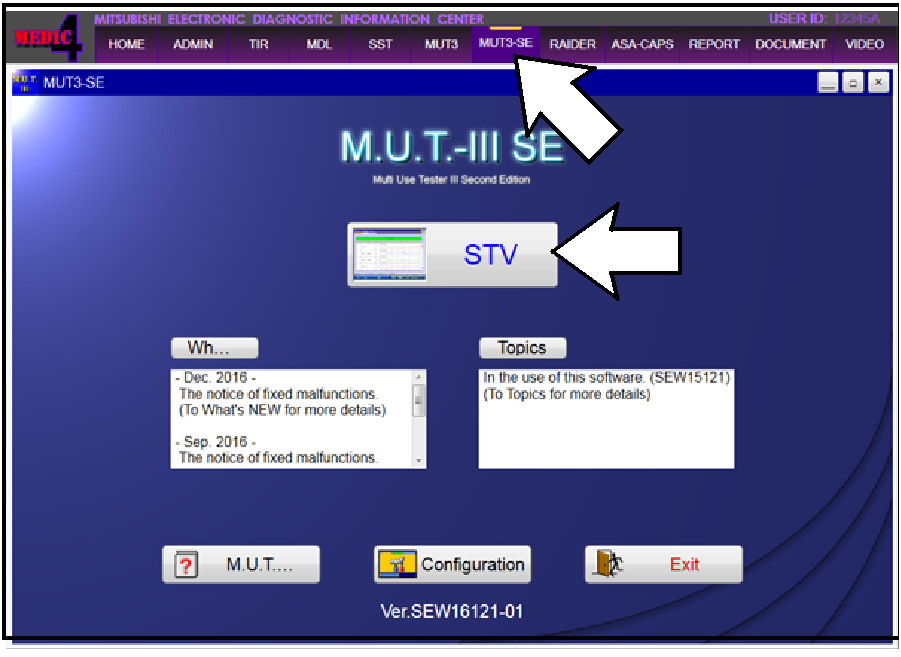
For MEDIC 3.5/4 users only: (MUT-III STV users go to step 4)

  1. Verify the MEDIC 3.5/4 is at version 3.5 and at update 445 or higher.

    If your MEDIC 3.5/4 update is at least 445, continue with the Reprogramming Procedure.

    If your MEDIC 3.5/4 update is below 445, update your MEDIC as follows.
520068082_graphic-text60
  1. Select the MEDIC 3.5/4 Admin tab and click on “Updates.”
520068082_graphic-text61
  1. IF the MEDIC update screen advises updates are available, click the “Begin” button. After all updates are complete, GO TO THE REPROGRAMMING PROCEDURE.
520068082_graphic-text62
  1. STANDALONE MUT-III SCAN TOOL VIEWER (STV) ONLY: (MEDIC 3.5 USERS GO TO THE REPROGRAMMING PROCEDURE). Verify that your MUT3-SE has the most current version of the reprogramming database:
    From the MUT3-SE Main Page:

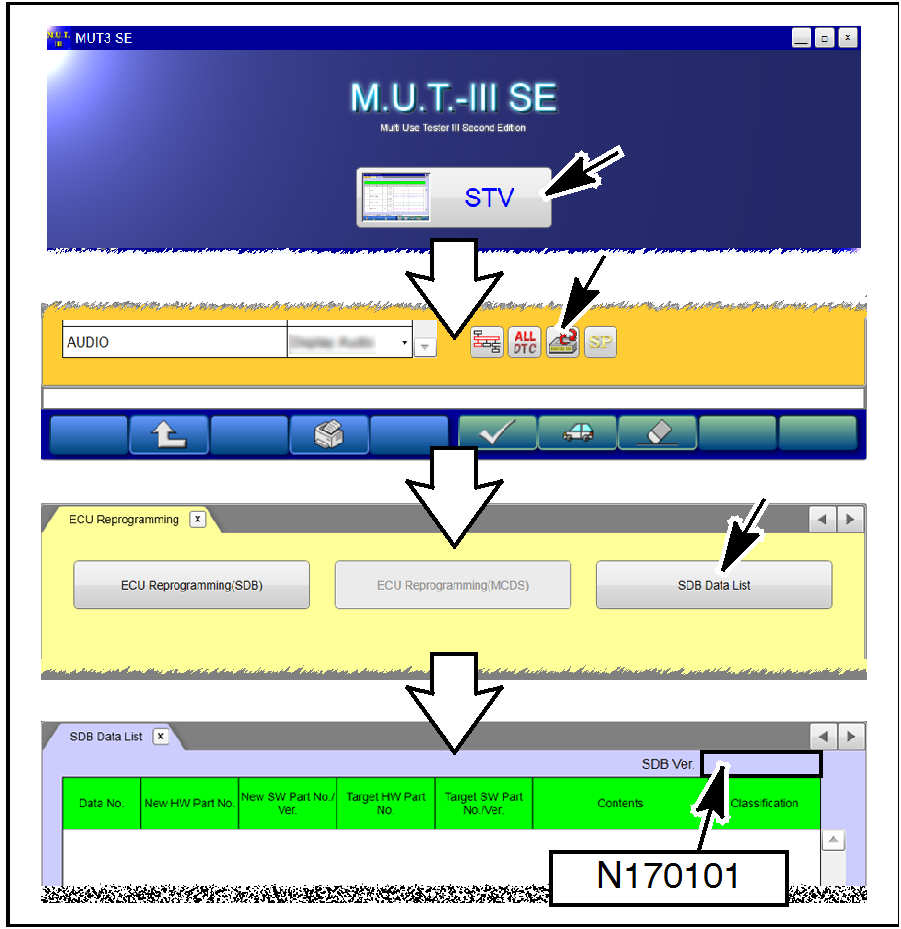
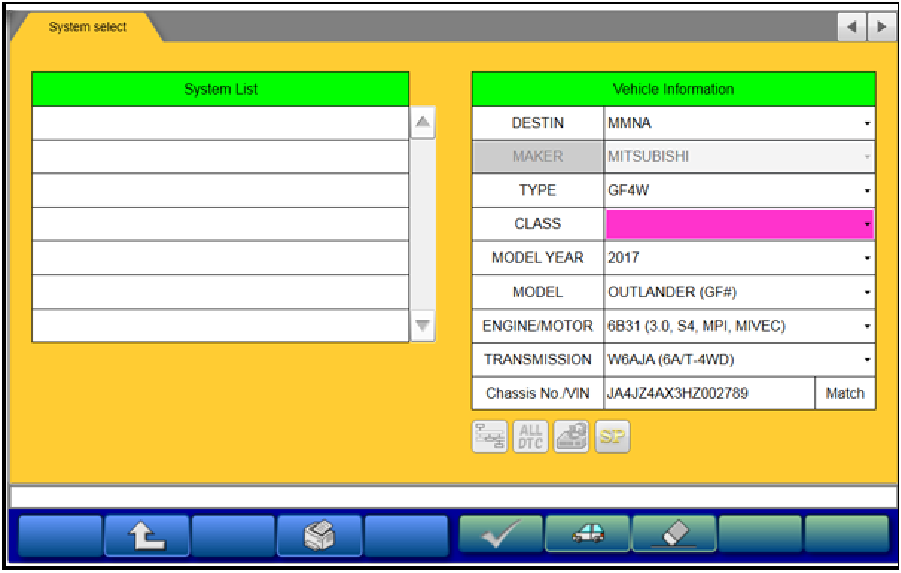
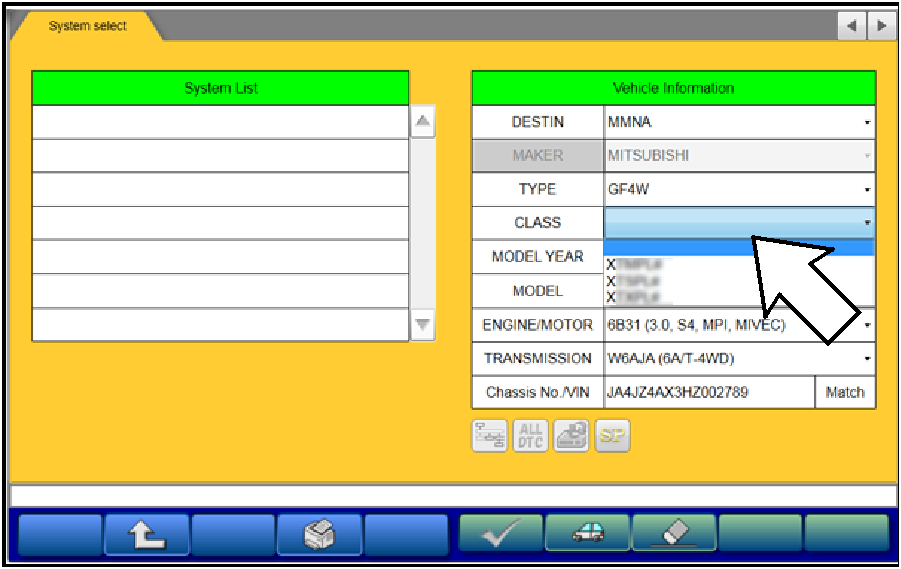
● Click “STV”

● Click the “ECU Reprogramming” button

● Click “SDB Data List”

● Confirm that the database number displayed in the upper right above the chart is N170101 or higher

  • If the database number displayed on your MUT3-SE is N170101 or greater, continue to the Reprogramming Procedure.
  • If the reprogramming database number displayed on your MUT3-SE is lower than N170101, then the MUT3-SE database needs to be updated.

REPROGRAMMING PROCEDURE

Caution! To ensure that the vehicle battery maintains 12V during the procedure, hook-up a battery charger to the vehicle during the procedure.

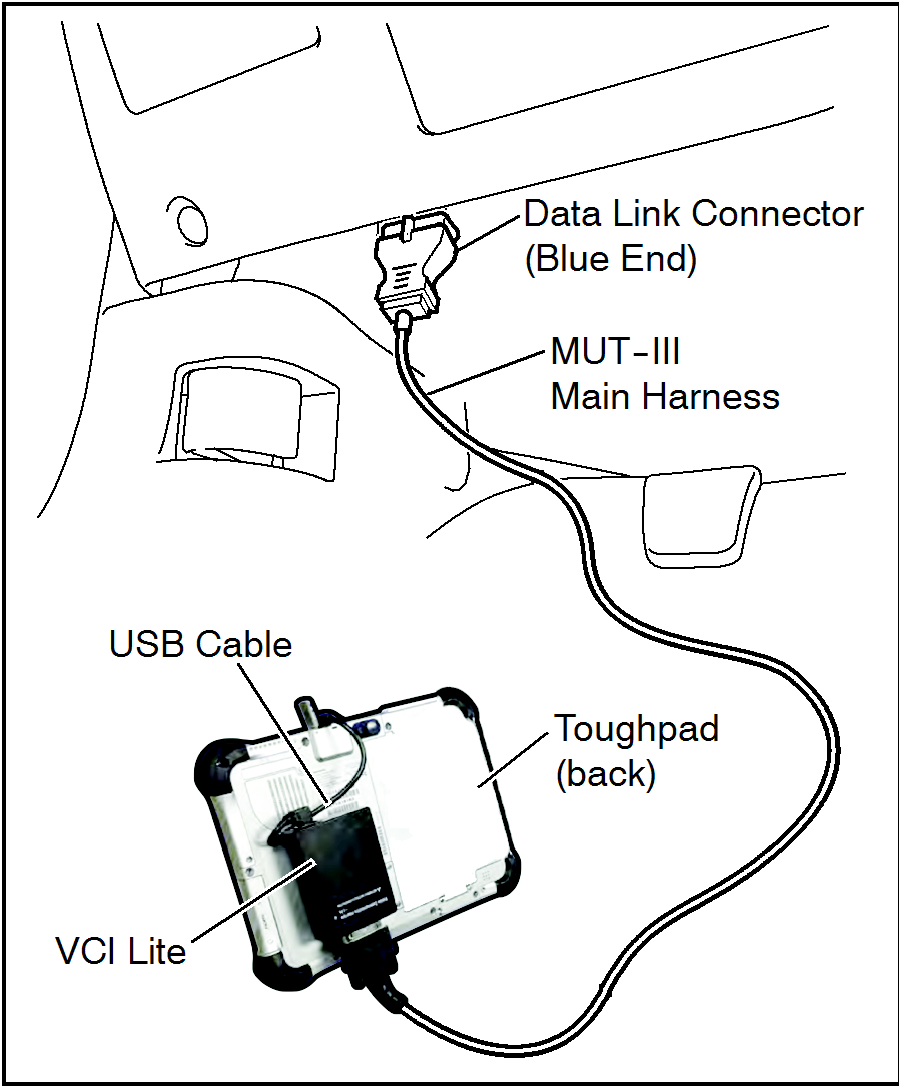
NOTE: VCI Stand-alone reprogramming is not available for this procedure.
The laptop/tablet and the VCI must remain connected for the entire procedure.

  1. Connect the equipment as follows:

NOTE: VCI Lite and MEDIC 4.0 Toughpad shown for illustration purposes only.

520068082_graphic-text50
  • Turn the MEDIC PC/tablet on. If the battery indicator in the lower right hand corner of the screen does not show a full charge, it is recommended that either the battery be charged prior to beginning, or be used with the A/C power adaptor connected.
  • Connect the USB cable to the VCI/VCI Lite.
  • When the laptop/tablet displays the MUT-III main screen, connect the USB cable to the device.
  • Connect the MUT-III main harness with the blue DLC connection to the VCI/VCI Lite.
  • Connect the blue connection of the MUT-III main harness to the vehicle's data link connector.
  • Turn the VCI power switch ON. Verify that the indicator lamp in the upper right corner of the screen is green.

Caution!

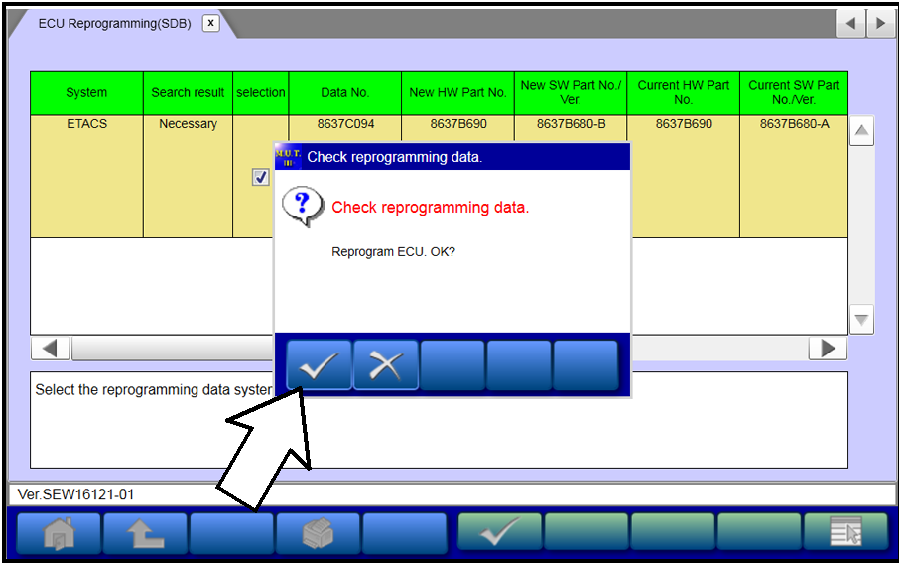
DO NOT DISTURB THE HARNESS CABLES OR CONNECTIONS DURING THE REPROGRAMMING PROCESS AS IT COULD CAUSE THE CONTROL UNIT TO LOSE DATA. IF THE USB CABLE IS DISCONNECTED DURING THIS PROCEDURE, A WARNING MESSAGE WILL DISPLAY.

  1. Turn the ignition switch to the “ON” position.
520068082_graphic-text40
  1. Using MEDIC, from the main page, click the “MUT3-SE” icon at the top center of the screen to open MUT-III SE.

    Click the STV button.
520068082_graphic-text41
  1. The System Select screen opens and populates with some basic information from the vehicle.
520068082_graphic-text42
  1. Look at the label on the passenger side B pillar to identify the appropriate class.

    Then select the correct class from the drop-down list.
520068082_graphic-text43
  1. The System List should now populate with vehicle information.

    Select the correct Loading Option Setup from the drop-down lists.
  • TPMS: “w/o F.A.S.T.”
  • AUDIO: (Display Audio or Standard Audio)
520068082_graphic-text44
  1. Select “ETACS” from the System List, then click on the Reprogram button.
520068082_graphic-text45
  1. Select “ECU Reprogramming (SDB).”
520068082_graphic-text46
  1. Click the check mark.
520068082_graphic-text47
  1. Select the correct data file (8637C094) in the ECU Reprogramming table.

    Click the check mark at the bottom of the page to initiate reprogramming.
520068082_graphic-text48
  1. Click the check mark in the “Check reprogramming data.” dialog box.
520068082_graphic-text49
  1. Once the reprogramming is initiated, the screen shown will indicate the reprogramming progress.

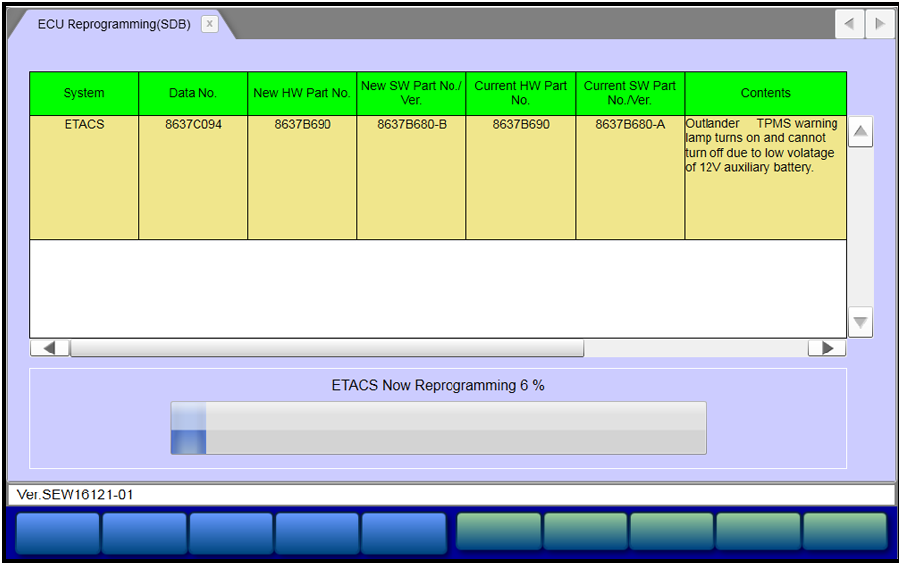
NOTE: Do NOT disturb the cables or turn off the ignition during reprogramming.

520068082_graphic-text4A
  1. Click the check mark in the “Completed” dialog box to view and confirm the reprogramming data.
520068082_graphic-text30
  1. Perform an Erase and Read All DTCs.
    1. Click the home button to go back to the System Select menu.

      Click the “ALL DTC” button.
520068082_graphic-text31
  1. Select “Erase and Read All DTCs.”
520068082_graphic-text32
  1. A window will pop up asking you to confirm DTC erasing. Click the check mark for DTC erasing and reading to begin.
520068082_graphic-text20
  1. The “System List” on the left side of the screen will have all selections checked. Do not change these selections. DTCs may be set if the vehicle is equipped with options that are unchecked.
  2. Click the check mark to continue.
520068082_graphic-text10
  1. When DTC erasing is completed, click the check mark in the pop-up message that reads “All erasing and checks are completed.”

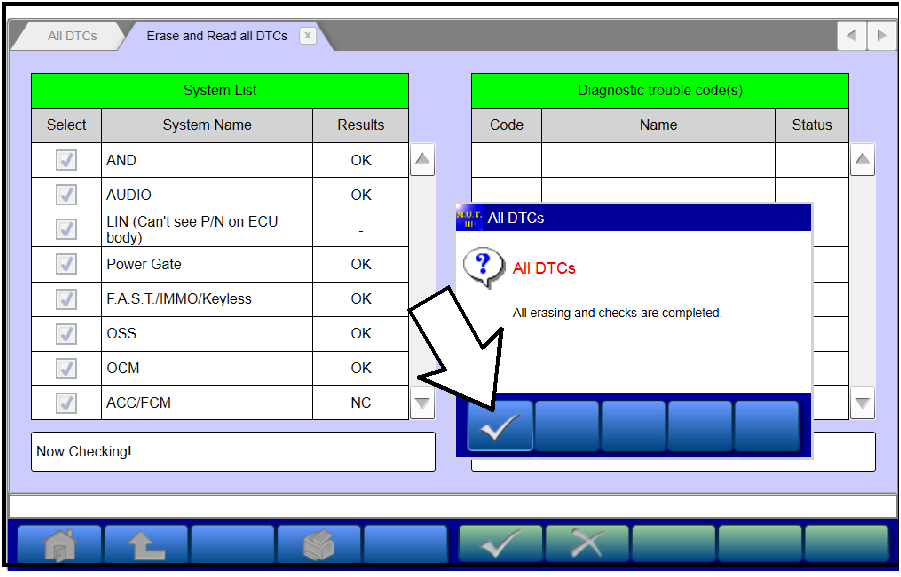
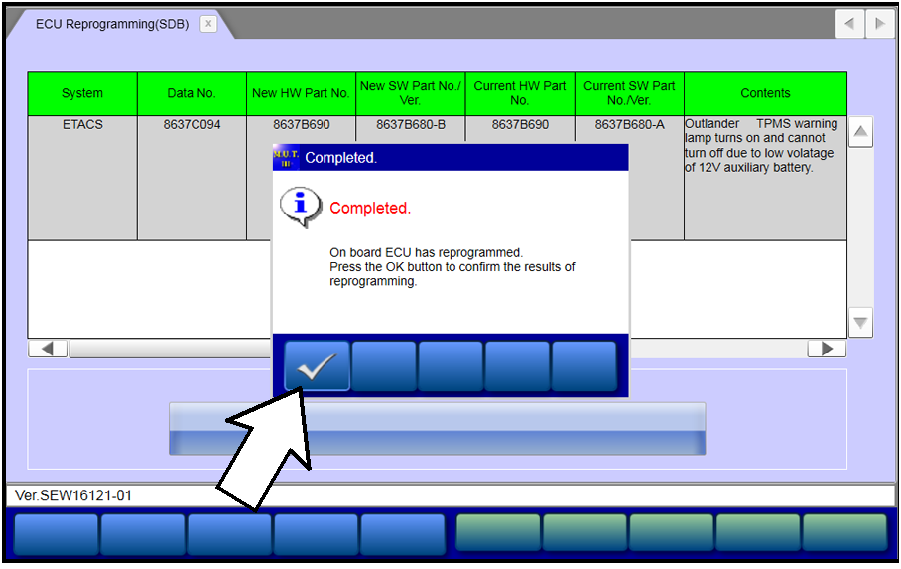
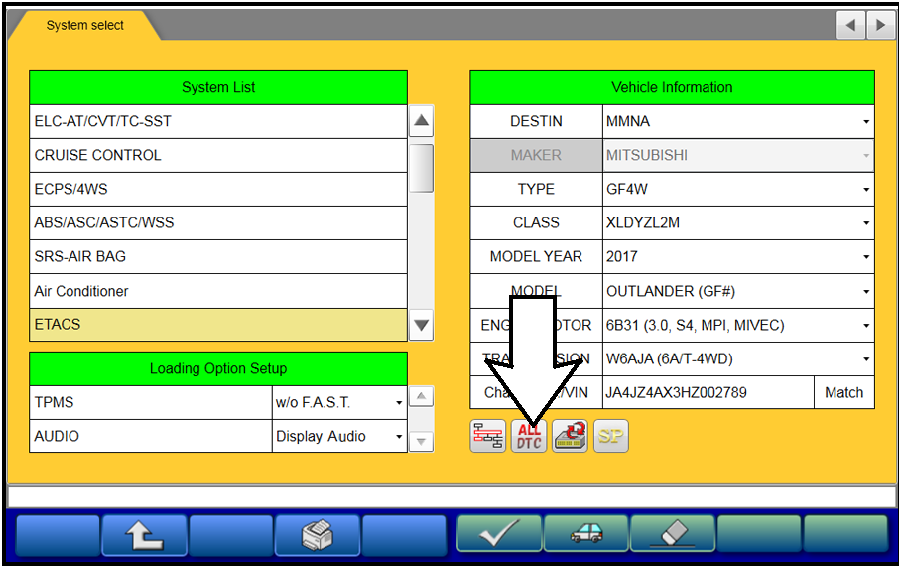
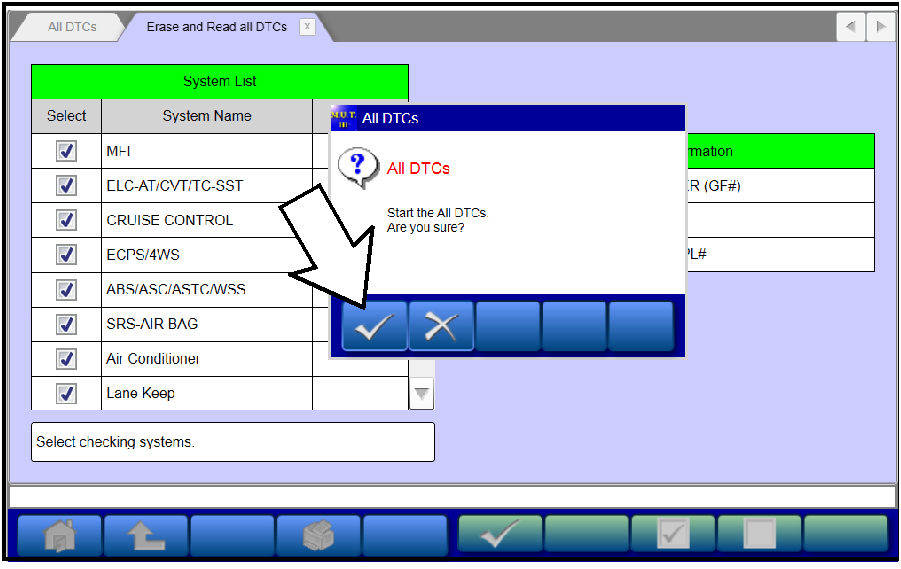
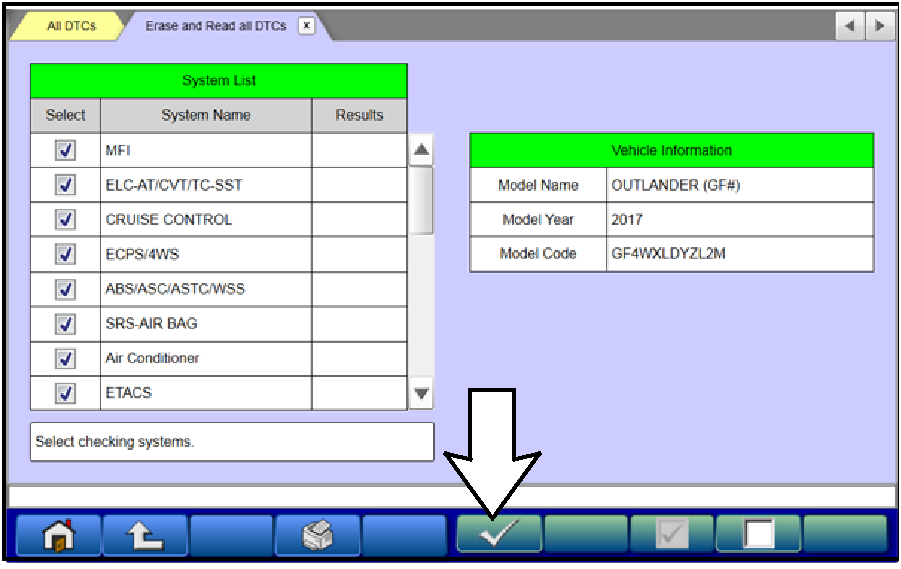
a. If DTCs return after reprogramming, click the check mark to clear the window. Diagnose and repair per the Service Manual.

520068082_graphic-text11

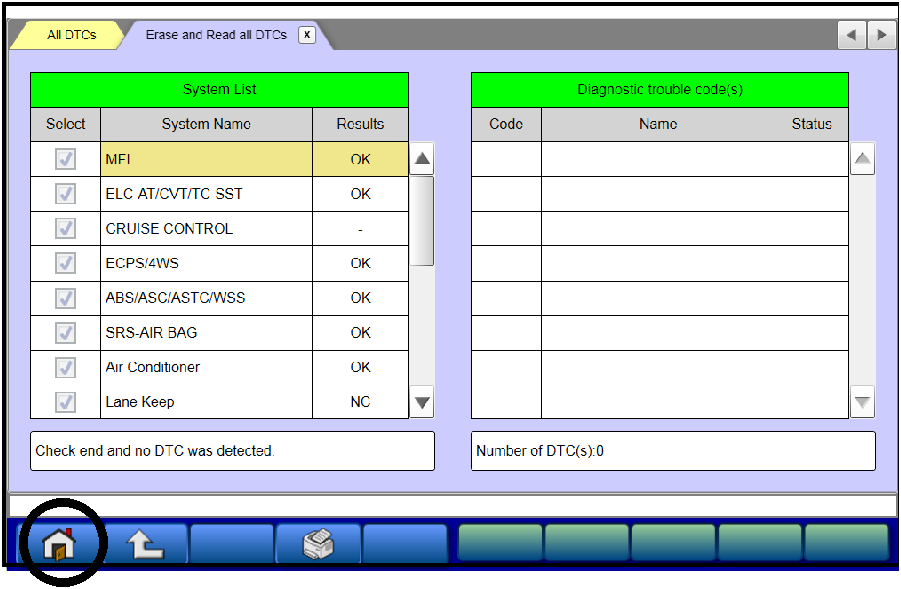
b. If DTCs do not return, click the check mark to clear the window, then click the Home icon at the lower left of the screen to return to the main menu.

  1. Turn off the ignition switch and disconnect the MUT-III.

WARRANTY INFORMATION

This bulletin is supplied as technical information only and is not an authorization to repair. If an affected vehicle is reported with the described condition, diagnose the condition, repair as described in this bulletin and submit a normal warranty claim using the following information.

Nature Code: 05A

Cause Code: 590

Labor Operation No.: 548501 PY

Time Allowance: 0.3 hrs.

Warranty Coverage: 5/60 Basic Coverage


Copyright 2017, Mitsubishi Motors North America, Inc.

The information contained in this bulletin is subject to change. For the latest version of this document, go to the Mitsubishi Dealer Link, MEDIC, or the Mitsubishi Service Information website (www.mitsubishitechinfo.com).