
|
SUBJECT:
WET CARPET ON DRIVER'S SIDE FLOOR
|
No: TSB-11-55-003
|
|
DATE: August, 2011
|
|
MODEL: See below
|
|
CIRCULATE TO:
|
[ ] GENERAL MANAGER
|
[ ] PARTS MANAGER
|
[ X ] TECHNICIAN
|
|
[ X ] SERVICE ADVISOR
|
[ X ] SERVICE MANAGER
|
[ X ] WARRANTY PROCESSOR
|
[ ] SALES MANAGER
|
|
This TSB supercedes TSB-08-55-007, issued September, 2008, to provide a new procedure to correct a
condition of HVAC drainage re-entering the vehicle due to a deteriorated seal, without removing the HVAC
unit (most vehicles). This is a complete re-write and changes are not indicated.
|
PURPOSE
While being driven with the air conditioning on, condensation created in the heater/ventilation/air
conditioning unit (HVAC) drains through an outlet into the engine compartment. If the grommet that
seals the HVAC case to the bulkhead deteriorates, air flow can force the drained condensation back
into the vehicle's interior where it collects on the driver's floor.
This TSB provides a procedure to add a 90° hose extension to the drain to correct this condition in
most vehicles without removing the HVAC unit.
AFFECTED VEHICLES
2006-2012 Eclipse
2007-2012 Eclipse Spyder
2004-2012 Galant
2004-2011 Endeavor
PROCEDURE
Eclipse, Eclipse Spyder, Galant
- Open the hood.
- Raise the vehicle on a hoist. Locate the existing heater unit drain outlet.
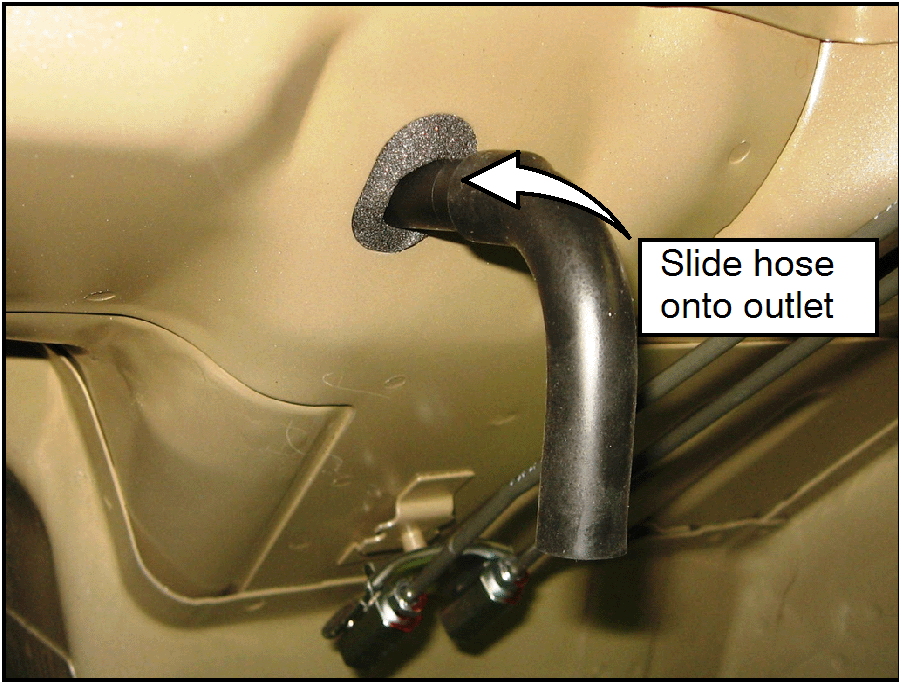 |
Vehicles with 4 Cylinder engine
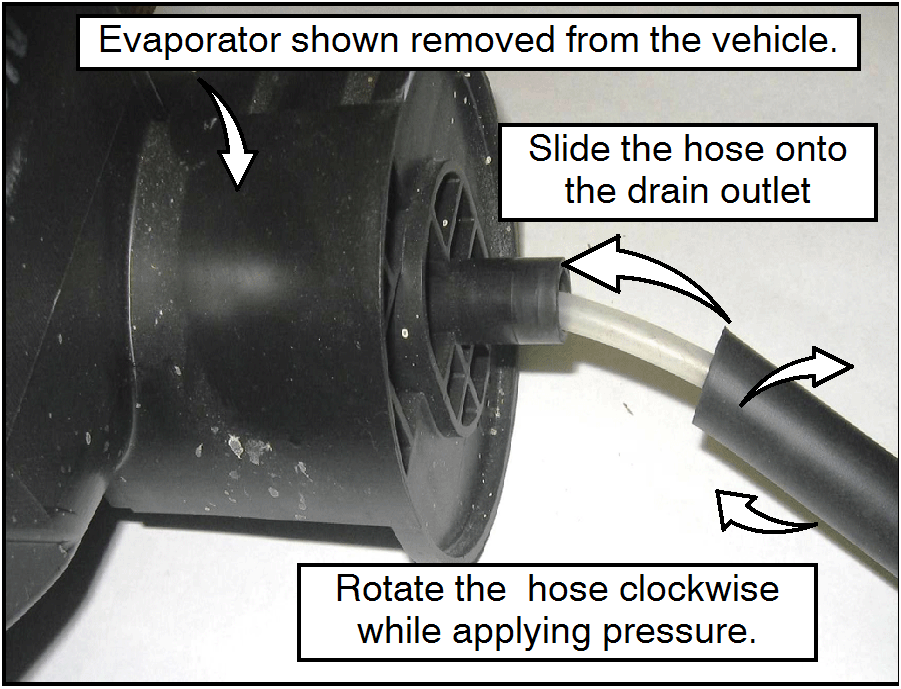
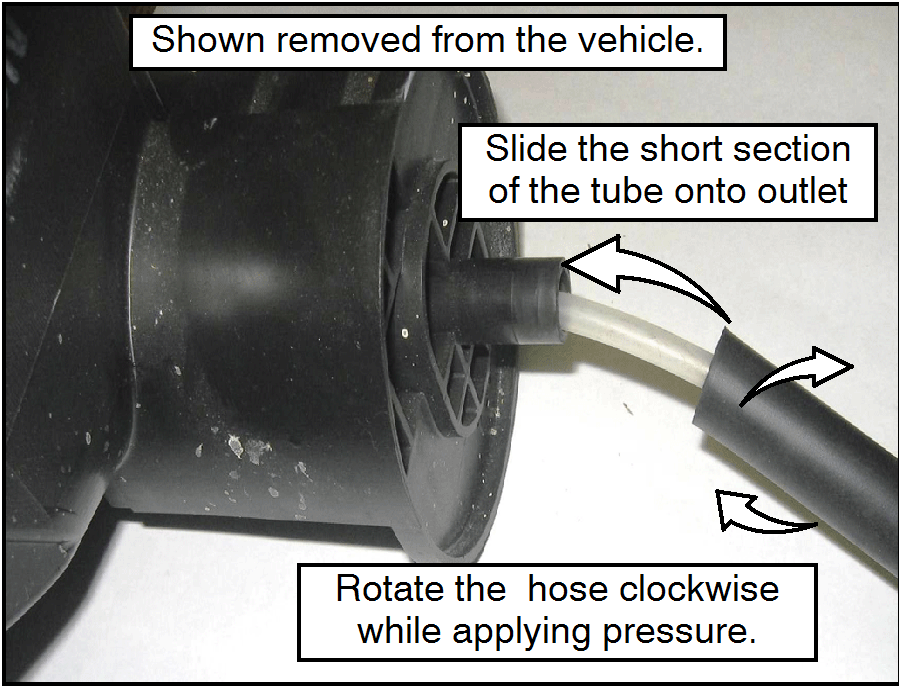
- Apply liquid soap to the inside of the short section of
the drain hose.
- Install the drain hose to the outlet tube.
- Position the short end of the drain hose over the
end of the outlet tube with the end ot the hose
hanging straight down.
- Twist and wiggle the hose while applying light
pressure until it contacts the foam bulkhead seal.
- Pull on the hose with light pressure to confirm it is
properly installed.
|
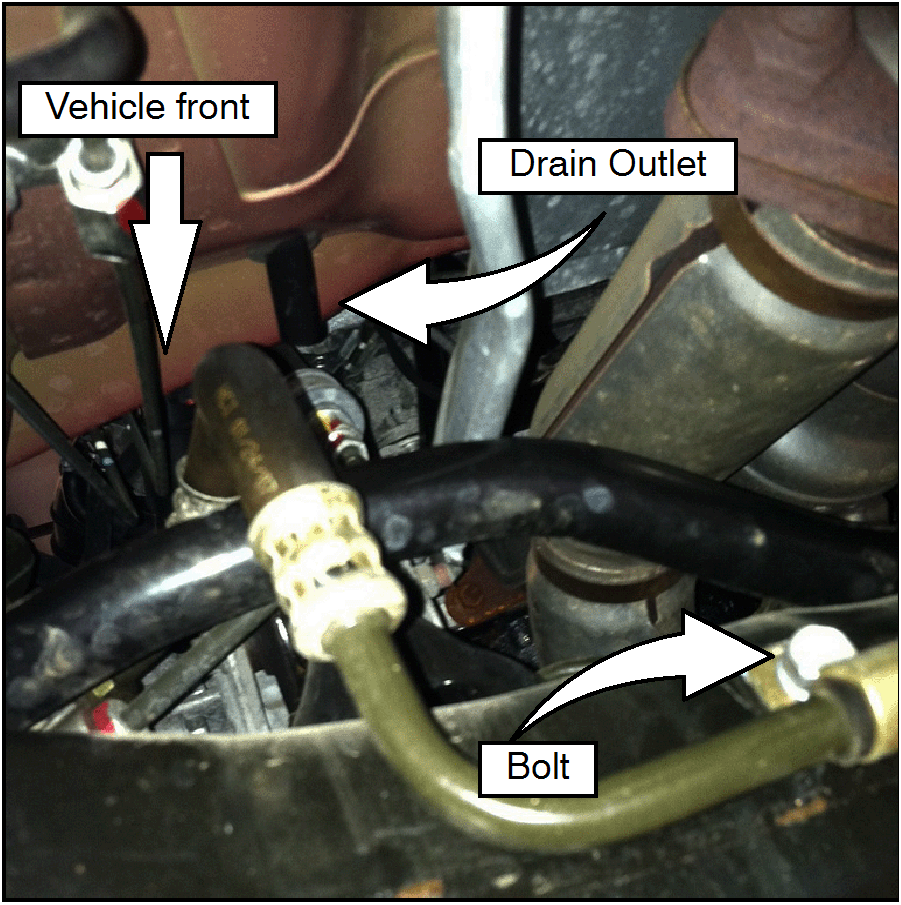 |
Vehicles with V6 engine
Perform this operation from under the driver's seat area
looking towards the front of the vehicle.
- Remove the bolt securing the power steering hose to
the cross member.
- Apply liquid soap to the inside of the short section of
the drain hose.
- Install the drain hose to the outlet tube.
- Position the short end of the drain hose over the
end of the outlet tube with the end ot the hose
hanging straight down.
- Twist and wiggle the hose while applying light
pressure until it contacts the foam bulkhead seal.
- Make sure the hose is at least 1” (25mm) from the
exhaust.
- Pull on the hose with light pressure to confirm it is
properly installed.
- Reinstall the power steering hose bolt. Torque the bolt
to 12 + 2Nm (106 + in-lb).
|
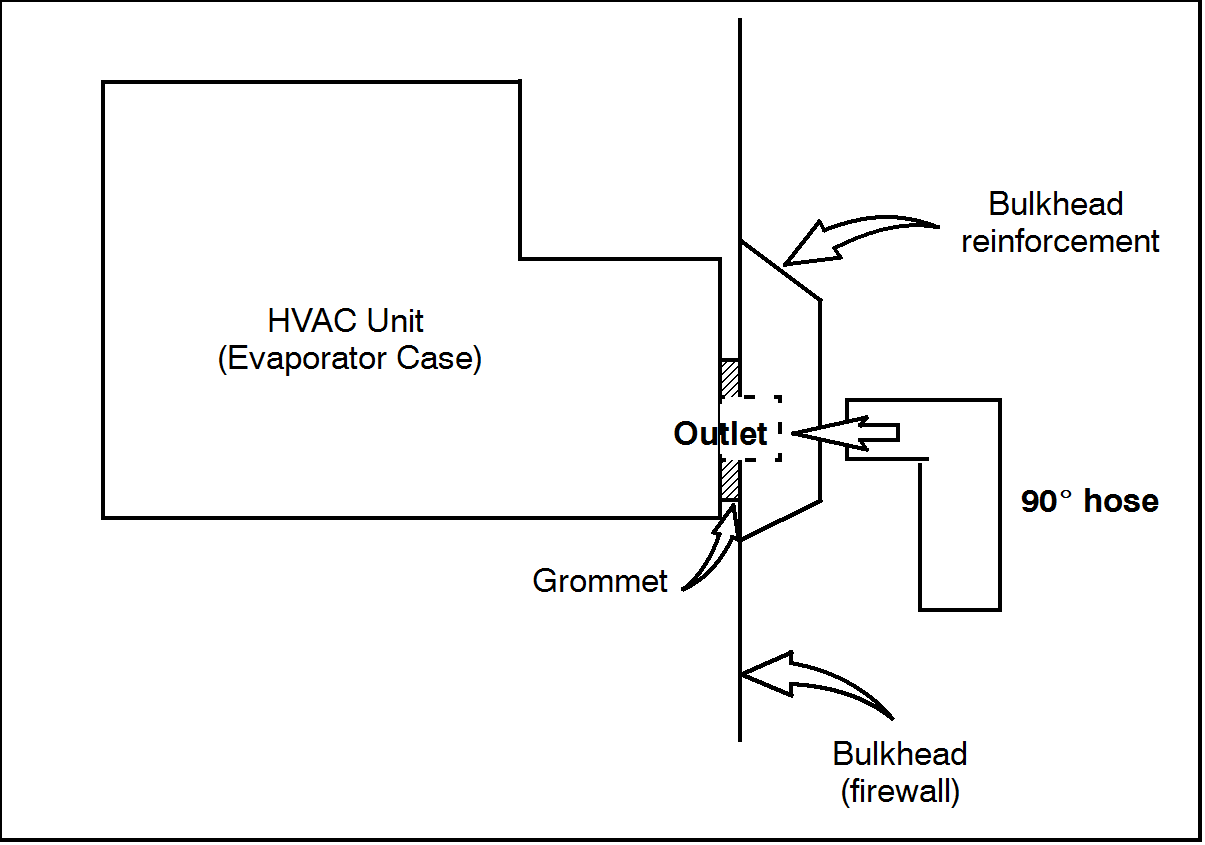
ENDEAVOR
The Endeavor drain outlet is between the bulkhead and a bulkhead reinforcement requiring that you
insert the drain hose through an existing hole in the reinforcement to attach it to the outlet(see
illustration below).
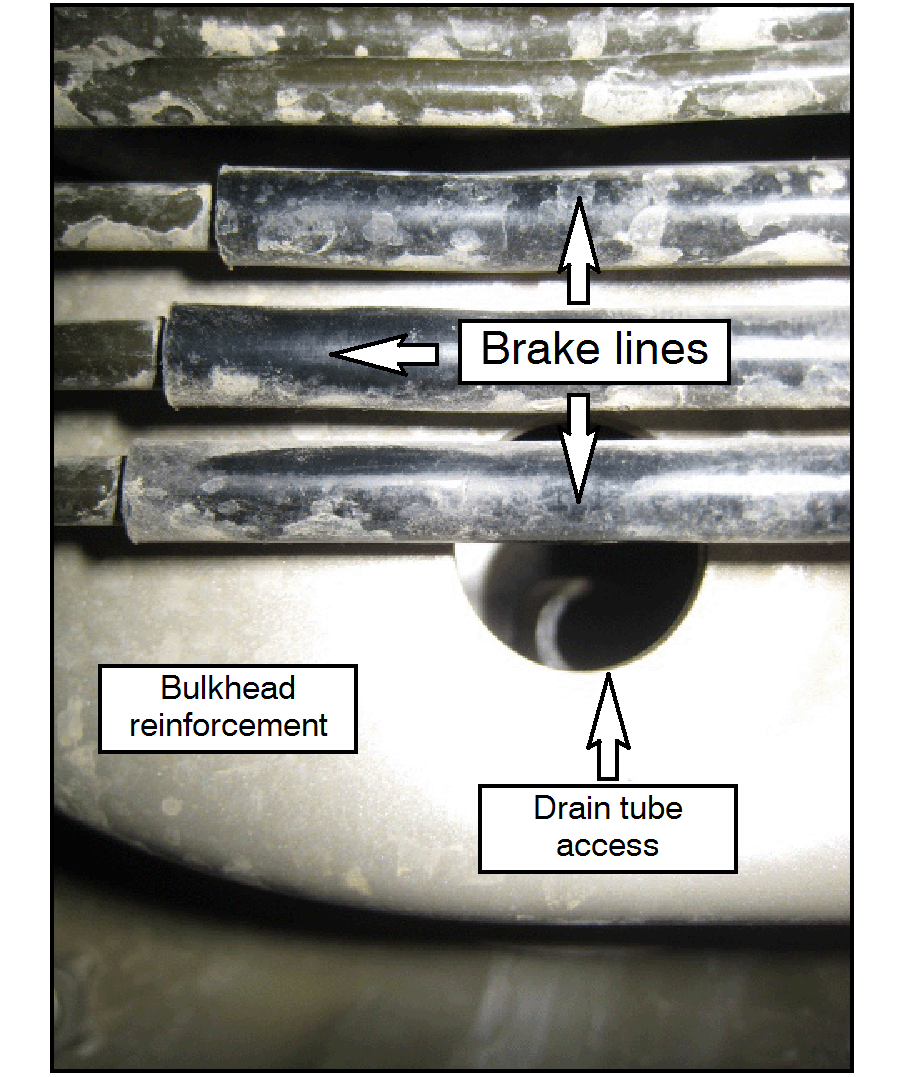 |
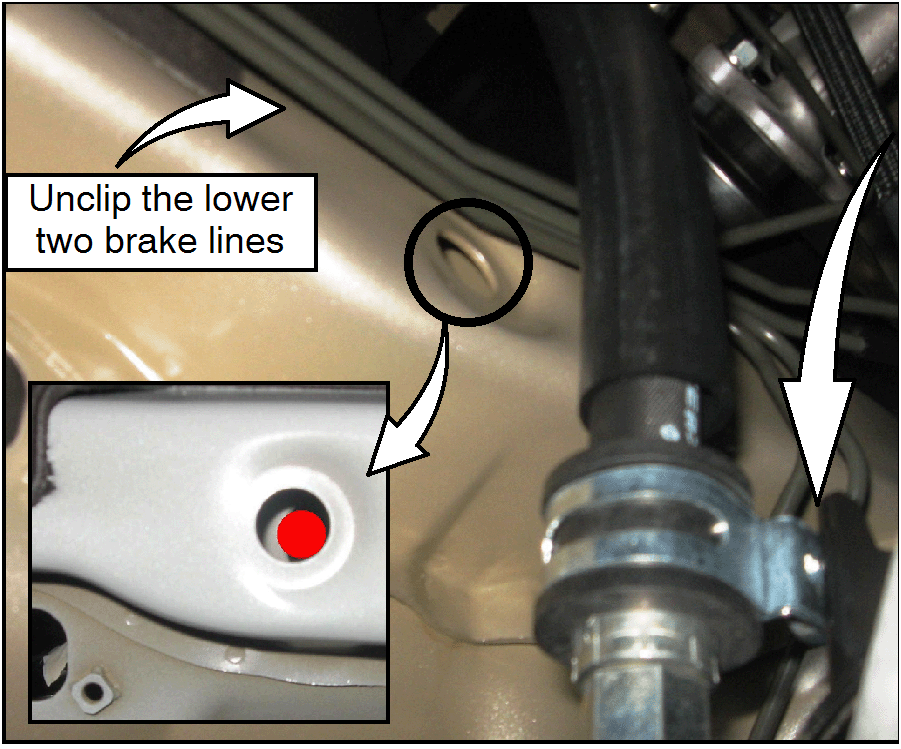
!! IMPORTANT !!
Installation of a drain hose cannot be performed on
some Endeavors. Due to production variation, the brake
lines may cover up to 50% of the access hole for the
HVAC drain outlet. If the position of brake lines prevents
you from properly inserting the drain hose, refer to
Procedure B on page 6. Procedure B includes removing
the HVAC assembly and replacing the bulkhead
grommet seal.
|
Special Equipment
The following equipment will help install the drain hose on all Endeavors.
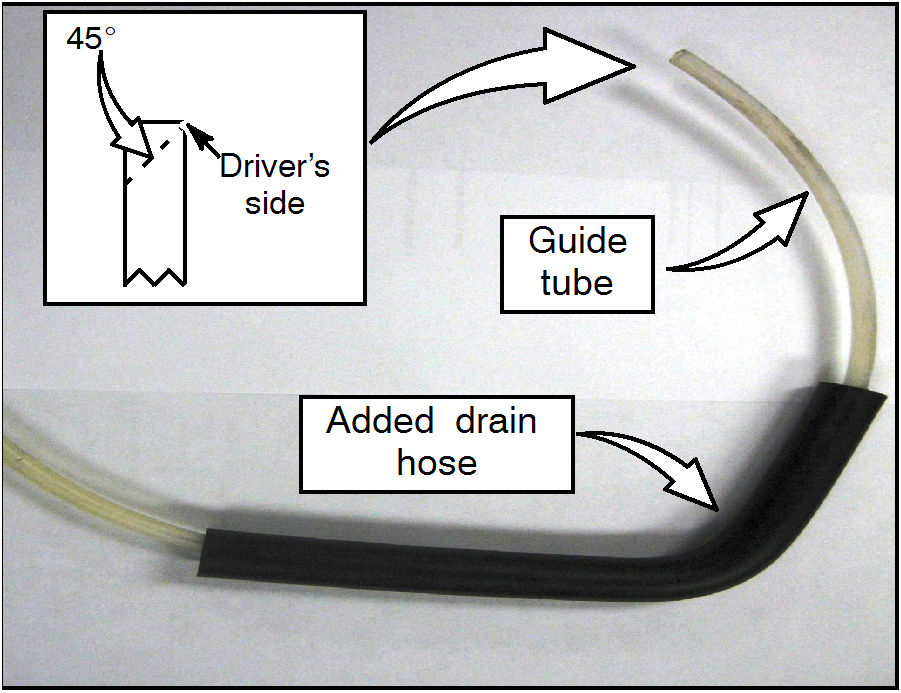 |
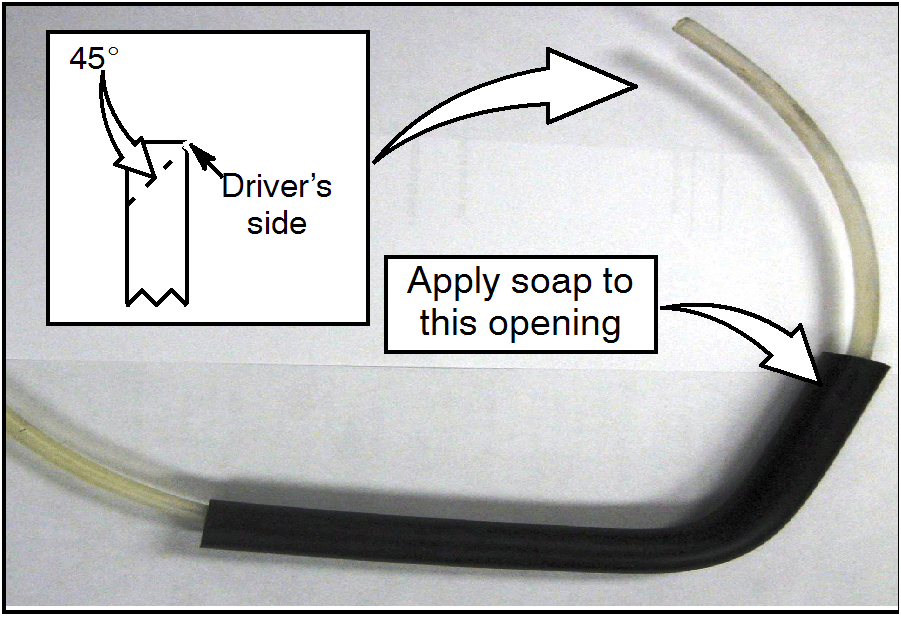
- Guide Tube - 18” length of stiff ¼” polyethylene tube
(e.g plastic ice maker water line).
Cut one end of the guide tube at a 45° angle to
ease inserting the hose into the drain tube.
|
Procedure A.
Use this procedure if there is sufficient clearance to insert the drain hose past the brake pipes. If
clearance is restricted, go to Procedure B on page 6.
Procedure B.
Use this procedure only if there is insufficient brake pipe clearance to insert the drain hose.
- Remove the HVAC case and evaporator and replace the heater drain grommet (p/n 7801A300). Refer
to Group 55 Heating, Air Conditioning & Ventilation in the applicable service manual for removal and
installation instructions.
- Install a cabin air filter (p/n MZ312931) into the blower motor housing (if one is not already installed).
Follow the installation instructions included with each filter. Installation instructions are also available
on the MDL from the “parts” page by selecting “parts information, then “Technical Resources,” then
“Accessory Installation Instructions.”
NOTE: Future replacement of cabin air filters (as any other filter) is considered maintenance and is at
customer expense.
PARTS INFORMATION
Use only the following Genuine Mitsubishi parts:
|
Hose
|
Eclipse, Eclipse Spyder, Galant
|
MB660749
|
|
Hose
|
Endeavor
|
MR450338
|
|
Grommet, Heater
|
Endeavor - Only if unable to install drain hose
|
7801A300
|
|
Filter, Cabin Air
|
All Affected Vehicles
|
MZ312931
|
WARRANTY INFORMATION
This bulletin is supplied as technical information only and is not an authorization to repair. If an affected
vehicle is reported with the described condition, diagnose the condition, repair as described in this bulletin
and submit a normal warranty claim using the following information.
|
HVAC Drain Outlet Hose Installation
|
|
Nature Code: 72D
|
Cause Code: 340
|
|
Labor Operation No.: 551110 96
|
Time Allowance: 0.3 hr. Endeavor 2WD
0.4 hr. Endeavor AWD
0.2 hr. Others
|
|
Warranty Coverage: Basic Coverage. Refer to the Superscreen for basic coverage terms
applicable to each vehicle.
|
|
HVAC Grommet Replacement (ENDEAVOR only)
|
|
Nature Code: 40Z
|
Cause Code: 580
|
|
Labor Operation No. 55151195
|
Time Allowance: 5.6 hr.
|
|
Warranty Coverage: Basic Coverage. Refer to Superscreen.
|
|
Blower Motor Housing Filter (if not already equipped)
|
|
Nature Code: 40Z
|
Cause Code: 580
|
|
Labor Operation No. 55251010
|
Time Allowance: 0.3 hr.
|
|
Warranty Coverage: Basic Coverage. Refer to Superscreen.
|
Special Warranty Information: The described filter installation should only be done on a customer
complaint basis and may only be claimed as part of this HVAC system warranty repair. Future filter
replacements are considered customer responsibility and part of normal maintenance.
Copyright 2011, Mitsubishi Motors North America, Inc.
| The information contained in this bulletin is subject to change. For the latest version of this document, go to the Mitsubishi Dealer Link, MEDIC, or the Mitsubishi Service Information website (www.mitsubishitechinfo.com).
|

 Take care to not damage the
retaining clip or kink the brake pipes when unclipping
or reinstalling them. Replace retaining clips if broken.
Take care to not damage the
retaining clip or kink the brake pipes when unclipping
or reinstalling them. Replace retaining clips if broken.
