DIAGNOSTIC FUNCTION
WARNING DISPLAY
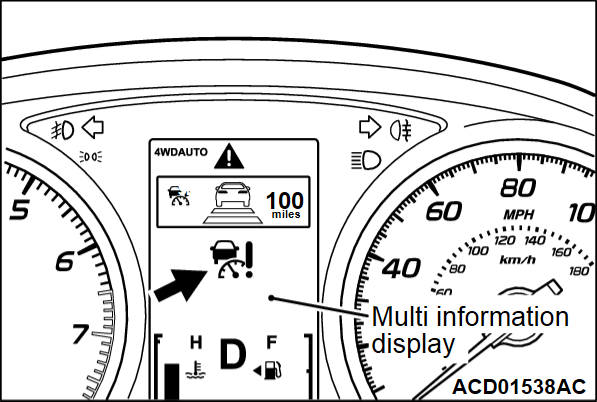
When a malfunction occurs in the ACC system, the figure will be displayed on the information screen of multi information display.
If the indicator continues to be displayed on the information screen of multi information display, check the diagnostic trouble code that is set.
HOW TO CONNECT THE SCAN TOOL (M.U.T.-III)
Required Special Tools:
- MB992744: Vehicle communication interface-Lite (V.C.I.-Lite)
- MB992745: V.C.I.-Lite main harness A
- MB992747: V.C.I.-Lite USB cable short
- MB992748: V.C.I.-Lite USB cable long
- MB991958: Scan Tool (M.U.T.-III Sub Assembly)
- MB991824: Vehicles Communication Interface (V.C.I.)
- MB991827: M.U.T.-III USB Cable
- MB991910: M.U.T.-III Main Harness A (Vehicles with CAN communication system)
| caution | To prevent damage to scan tool (M.U.T.-III), always turn the ignition switch to the "LOCK" (OFF) position before connecting or disconnecting scan tool (M.U.T.-III). |
1. Ensure that the ignition switch is at the "LOCK" (OFF) position.
2. Start up the personal computer.
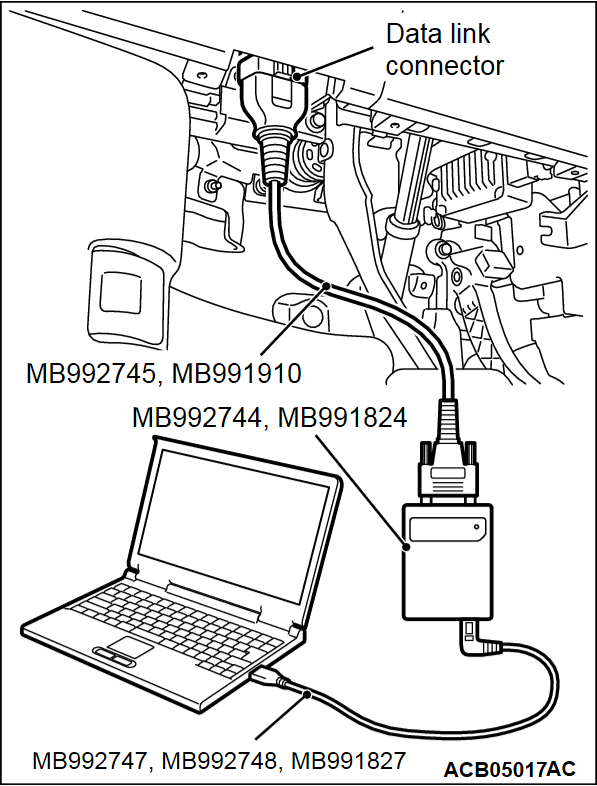
3. Connect special tool MB992747/M992748 or special tool MB991827 to special tool MB992744 or special tool MB991824 and the personal computer.
4. Connect special tool MB992745 or special tool MB991910 to special tool MB992744 or special tool MB991824.
5. Connect special tool MB992745 or special tool MB991910 to the data link connector.
| note | When the special tool MB992745 is connected to the data link connector, the special tool MB992744 indicator light will be illuminated in a green color. |
6. Turn the power switch of special tool MB991824 to the "ON" position. <When using the special tool MB991824>
| note | When special tool MB991824 is energized, special tool MB991824 indicator light will be illuminated in a green color. |
7. Start the M.U.T.-III system on the personal computer.
| note | Disconnecting scan tool (M.U.T.-III) is the reverse of the connecting sequence, making sure that the ignition switch is at the "LOCK" (OFF) position. |
HOW TO READ AND ERASE DIAGNOSTIC TROUBLE CODES
Required Special Tools:
- MB992744: Vehicle communication interface-Lite (V.C.I.-Lite)
- MB992745: V.C.I.-Lite main harness A
- MB992747: V.C.I.-Lite USB cable short
- MB992748: V.C.I.-Lite USB cable long
- MB991958: Scan Tool (M.U.T.-III Sub Assembly)
- MB991824: Vehicles Communication Interface (V.C.I.)
- MB991827: M.U.T.-III USB Cable
- MB991910: M.U.T.-III Main Harness A (Vehicles with CAN communication system)
| note | If the battery voltage is low, diagnostic trouble codes will not be set. Check the battery if scan tool (M.U.T.-III) does not display. |
1. Connect scan tool (M.U.T.-III) to the data link connector.
2. Turn the ignition switch to the "ON" position.
3. Select "System select" from the start-up screen.
4. Select "From 2006 MY" of "Model Year." When the "Vehicle Information" is displayed, check the contents.
5. Select "ACC/FCM" from "System List," and press the "OK" button.
| note | When the "Loading Option Setup" list is displayed, check the applicable item. |
6. Select "Diagnostic Trouble Code" to read the DTC.
7. If a DTC is set, it is shown.
8. Choose "Erase DTCs" to erase the DTC.
HOW TO READ DATA LIST
Required Special Tools:
- MB992744: Vehicle communication interface-Lite (V.C.I.-Lite)
- MB992745: V.C.I.-Lite main harness A
- MB992747: V.C.I.-Lite USB cable short
- MB992748: V.C.I.-Lite USB cable long
- MB991958: Scan Tool (M.U.T.-III Sub Assembly)
- MB991824: Vehicles Communication Interface (V.C.I.)
- MB991827: M.U.T.-III USB Cable
- MB991910: M.U.T.-III Main Harness A (Vehicles with CAN communication system)
1. Connect scan tool (M.U.T.-III) to the data link connector.
2. Turn the ignition switch to the "ON" position.
3. Select "System Select" from the start-up screen.
4. Select "From 2006 MY" of "Model Year." When the "Vehicle Information" is displayed, check the contents.
5. Select "ACC/FCM" from "System List", and press the "OK" button.
| note | When the "Loading Option Setup" list is displayed, check the applicable item. |
6. Select the "Data List."
| note | When the "Data List Reference Table" button is selected, the service data reference table is displayed, and the normal values can be checked. |
7. Choose an appropriate item.
HOW TO DIAGNOSE THE CAN BUS LINES
Required Special Tools:
- MB992744: Vehicle communication interface-Lite (V.C.I.-Lite)
- MB992745: V.C.I.-Lite main harness A
- MB992747: V.C.I.-Lite USB cable short
- MB992748: V.C.I.-Lite USB cable long
- MB991958: Scan Tool (M.U.T.-III Sub Assembly)
- MB991824: Vehicles Communication Interface (V.C.I.)
- MB991827: M.U.T.-III USB Cable
- MB991910: M.U.T.-III Main Harness A (Vehicles with CAN communication system)
1. Connect scan tool (M.U.T.-III) to the data link connector.
2. Turn the ignition switch to the "ON" position.
3. Select "CAN bus diagnosis" from the start-up screen.
4. When the vehicle information is displayed, confirm that it matches the vehicle being diagnosed.
- If they match, go to Step 8.
- If not, go to Step 5.
5. Select the "view vehicle information" button.
6. Enter the vehicle information and select the "OK" button.
7. When the vehicle information is displayed, confirm again that it matches the vehicle being diagnosed.
- If they match, go to Step 8.
- If not, go to Step 5.
8. Select the "OK" button.
9. When the optional equipment screen is displayed, choose the one which the vehicle is fitted with, and then select the "OK" button.
CHECK OF THE FREEZE FRAME DATA
Various data of when the diagnostic trouble code has been set is obtained, and the status of that time is stored. By analyzing each data using M.U.T.-III, troubleshooting can be carried out efficiently.
Display items of the freeze frame data are as follows.
DISPLAY ITEM LIST
| Item No. | Item | Unit/display contents |
| 1 | Odometer | km (mile) |
| 2 | Odometer (Last time) | km (mile) |
| 3 | Frequency counter | Count |
| 4 | Operation counter | Count |
| 5 | System counter | Count |
FAIL-SAFE FUNCTIONS <ACC-ECU> (Related to the ACC)
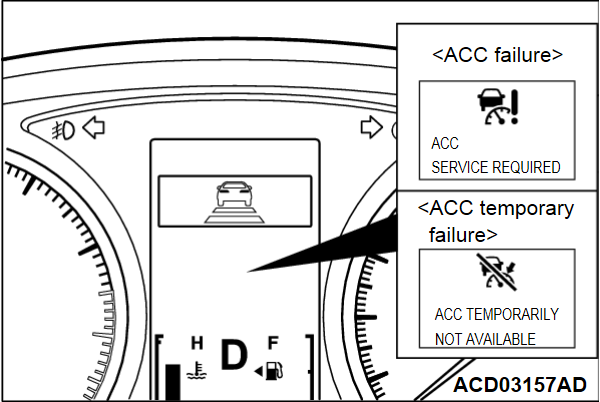
If the ACC-ECU determines that the ACC is defective by means of its self-diagnosis, the ACC failure display or the ACC temporary failure display will illuminate.
Illumination condition of display in case of failure
| DTC No. | Item | ACC failure display | ACC temporary failure display |
| C1394 | Incompleted learn neutral (Steering wheel sensor) | ON | OFF |
| C1707 | Implausible coding data | ON | OFF |
| C1750 | ACC-ECU voltage out of range | OFF | ON |
| C1751 | ACC-ECU failure | ON | OFF |
| C1752 | ACC/FCM radar temperature out of range | OFF | ON |
| C1753 | ACC/FCM radar blockage detected | OFF | ON |
| C1754 | ACC/FCM radar calibration not completed | OFF | ON |
| C1768 | Alignment left compensation | ON | OFF |
| C1769 | Alignment right compensation | ON | OFF |
| C1770 | Reflector plate in the lowermost | ON | OFF |
| C1771 | Reflector plate in the uppermost | ON | OFF |
| C1772 | Alignment sensor too far right | ON | OFF |
| C1773 | Alignment sensor too far left | ON | OFF |
| C1774 | Alignment sensor too low | ON | OFF |
| C1775 | Alignment sensor too high | ON | OFF |
| C1776 | Received ACC failure from engine control module | ON | OFF |
| C1777 | Received ACC failure from ASC-ECU | ON | OFF |
| C1778 | Vehicle speed signal failure | ON | OFF |
| C1779 | Brake master pressure signal failure | ON | OFF |
| C1780 | A basis signal failure | ON | OFF |
| C1781 | SAS failure | ON | OFF |
| C1782 | SAS signal failure | ON | OFF |
| C1783 | ACC distance switch fixed ON | ON | OFF |
| C1785 | Fault detection signal failure | ON | OFF |
| C1786 | Received limp home from transaxle control module | ON | OFF |
| U0100 | Engine CAN timeout | ON | OFF |
| U0101 | T/M CAN timeout | ON | OFF |
| U0121 | ABS/ASC CAN timeout | ON | OFF |
| U0126 | SAS CAN timeout | ON | OFF |
| U0141 | ETACS CAN timeout | ON | OFF |
| U1195 | Coding not completed | ON | OFF |
![[Previous]](../../../buttons/fprev.png)
![[Next]](../../../buttons/fnext.png)


