[Previous] [Next]

REMOVAL AND INSTALLATION


caution
  • Before removing the steering wheel , driver’s air bag module assembly and Knee Air Bag Module refer to GROUP 52B, Service Precautions , Driver’s Air Bag Module(s) and Clock Spring or and Knee Air Bag Module .
  • After the installation, perform a calibration for the ASC-ECU to learn the steering wheel sensor neutral point. (Refer to GROUP 35C - On-vehicle Service - Steering Wheel Sensor Calibration ). <Vehicles with ASC>
Pre-removal Operation
  • Steering Wheel Assembly Removal (Refer to ).
  • Instrument Panel Cover Lower Removal (Refer to GROUP 52A - Instrument Lower Panel ).
  • Knee Air Bag Module Removal (Refer to GROUP 52B - Knee Air Bag Module ).
  • Front Scuff Plate and Cowl Side Trim Removal (Refer to GROUP 52A - Interior Trim ).
  • Floor Console and Floor Console Side Cover Removal (Refer to GROUP 52A - Front Floor Console Assembly ).

Post-installation Operation
  • Floor Console and Floor Console Side Cover Installation (Refer to GROUP 52A - Front Floor Console Assembly ).
  • Front Scuff Plate and Cowl Side Trim Installation (Refer to GROUP 52A - Interior Trim ).
  • Knee Air Bag Module Installation (Refer to GROUP 52B - Knee Air Bag Module ).
  • Instrument Panel Cover Lower Installation (Refer to GROUP 52A - Instrument lower Panel ).
  • Steering Wheel Assembly Installation (Refer to ).


Removal steps
<<A>>

1.
Knob cap <Vehicles with KOS>


2.
Ignition key cover


3.
Steering column lower cover


4.
Steering column upper cover


5.
Paddle shift assembly <Vehicles with paddle shift>


6.
Clock spring column switch assembly


7.
Key interlock cable (Refer to GROUP 23A - CVT Key Interlock And Shift Lock Mechanisms <CVT>, Refer to 22C - TC-SST Key Interlock and Shift Lock Mechanisms <TC-SST>).
<<B>>

8.
Steering shaft cover

>>B<<
9.
Steering column bolt (steering column shaft assembly and steering gear and linkage connection)
<<C>>
>>A<<
10.
Steering column shaft assembly

REMOVAL SERVICE POINTS


<<A>> KNOB CAP REMOVAL


Remove the knob cap while pressing the two projections.

<<B>> STEERING SHAFT COVER REMOVAL


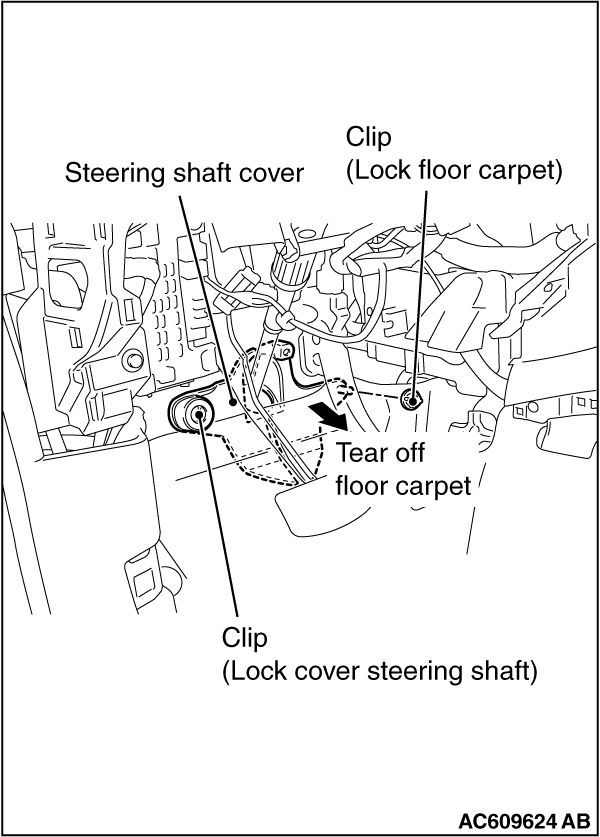
  1. Remove the clip (for securing the floor carpet), and turn back the floor carpet.
  2. Remove the clip (for securing the steering shaft cover), and then remove the steering shaft cover.

<<C>> STEERING COLUMN SHAFT ASSEMBLY DISCONNECTION


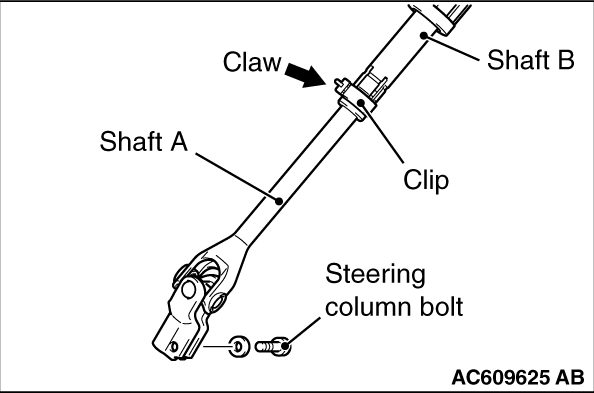
  1. Remove the steering column bolt connecting the steering gear to the steering column assembly.
  2. Disconnect the steering gear from the steering column assembly while sliding the shaft A to the shaft B with the clip claw as shown in the figure is pinched.
  3. Remove the steering column mounting bolt.

INSTALLATION SERVICE POINTS


>>A<< STEERING COLUMN SHAFT ASSEMBLY INSTALLATION


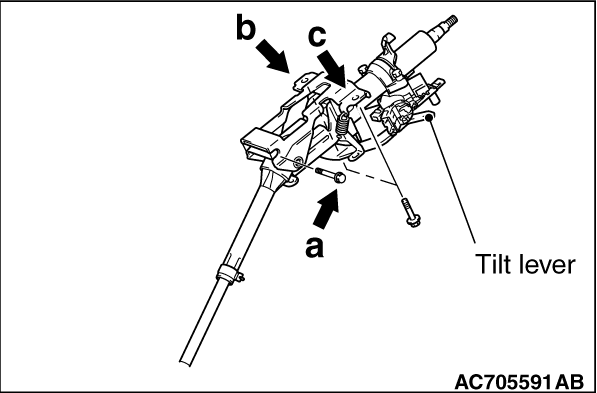
1.Ensure that the tilt lever is in the lock position.

2.Temporarily tighten the mounting bolts in the order of a, b, and c, and then tighten them in the order of c, b, and a to the specified torque.
Tightening torque a: 28 ± 7 N·m (21 ± 5 ft-lb)
Tightening torque b,c: 12 ± 3 N·m (106 ± 27 in-lb)

>>B<< STEERING COLUMN BOLT (STEERING COLUMN SHAFT ASSEMBLY AND STEERING GEAR & LINKAGE CONNECTION) INSTALLATION


1.While sliding shaft A from shaft B with the clip claw as shown in the figure being pinched, connect the steering column shaft assembly and the steering gear and linkage.
2.Insert the steering column bolt from the no tapped bolt hole, and tighten it to the specified torque.
Tightening torque : 20 ± 5 N·m (15 ± 4 ft-lb)