HOW TO PERFORM VIN WRITING FOR ENGINE CONTROL MODULE, KOS&OSS-ECU AND ETACS-ECU
| caution | The F.A.S.T-Key (Free-hand Advanced Security Transmitter) is described as the Keyless Operation System (KOS) in this manual [KOS is indicated as F.A.S.T. in the scan tool (M.U.T.-III) display]. |
The chassis number/Vehicle Identification Number (VIN) is stored in the engine control module (ECM), the KOS&OSS-ECU and the ETACS-ECU. If the chassis number/Vehicle Identification Number (VIN) is improperly erased, the engine warning light or the keyless operation system warning indicator illuminates, and the diagnostic trouble code is displayed. When the ECM, the KOS&OSS-ECU and the ETACS-ECU are replaced, follow the procedure below to write the chassis number/Vehicle Identification Number (VIN).
SCREEN FLOW OF SCAN TOOL (M.U.T.-III)
| note |
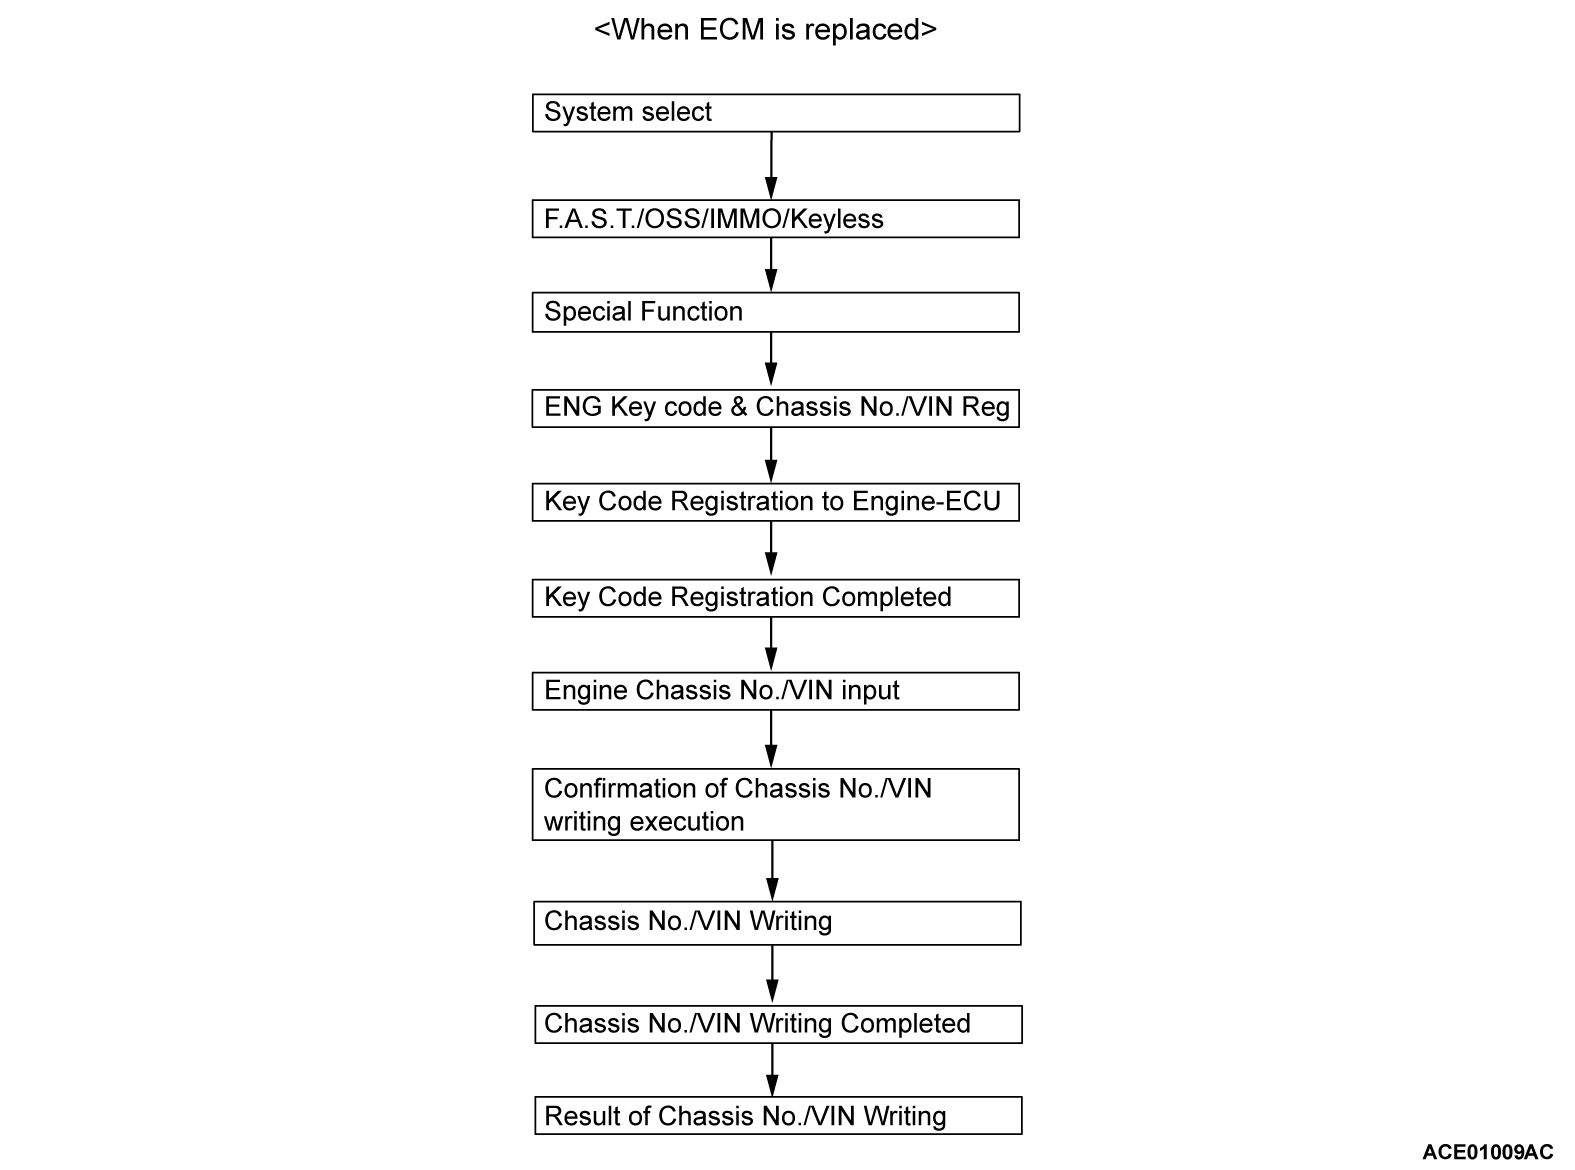
WHEN ECM IS REPLACED
Required Special Tools:
- MB992744: Vehicle communication interface-Lite (V.C.I.-Lite)
- MB992745: V.C.I.-Lite main harness A
- MB992747: V.C.I.-Lite USB cable short
- MB992748: V.C.I.-Lite USB cable long
- MB991958: Scan Tool (M.U.T.-III Sub Assembly)
- MB991824: Vehicles Communication Interface (V.C.I.)
- MB991827: M.U.T.-III USB Cable
- MB991910: M.U.T.-III Main Harness A (Vehicles with CAN communication system)
| caution |
|
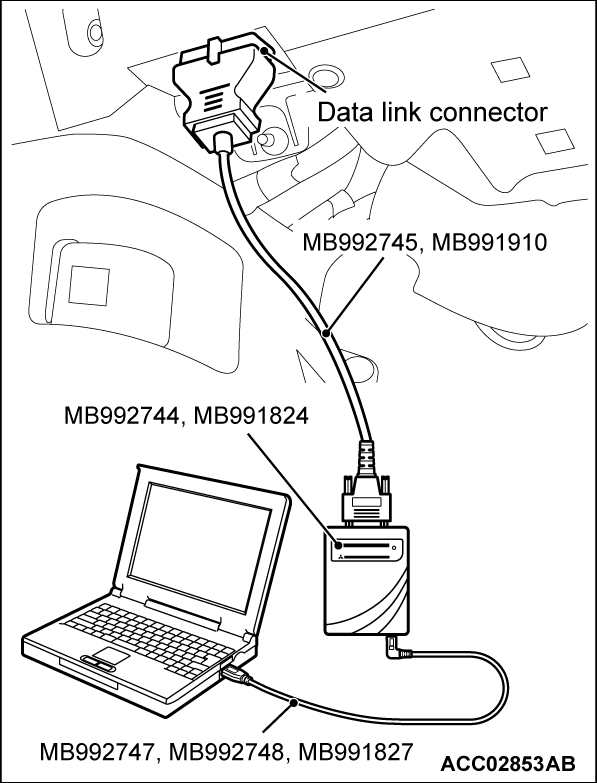
Connect the scan tool (M.U.T.-III) to the data link connector as follows.
| note | For details on how to use the scan tool (M.U.T.-III), refer to the "M.U.T.-III User’s Manual." |
1. Start up the personal computer.
2. Connect special tool MB992747/M992748 or special tool MB991827 to special tool MB992744 or special tool MB991824 and the personal computer.
3. Connect special tool MB992745 or special tool MB991910 to special tool MB992744 or special tool MB991824.
4. Connect special tool MB992745 or special tool MB991910 to the data link connector.
| note | When the special tool MB992745 is connected to the data link connector, the special tool MB992744 indicator light will be illuminated in a green color. |
5. Turn the power switch of special tool MB991824 to the "ON" position. <When using the special tool MB991824>
| note | When special tool MB991824 is energized, special tool MB991824 indicator light will be illuminated in a green color. |
6. Start the M.U.T.-III system on the personal computer and turn the ignition switch to the "ON" position.
7. Select "F.A.S.T./OSS/IMMO/Keyless" in the "System Select" screen. Select the model year and push the OK button (Check each model if there is an option). Select "Special Function" on the next screen, and select "ENG Key Code & Chassis No/VIN Reg" on the further screen.
8. Push the OK button after "Key Code Registration" is displayed.
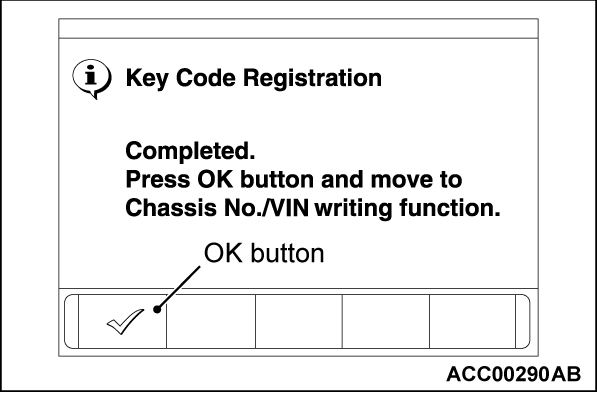
9. Push the OK button after "Completed. Press OK button and move to Chassis No./VIN writing function." is displayed.
10. Enter the VIN of registering vehicle and push the OK button.
11. Push the OK button after "Chassis No. Writing will start. Are you sure?" is displayed.
12. Return to the previous screen and "In Progress" is displayed at the lower-left corner on the screen.
13. Push the OK button after "Completed." is displayed.
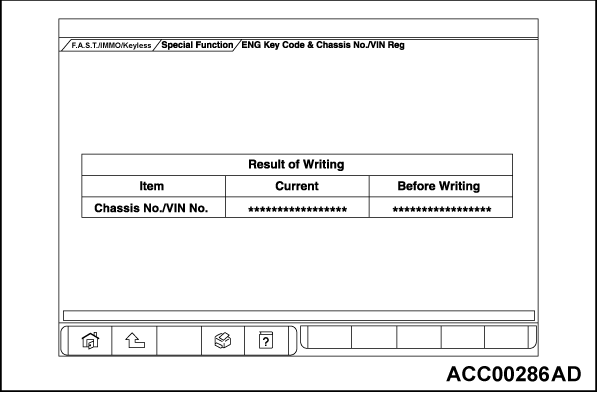
14. VIN writing result is displayed.
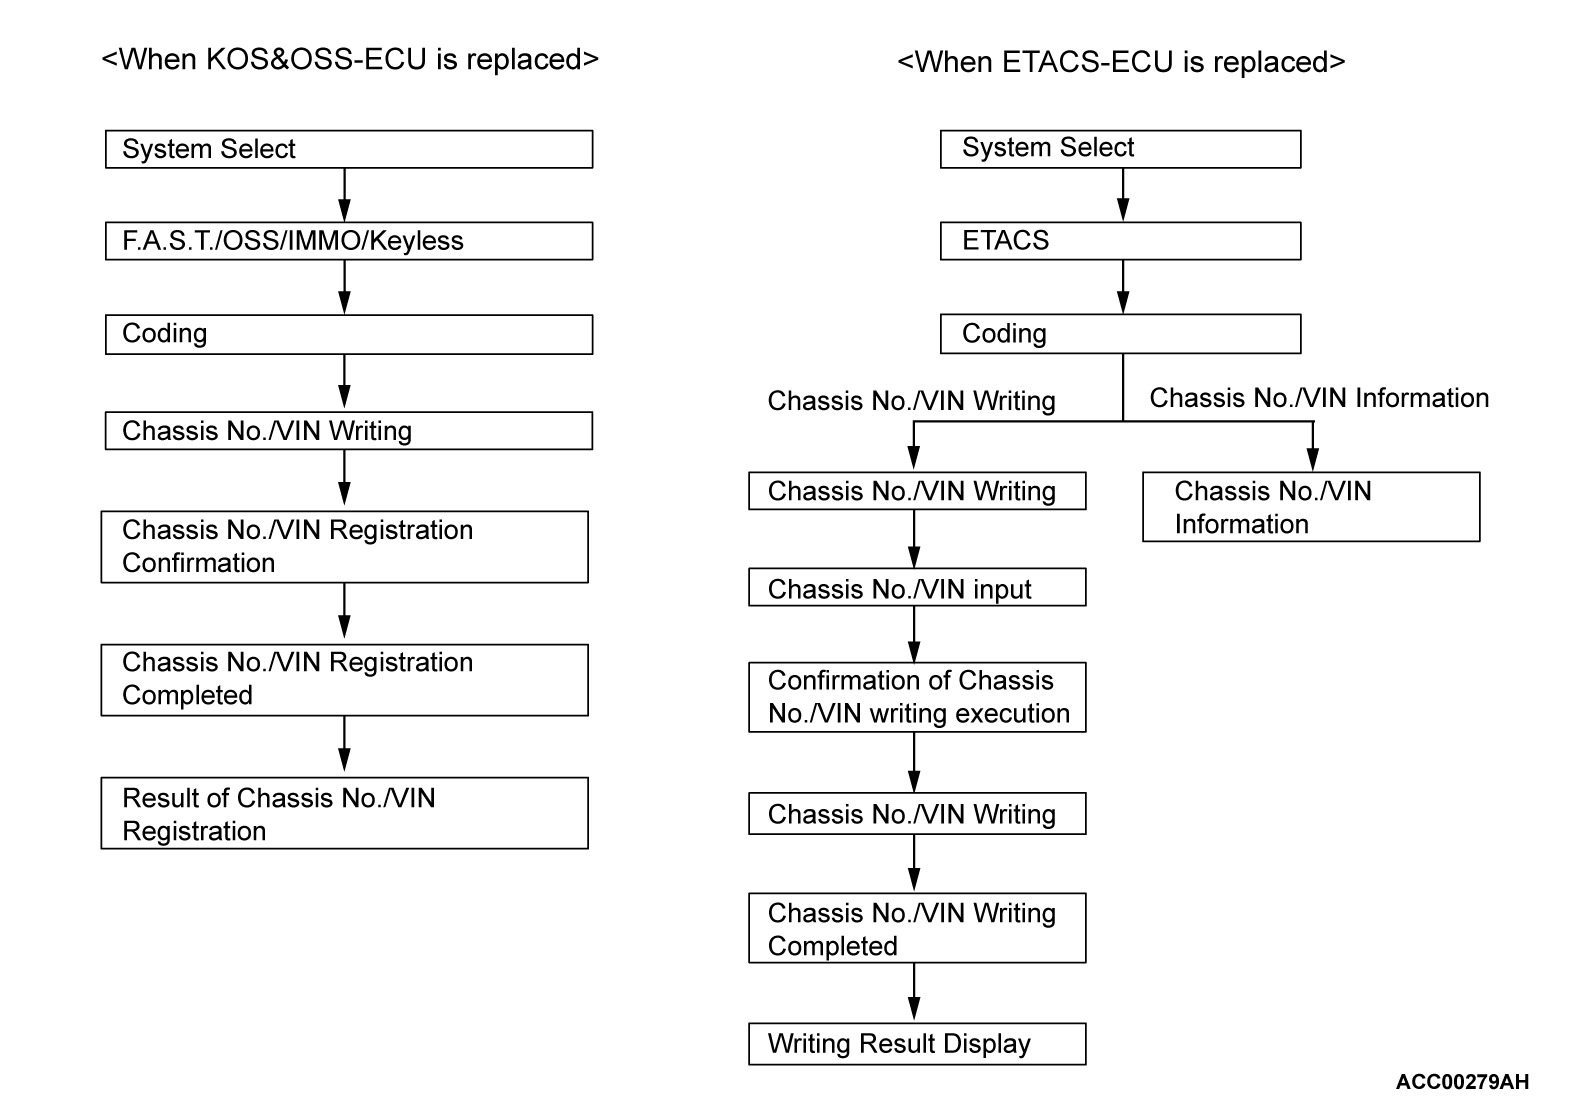
WHEN KOS&OSS-ECU, ESL ECU IS REPLACED
VIN registration steps for KOS-ECU
Required Special Tools:
- MB992744: Vehicle communication interface-Lite (V.C.I.-Lite)
- MB992745: V.C.I.-Lite main harness A
- MB992747: V.C.I.-Lite USB cable short
- MB992748: V.C.I.-Lite USB cable long
- MB991958: Scan Tool (M.U.T.-III Sub Assembly)
- MB991824: Vehicles Communication Interface (V.C.I.)
- MB991827: M.U.T.-III USB Cable
- MB991910: M.U.T.-III Main Harness A (Vehicles with CAN communication system)
| caution |
|
Connect the scan tool (M.U.T.-III) to the data link connector as follows.
| note | For details on how to use the scan tool (M.U.T.-III), refer to the "M.U.T.-III User’s Manual." |
1. Start up the personal computer.
2. Connect special tool MB992747/M992748 or special tool MB991827 to special tool MB992744 or special tool MB991824 and the personal computer.
3. Connect special tool MB992745 or special tool MB991910 to special tool MB992744 or special tool MB991824.
4. Connect special tool MB992745 or special tool MB991910 to the data link connector.
| note | When the special tool MB992745 is connected to the data link connector, the special tool MB992744 indicator light will be illuminated in a green color. |
5. Turn the power switch of special tool MB991824 to the "ON" position. <When using the special tool MB991824>
| note | When special tool MB991824 is energized, special tool MB991824 indicator light will be illuminated in a green color. |
6. Start the M.U.T.-III system on the personal computer and turn the ignition switch to the "ON" position.
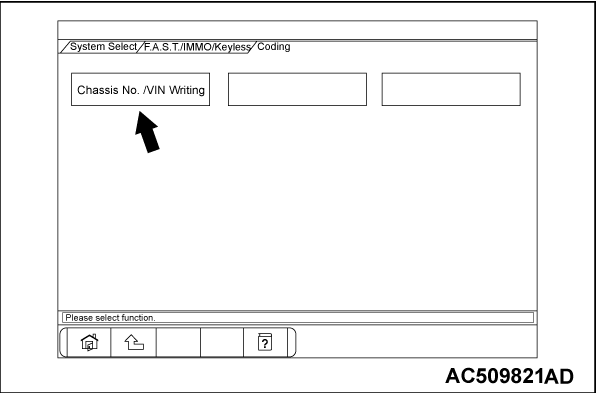
7. Select "F.A.S.T./OSS/IMMO/Keyless" in the "System Select" screen. Select the model year and push the OK button (Check each model if there is an option). Select "Coding" on the next screen.
8. Select "Chassis No. /VIN Writing" on "Coding" screen.
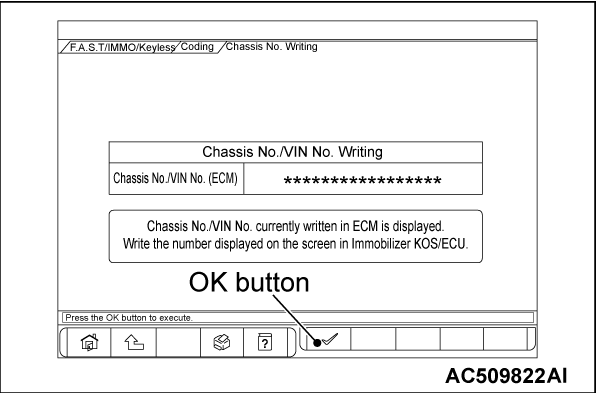
9. Push the OK button after the VIN written in the ECM is displayed.
10. Push the OK button after "Chassis No. Writing will start. Are you sure?" is displayed.
11. Push the OK button after "Completed." is displayed.
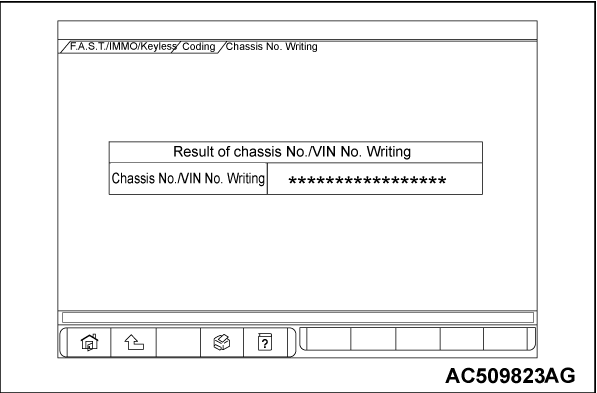
12. Result of VIN writing is displayed.
13. Register the other ID code (Refer to GROUP 42B, Troubleshooting - ID Codes Registration Procedure).
WHEN ETACS-ECU IS REPLACED
Chassis number/Vehicle Identification Number (VIN) registration steps for ETACS-ECU.
Required Special Tools:
- MB992744: Vehicle communication interface-Lite (V.C.I.-Lite)
- MB992745: V.C.I.-Lite main harness A
- MB992747: V.C.I.-Lite USB cable short
- MB992748: V.C.I.-Lite USB cable long
- MB991958: Scan Tool (M.U.T.-III Sub Assembly)
- MB991824: Vehicles Communication Interface (V.C.I.)
- MB991827: M.U.T.-III USB Cable
- MB991910: M.U.T.-III Main Harness A (Vehicles with CAN communication system)
| caution | Before connecting or disconnecting the scan tool (M.U.T.-III), turn the ignition switch to the "LOCK" (OFF) position. |
Connect the scan tool (M.U.T.-III) to the data link connector as follows.
| note | For details on how to use the scan tool (M.U.T.-III), refer to the "M.U.T.-III User’s Manual". |
1. Start up the personal computer.
2. Connect special tool MB992747/M992748 or special tool MB991827 to special tool MB992744 or special tool MB991824 and the personal computer.
3. Connect special tool MB992745 or special tool MB991910 to special tool MB992744 or special tool MB991824.
4. Connect special tool MB992745 or special tool MB991910 to the data link connector.
| note | When the special tool MB992745 is connected to the data link connector, the special tool MB992744 indicator light will be illuminated in a green color. |
5. Turn the power switch of special tool MB991824 to the "ON" position. <When using the special tool MB991824>
| note | When special tool MB991824 is energized, special tool MB991824 indicator light will be illuminated in a green color. |
6. Start the M.U.T.-III system on the personal computer and turn the ignition switch to the "ON" position.
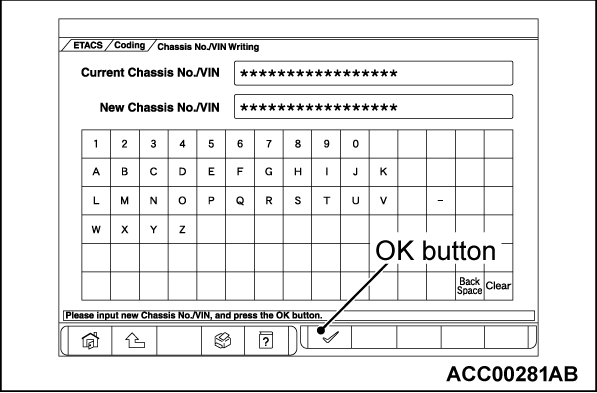
7. Select "ETACS" in the "System Select" screen. Select the model year and push the OK button (Check each model if there is an option). Select "Coding" on the next screen, and select "Chassis No./VIN Writing" on the further screen.
8. Enter the VIN of registering vehicle and push the OK button.
9. Push the OK button after "Chassis No./VIN Writing will start. Are you sure?" is displayed.
10. Return to the previous screen and "In Progress" is displayed at the lower-left corner on the screen.
11. Push the OK button after "Completed." is displayed.
12. VIN writing result is displayed.
13. Select "Chassis No./VIN Information" on the "Coding" screen after the VIN writing is completed, and check that the VIN is changed.
![[Previous]](../../../buttons/fprev.png)
![[Next]](../../../buttons/fnext.png)
