[Previous][Next]
DISASSEMBLY AND ASSEMBLY
warningBefore disassembly and assembly the second seat assembly, refer to Precaution for Supplemental Restraint System (SRS) "AIR BAG" and "SEAT BELT PRE-TENSIONER".
caution
  • Second seat back assembly has included rear side air bag module.
  • After second seat back assembly removal, To prevent accidental explosion, always place the rear side air bag module with deploying direction facing upward.
  • To prevent damage to the parts, never impact to the second seat back assembly.
  • Replace second seat back assembly if it is dropped or sustains an impact.
  • To prevent accidental explosion, never expose second seat back assembly to temperature of more than 90°C (194°F).
  • To prevent damage to the parts, never allow oil, grease, detergent, or water to come in contact with second seat back assembly.
 
 
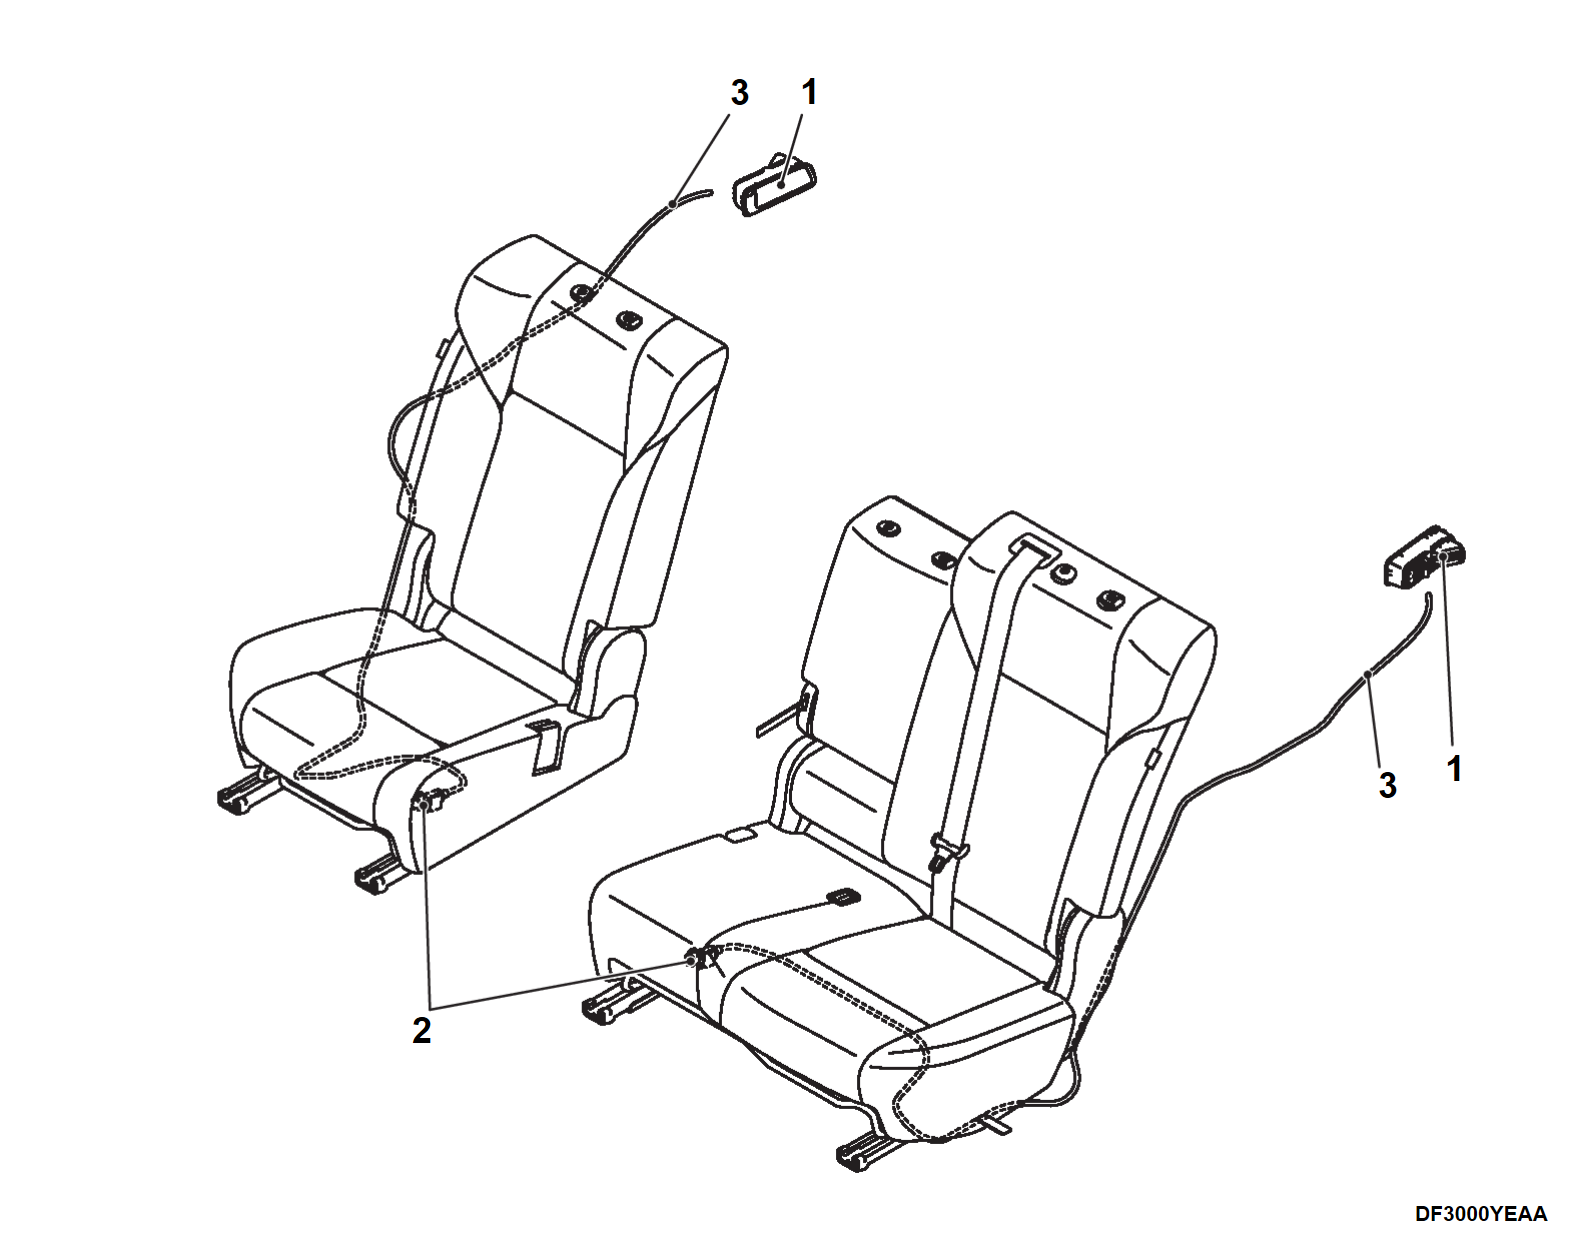
<Seatback remote release lever assembly>
Disassembly steps
1.Seatback remote release lever
2.Seatback remote release lever cable and seatback release cable connection
3.Seatback remote release lever cable
 
 
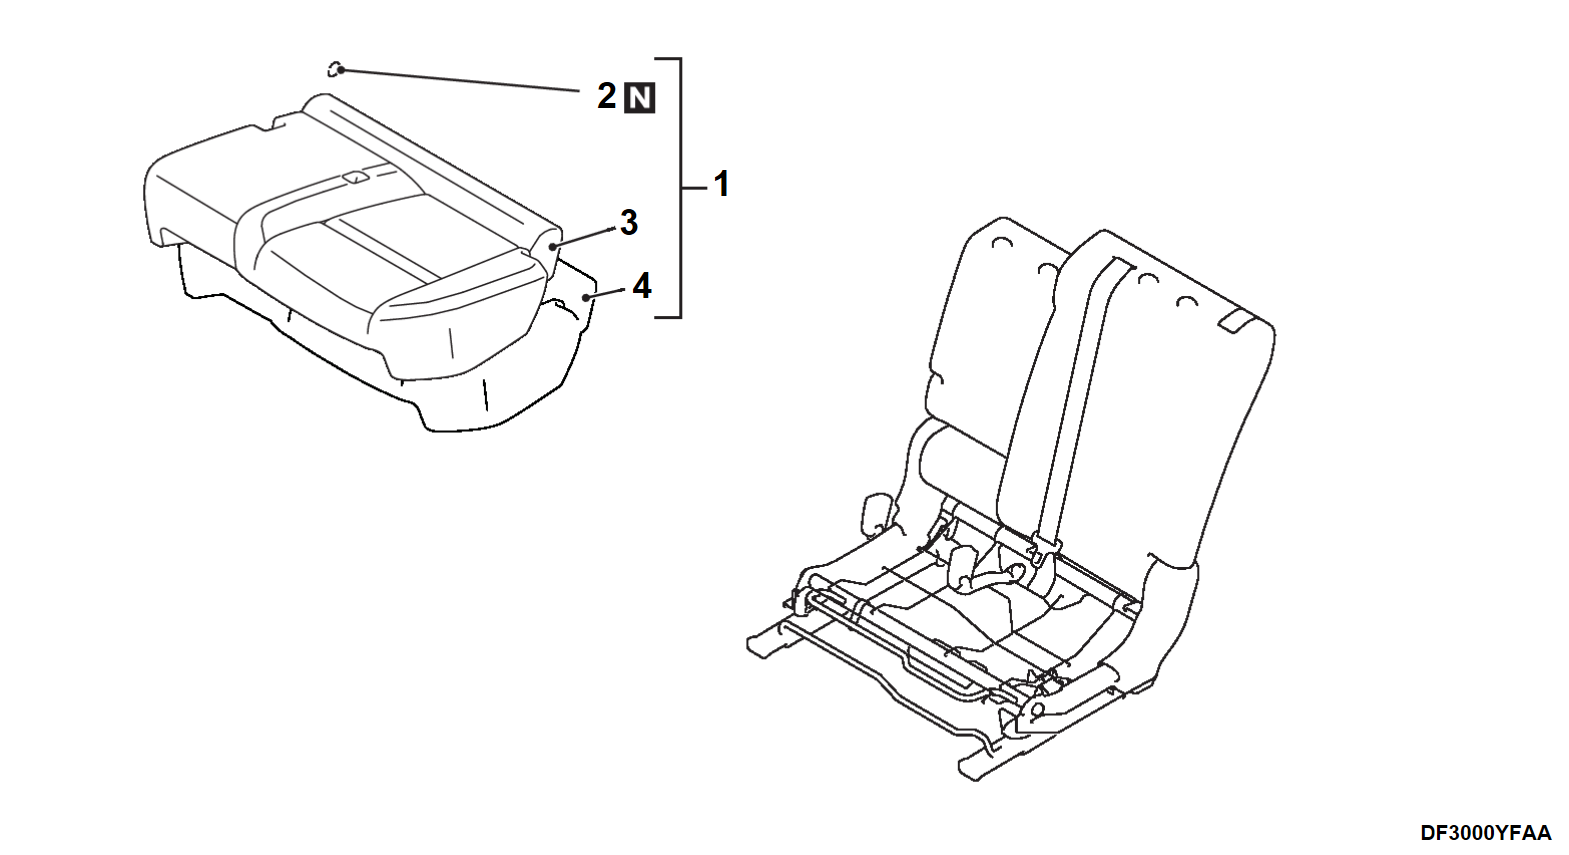
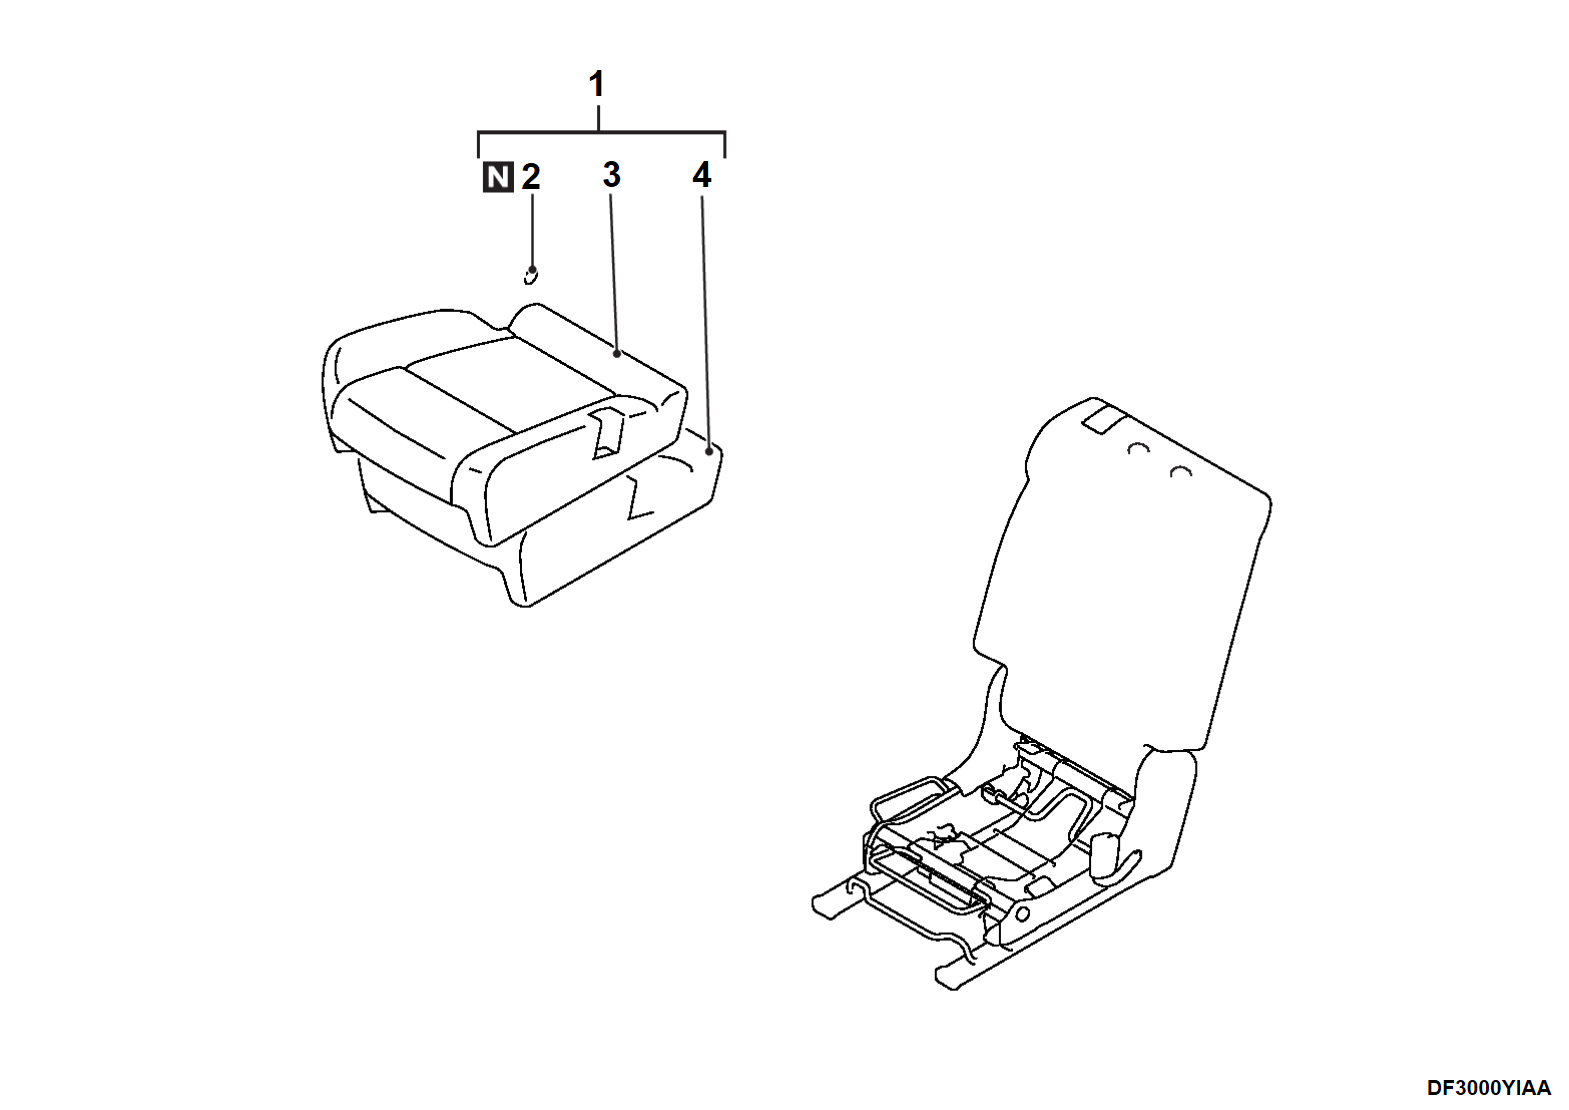
<Seat cushion assembly LH>
Disassembly steps
1.Seat cushion assembly LH
2.Hog ring
3.Seat cushion trim LH
4.Seat cushion pad LH
 
 
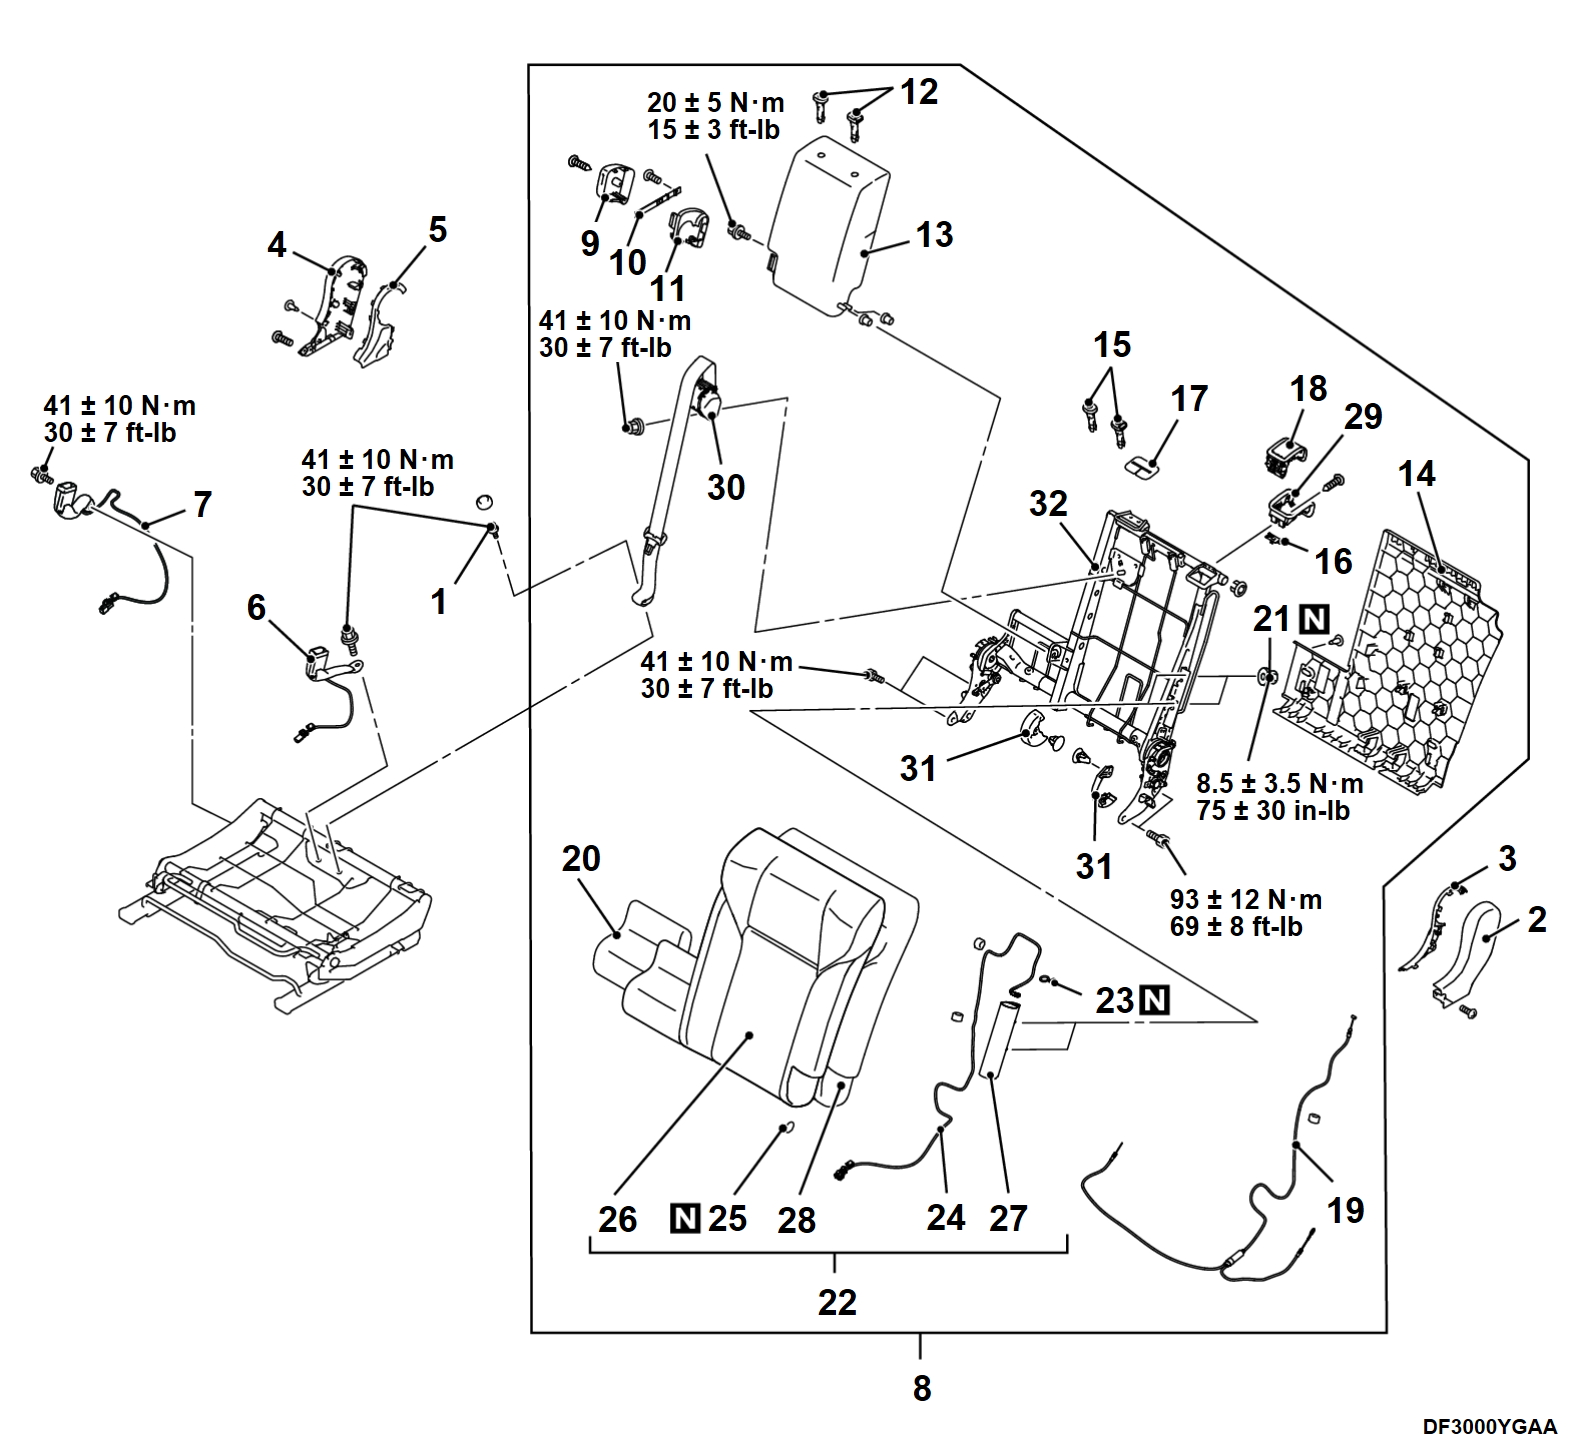
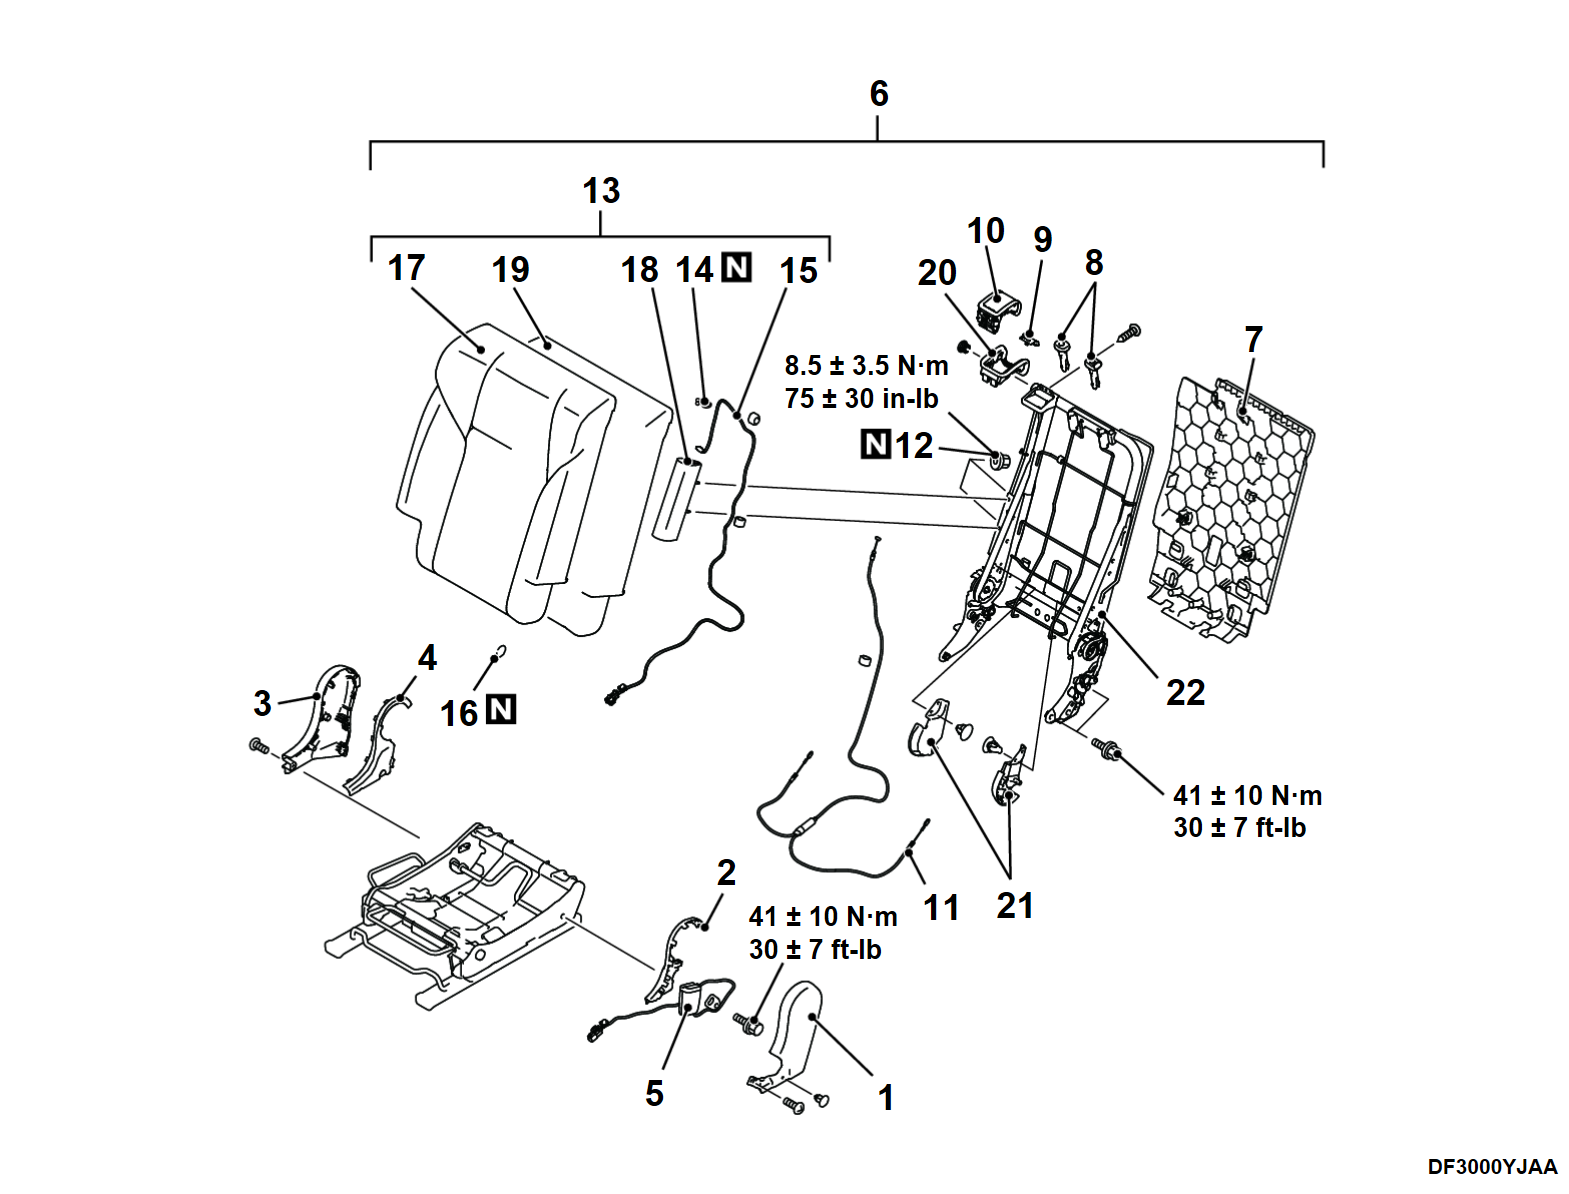
<Seatback assembly LH>
Disassembly steps
1.Second seat bolt LH
2.Outside seat cushion finisher outer LH
3.Outside seat cushion finisher inner LH
4.Inside seat cushion finisher outer LH
5.Inside seat cushion finisher inner LH
6.Seat belt buckle LH
7.Center seat belt buckle
8.Seatback assembly LH
9.Second seat hinge cover outer
10.Second seat back strap
11.Second seat hinge cover inner
12.Headrest holder
13.Armrest assembly
14.Second seat protector LH
15.Headrest holder
16.Second seat back garnish
17.Center seat belt finisher
18.Seatback release lever
19.Seatback release cable
20.Seatback pad center
21.Second seat nut
22.Rear side air bag module LH, seatback pad LH and seatback trim LH
23.Second seat band
24.Rear side air bag module harness
25.Hog ring
26.Seatback trim LH
27.Rear side air bag module LH
28.Seatback pad LH
29.Seatback release lever finisher
30.Center seat belt retractor
31.Center seat cushion finisher LH
32.Seatback frame LH
 
 
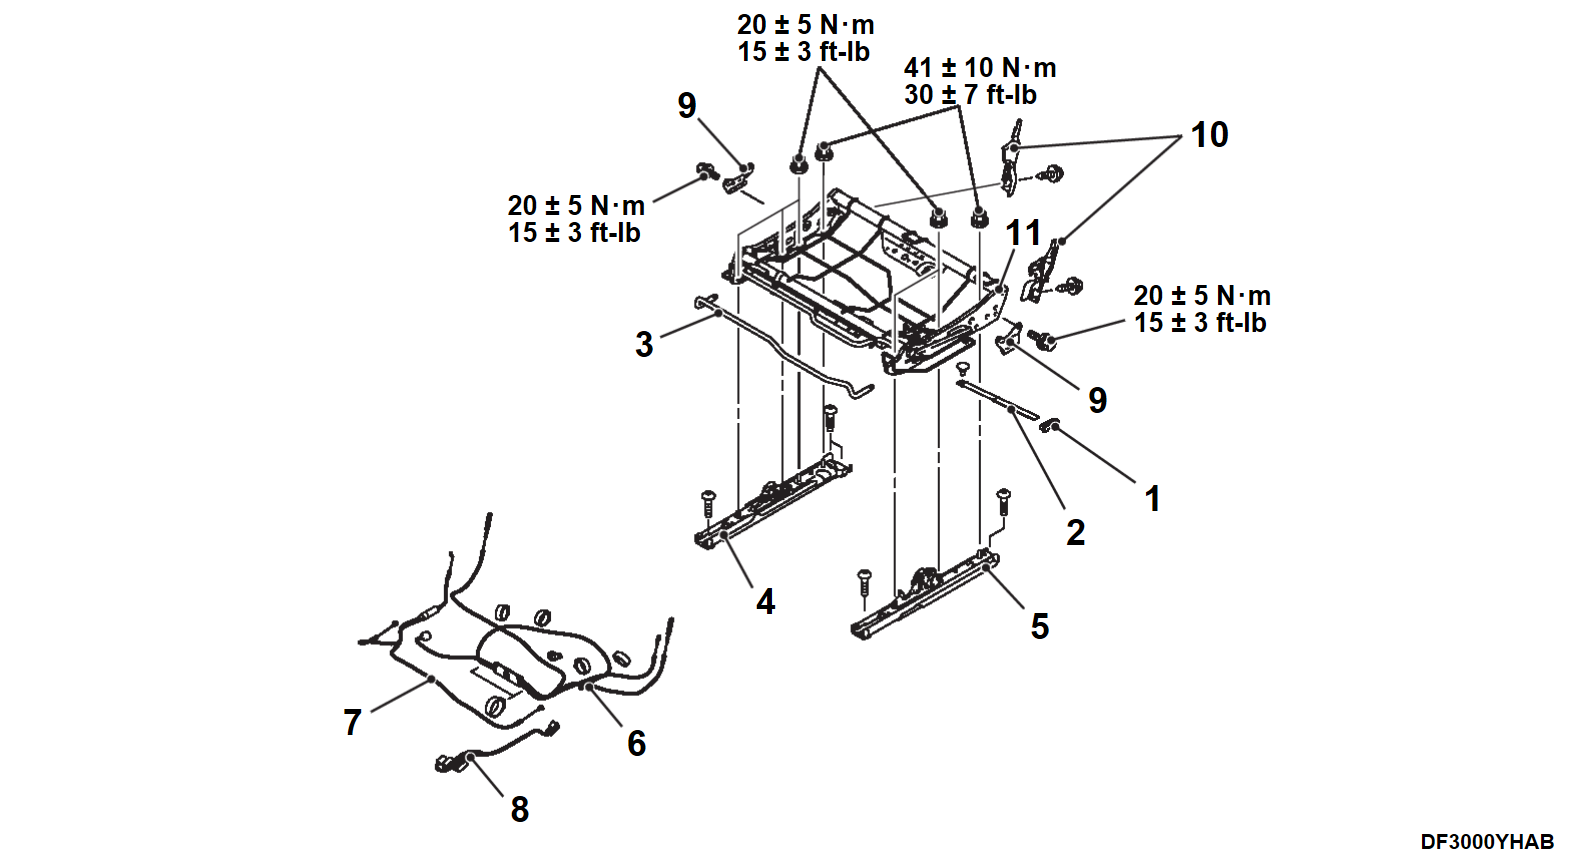
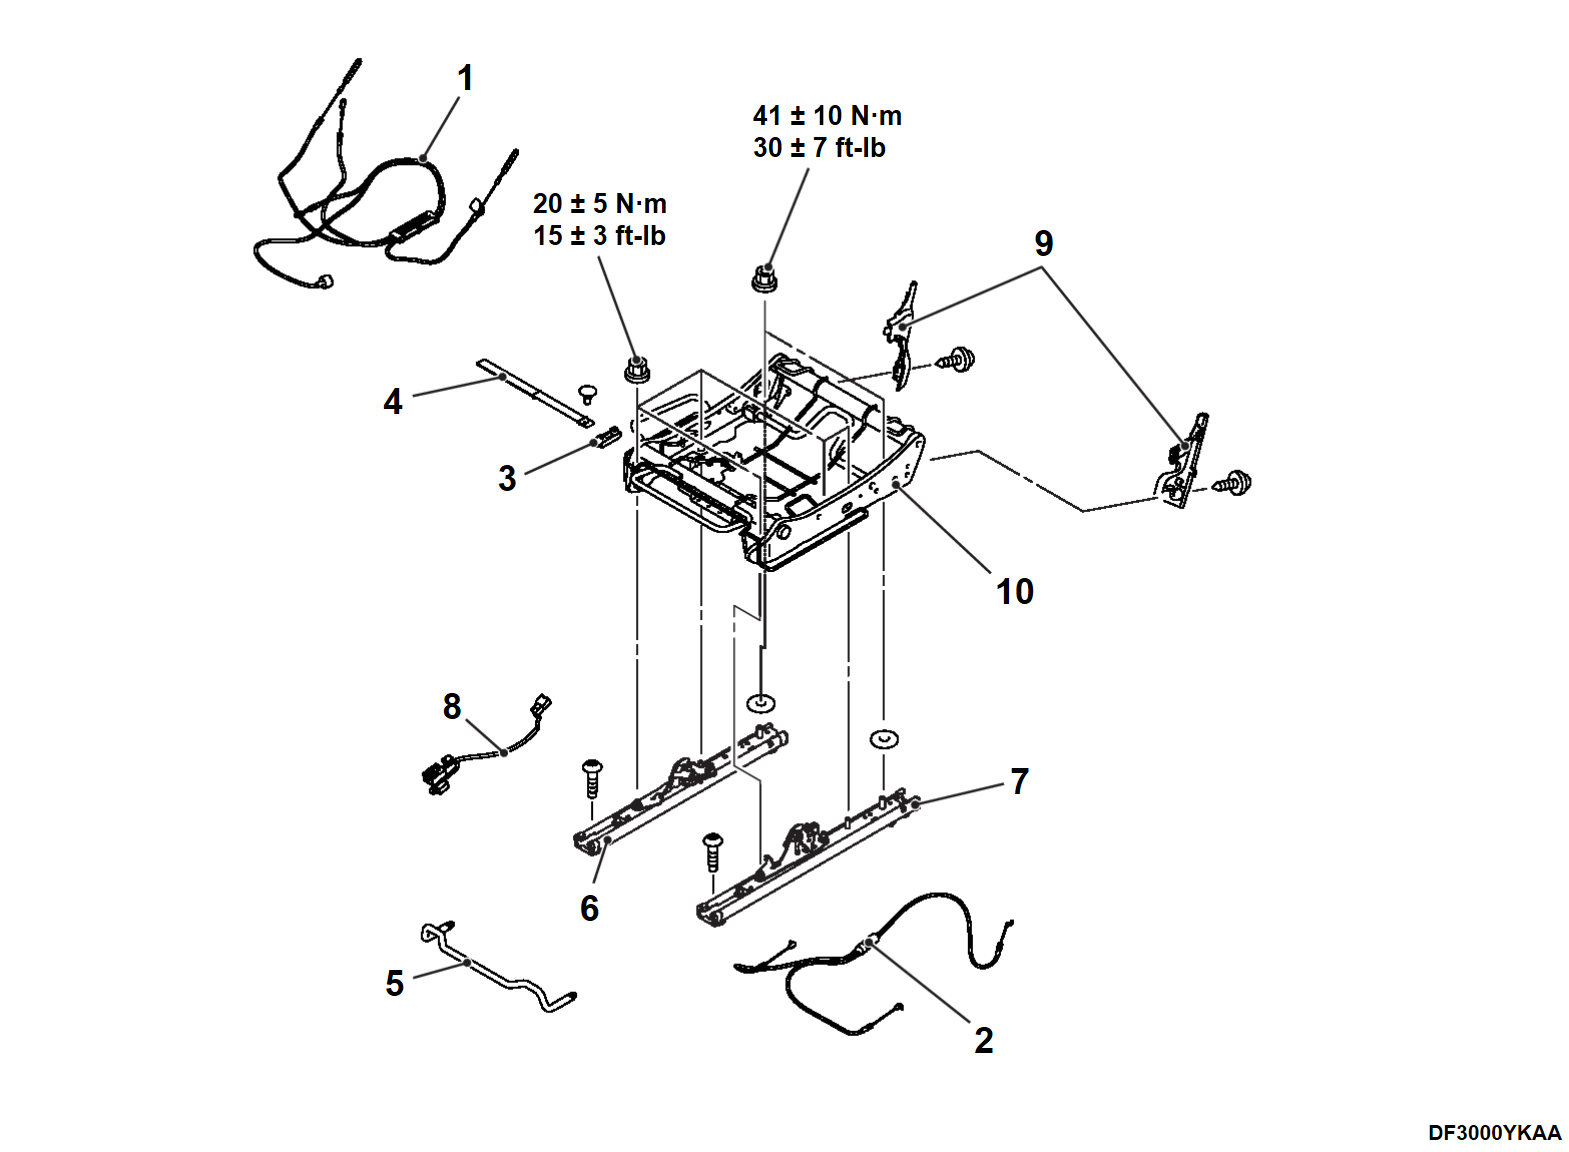
<Seat cushion frame LH>
Disassembly steps
1.Second seat cushion guide
2.Second seat cushion strap
3.Second seat slide lever
4.Second seat adjuster inner LH
5.Second seat adjuster outer LH
6.Second seat slide cable
7.Second seat slide cable
8.Second seat harness
9.Second seat hook
10.Second seat reclining adjuster cover
11.Second seat cushion frame
 
 
<Seat cushion assembly RH>
Disassembly steps
1.Seat cushion assembly RH
2.Hog ring
3.Seat cushion trim RH
4.Seat cushion pad RH
 
 
<Seatback assembly RH>
Disassembly steps
1.Inside seat cushion finisher outer RH
2.Inside seat cushion finisher inner RH
3.Outside seat cushion finisher outer RH
4.Outside seat cushion finisher inner RH
5.Seat belt buckle LH
6.Seatback assembly RH
7.Second seat protector RH
8.Headrest holder
9.Second seat back garnish
10.Seatback release lever
11.Seatback release cable
12.Second seat nut
13.Rear side air bag module RH, seatback pad RH and seatback trim RH
14.Second seat band
15.Rear side air bag module harness
16.Hog ring
17.Seatback trim RH
18.Rear side air bag module RH
19.Seatback pad RH
20.Seatback release lever finisher
21.Center seat cushion finisher RH
22.Seatback frame RH
 
 
<Seat cushion frame RH>
Disassembly steps
1.Seatback release cable
2.Second seat slide cable
3.Second seat cushion guide
4.Second seat cushion strap
5.Second seat slide lever
6.Second seat adjuster outer RH
7.Second seat adjuster inner RH
8.Second seat harness
9.Second seat reclining adjuster cover
10.Second seat cushion frame RH
 
 
DISASSEMBLY SERVICE POINTS
 
 
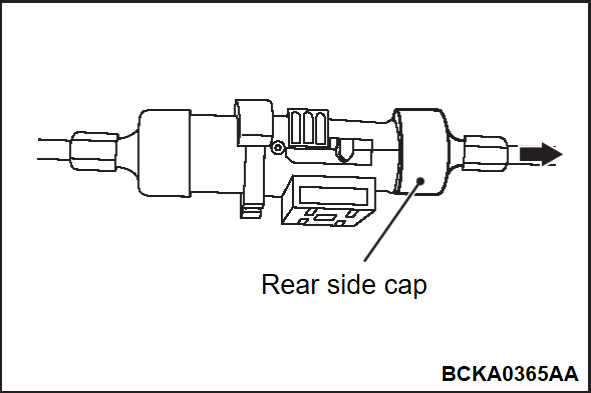
<<A>> SEATBACK REMOTE RELEASE LEVER CABLE AND SEATBACK RELEASE CABLE DISCONNECTION
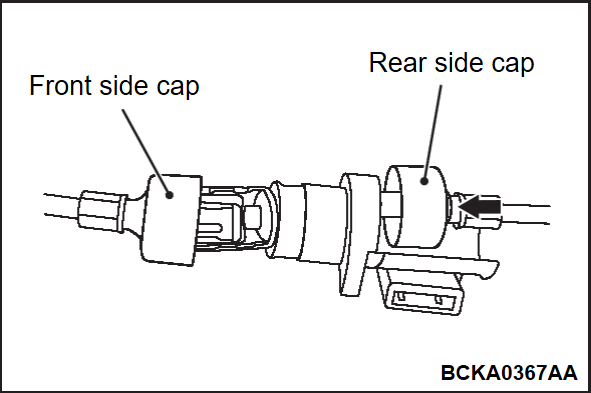
1. Remove the cap on the vehicle rear side of the seatback release cable joint part.
2. Remove the weight piece.
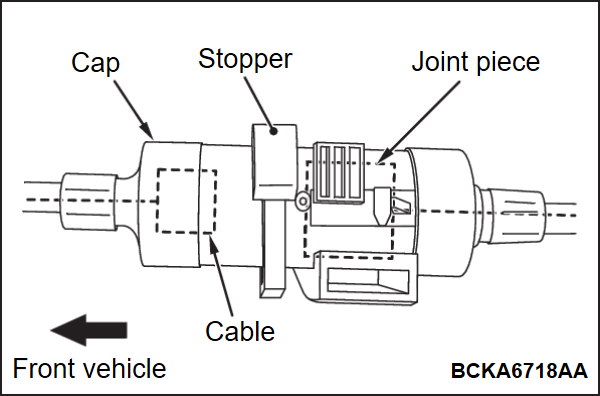
3. Move the cap on the vehicle rear side forward to remove the cap on the vehicle front side as shown in the figure.
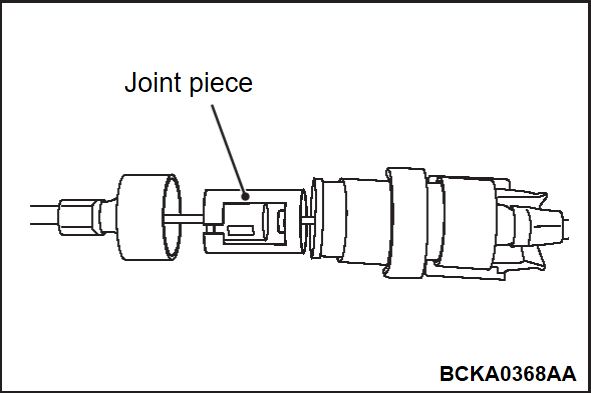
4. Place the headrest on the seat cushion to prevent the seatback from being folded completely. Pull the strap by the seat cushion to fold down the seatback. Then remove the joint piece.
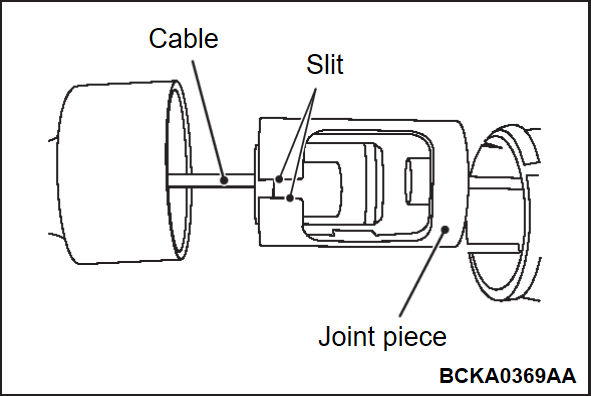
5. Remove the joint piece by passing the cable through the slit of the joint piece.


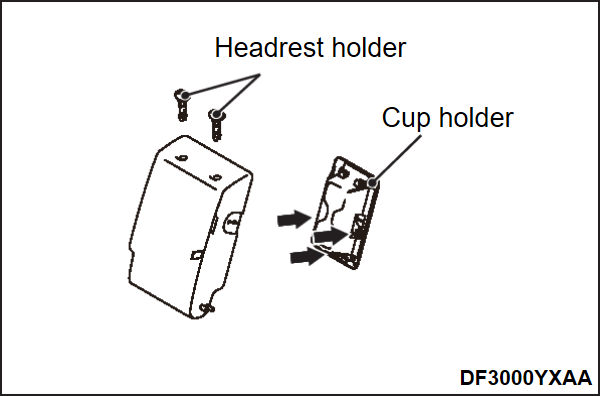
<<B>> HEADREST HOLDER REMOVAL
1. Remove the clips shown by the arrows in the figure and remove the cup holder from the armrest assembly.
2. Remove the second seat headrest holder.


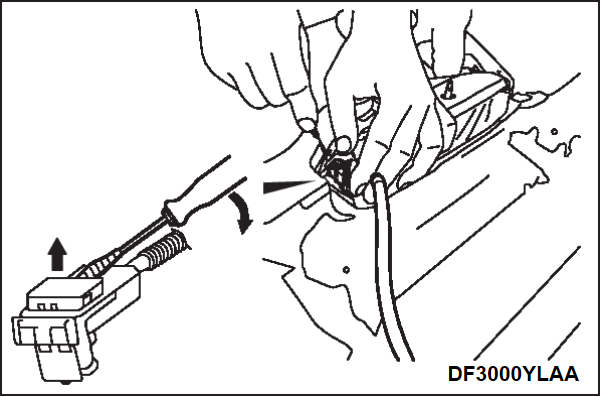
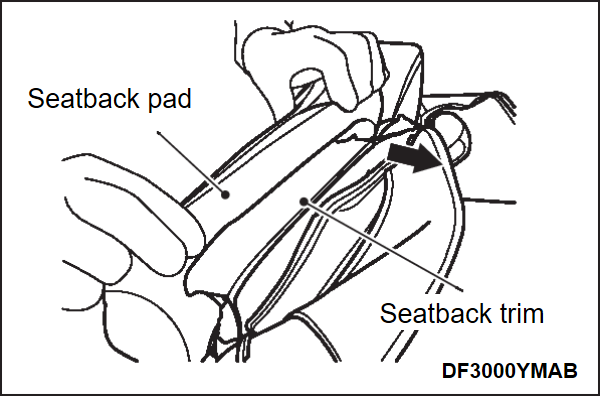
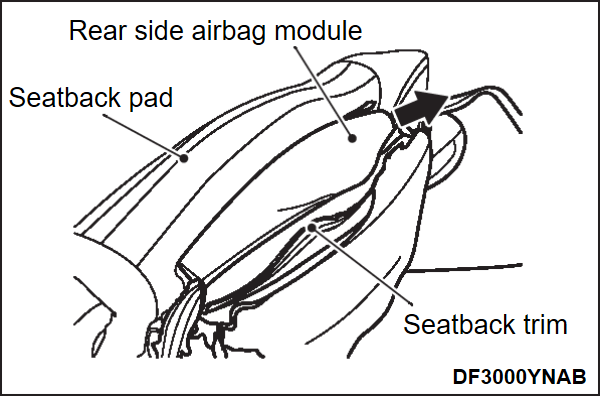
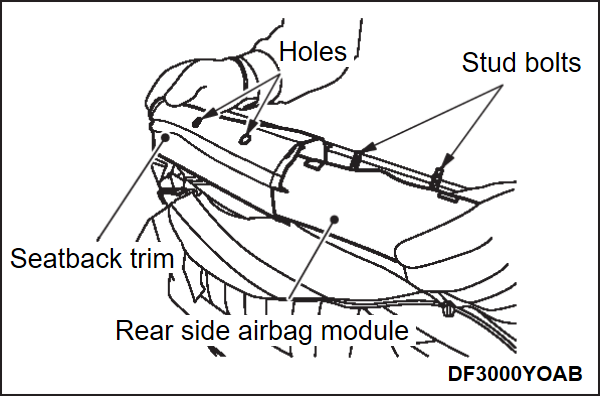
<<C>> REAR SIDE AIRBAG MODULE HARNESS/SEATBACK TRIM/REAR SIDE AIRBAG MODULE REMOVAL
1. Use the flat-tipped screwdriver to pull out the locking button of wiring harness side connector, and release the lock.
caution
  • Be careful not to damage the seatback pad during work.
  • When pulling out the rear side airbag module from the airbag module storage part of the seatback trim, be careful not to damage the airbag module storage part.
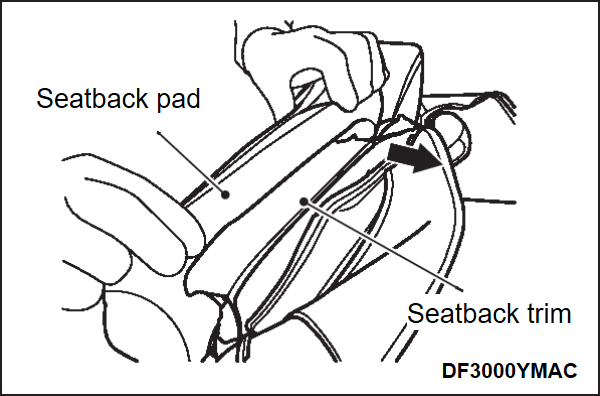
2. Pull out the rear side airbag module and the airbag module storage part of the seatback trim from the upper side of the slit of the seatback pad.
3. Slide the rear side airbag module and the seatback trim diagonally upward to remove them from the slit of the seatback pad.
4. Remove the stud bolt of the rear side airbag module from the hole of the airbag module storage part of the seatback trim. Then remove the rear side airbag module from the airbag module storage part of the seatback trim.


ASSEMBLY SERVICE POINTS
 
 
>>A<< SEATBACK RELEASE LEVER FINISHER/SEATBACK PAD/REAR SIDE AIRBAG MODULE/SEATBACK TRIM/HOG RING INSTALLATION
cautionBe careful not to damage the seatback pad during work.
1. Set the rear side airbag module to the airbag module storage part of the seatback trim, and make the stud bolt of the rear side airbag module protrude from the hole of the airbag module storage part of the seatback trim.
2. Insert the rear side airbag module and the airbag module storage part of the seatback trim from the upper side of the slit of the seatback pad.
3. Check that there are no wrinkles on the airbag module storage part of the inserted seatback trim. If there are wrinkles, stretch them out.
4. Install the seatback pad, the seatback trim and the hog ring. Then install the seatback release lever finisher.


>>B<< SEATBACK RELEASE LEVER INSTALLATION
After the seatback trim is installed, install the seatback release lever to clip the seatback trim and the seatback release lever finisher.
 
 
>>C<< SEATBACK REMOTE RELEASE LEVER CABLE AND SEATBACK RELEASE CABLE CONNECTION
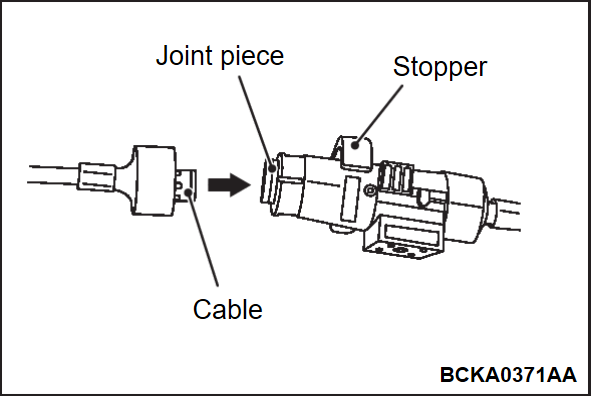
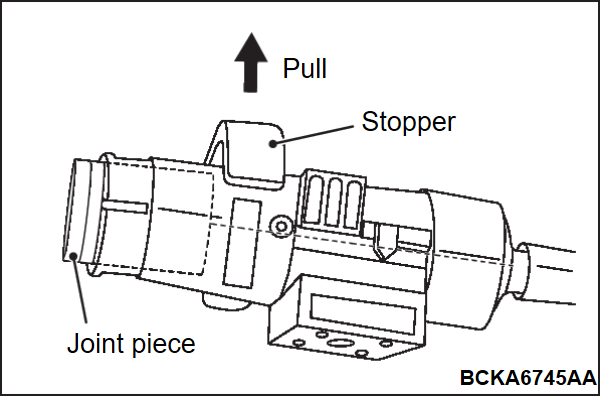
1. Lift the stopper and lock the joint piece. Before connection in step 2, in order to confirm that the joint piece is locked, push the joint piece by a finger to the direction of the arrow and check that it cannot be pushed in.
2. Push the cable into the joint piece as shown in the figure.
3.
cautionIf the stopper is accidentally pressed first and the joint piece got inside, pull out the joint piece according to the procedure below.
  1. Remove the cap at the front of the vehicle.
  2. Pull out the joint piece toward the front side of the vehicle.
  3. Pull up the stopper to lock the joint piece.
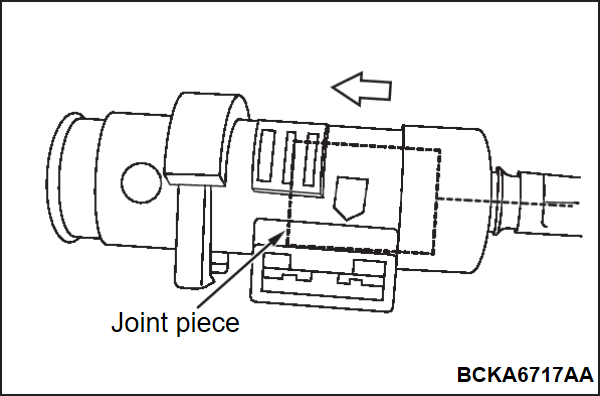
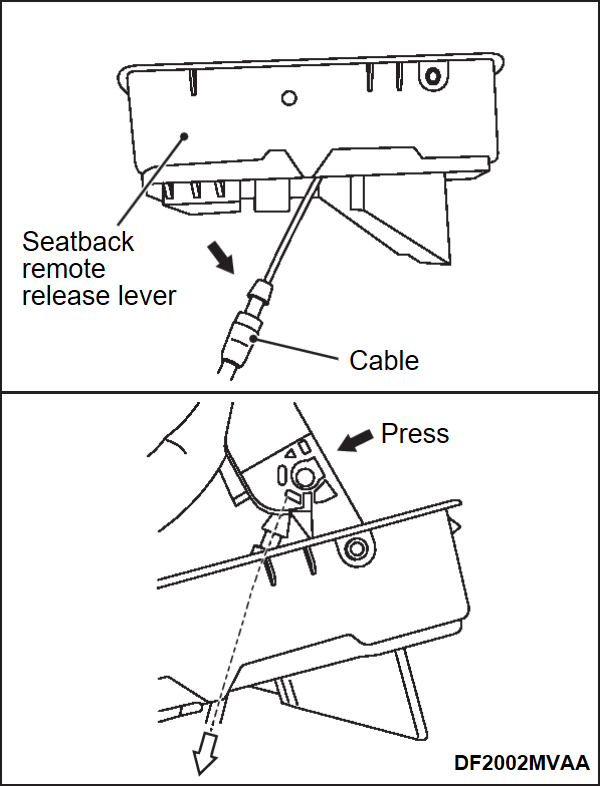
    If the cable of the joint piece is pulled toward the seatback remote release lever side and cannot be pulled out, release the cable fixing part on the seatback remote release lever side, and press in the cable from the seatback release remote lever side as shown in the figure.
Push the stopper.